一、博客的创建
1、下载node.js和Git并安装(Hexo框架依赖于node.js)
2、查看node.js的版本:	node -v
3、查看npm的版本:	npm -v
4、切换成国内的打包工具(使用淘宝的):
npm config set registry https://registry.npm.taobao.org
npm install -g cnpm -registry=https://registry.npm.tabao.org
5、查看cnpm的版本: cnpm -v
6、安装博客的框架(Hexo):cnpm install -g hexo-cli
7、查看Hexo框架的版本: hexo -v
8、windows下查看当前目录位置: chdir
9、创建一个文件夹blog在你指定的盘,进入文件夹右键,点击 git bash here(安装好git后就会有此选择;pwd查看当前目录)
10、初始化Hexo框架: hexo init
11、启动Hexo服务: hexo s
12、访问: http://localhost:4000/
13、创建自己的博客: hexo n "我的第一个博客"
14、本地指定blog位置可查看博客,并可以本地编辑
15、清除没用的东西: hexo clean
16、重新发布博客: hexo g
17、重启Hexo服务: hexo s
18、再访问: http://localhost:4000/
19、可查看到我们自己创建的博客:"我的第一个博客"
二、如何通过外网来访问我的博客
1、在gitee上创建一个仓库
(我的是:https://gitee.com/LJH130168/ljh-of-blog.git)
2、安装git部署工具:cnpm install --save hexo-deployer-git
3、修改blog根目录下的config.yml文件:
deploy:
type:'git'
repo:https://gitee.com/LJH130168/ljh-of-blog.git
branch:master
4、部署(发布项目到码云):hexo d
5、部署报错运行:
git config --global user.name "LuJiaHong"
git config --global user.email "2275435906@qq.com"
6、再执行部署:hexo d
7、使用gitee pages服务发布项目成一个网站
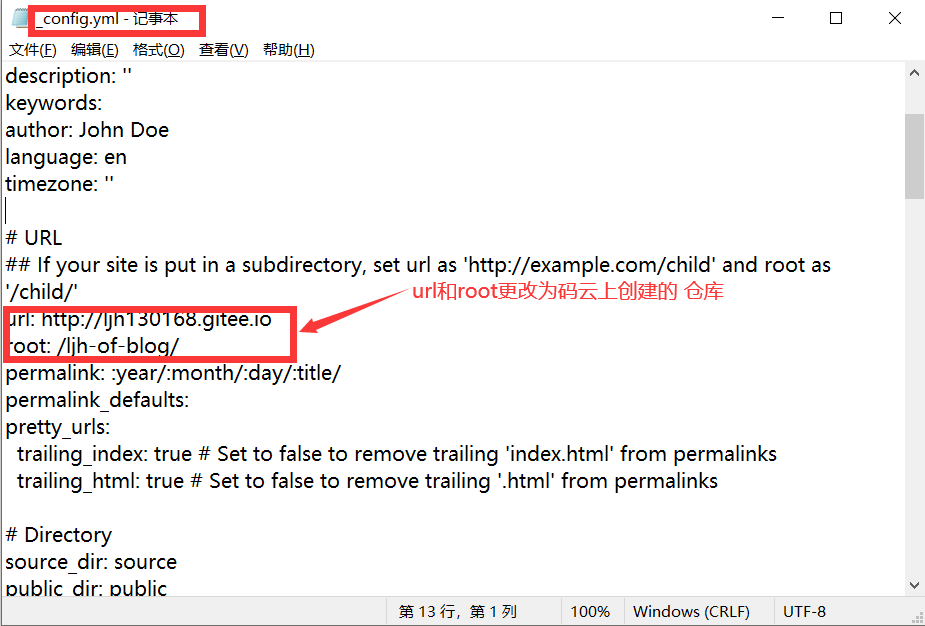
8、添加样式(修改blog根目录下的config.yml文件):
url: http://ljh130168.gitee.io
root: /ljh-of-blog/
9、再执行:hexo clean、hexo g、hexo s、hexo d 系列步骤
10、访问:https://gitee.com/LJH130168/ljh-of-blog/pages
部署点更新即可
11、即可访问个人博客:http://ljh130168.gitee.io/ljh-of-blog/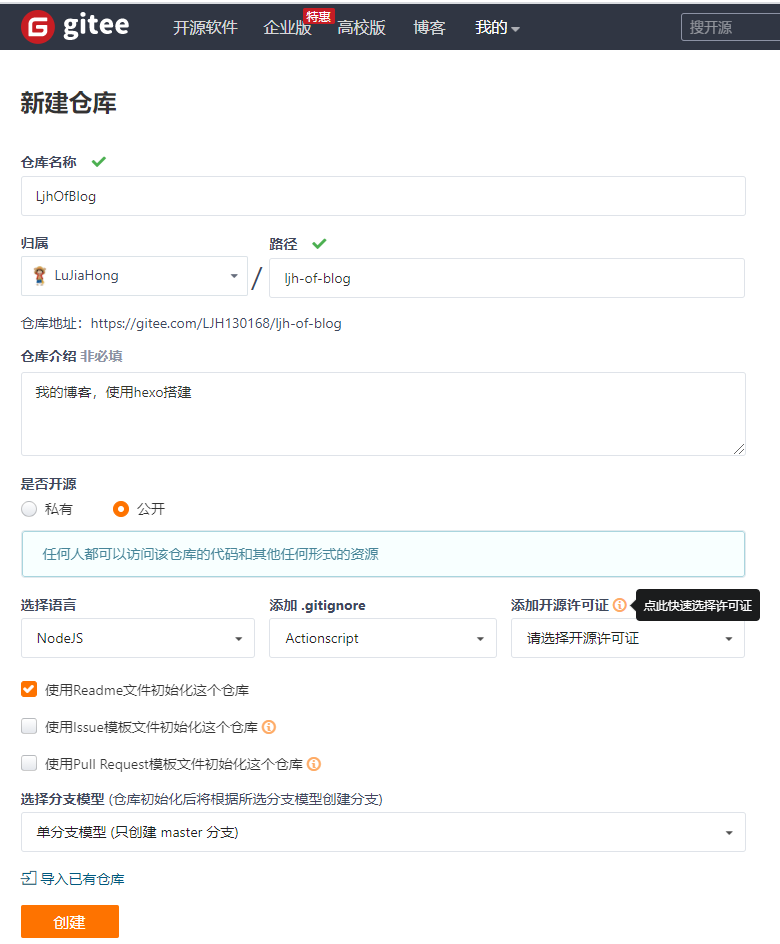
三、修改个人博客主题(Hexo)
https://hexo.io/themes/
我们查看E:\blog\themes知道默认主题,因此自己下载一些主题放里面即可。

1、主题:
yilia主题:
	https://github.com/litten/hexo-theme-yilia
yilia-plus主题:
	https://github.com/JoeyBling/hexo-theme-yilia-plus

2、在blog子文件themes里面克隆:
yilia主题:
	git clone https://github.com/litten/hexo-theme-yilia.git themes/yilia
yilia-plus主题:
	git clone --depth=1 https://github.com/JoeyBling/hexo-theme-yilia-plus.git ./yilia-plus

3、配置
修改hexo根目录下的 _config.yml ➡️ theme: yilia-plus

4、显示侧边栏(在博客根目录(不是yilia-plus根目录)执行以下命令):
	cnpm i hexo-generator-json-content --save

5、复制下面到blog下面的_config.yml中
	jsonContent:
    meta: false
    pages: false
    posts:
      title: true
      date: true
      path: true
      text: false
      raw: false
      content: false
      slug: false
      updated: false
      comments: false
      link: false
      permalink: false
      excerpt: false
      categories: false
      tags: true

6、再执行:hexo clean、hexo g、hexo s、hexo d 系列步骤
7、访问:https://gitee.com/LJH130168/ljh-of-blog/pages
	部署点更新即可
8、即可访问个人博客:http://ljh130168.gitee.io/ljh-of-blog/
四、如何外网上显示自己博客上传的图片
1.找到Hexo下的_config.yml里的post_asset_folder,把这个选项从false改成true。

2.在Hexo目录下打开Git Brsh,执行一个下载上传图片插件的命令:
cnpm install hexo-asset-image --save。

3.继续在Git Brsh下利用hexo n "博客名"来生成md的文件,这时就会在同级的目录下生成一个同名的文件夹。

4.在.md的文件中要插入图片时,先要把所要插入的图片放在生成的同名文件夹下。

5.利用markdown的语法将文件引入文章中。

6.最后再执行:hexo clean、hexo g、hexo s、hexo d 系列步骤
7.访问:https://gitee.com/LJH130168/ljh-of-blog/pages
	部署点更新即可
8.即可访问个人博客:http://ljh130168.gitee.io/ljh-of-blog/#下载插件 npm install hexo-asset-img --save
五、插入图片的方法
1、原生写法:

2、html->img写法(控制图片缩放):
<img src="xxx\xxx.png" style="zoom:50%;" />
3、html->div->img写法(插入多张图片,并控制大小):
<div align="center">
<img src="xxx\xxx.png" height="300" width="100%" />
<img src="xxx\xxx.png" height="300" width="100%" />
</div>六、插入视频
<video src="链接" type="video/mp4" controls="controls" style="max-width: 100%; display: block; margin-left: auto; margin-right: auto;">
your browser does not support the video tag
</video>
七、github
我的github地址
https://github.com/LJH130168用户名和密码
username:LJH130168 password:LuJiaHong130168-
https://zhuanlan.zhihu.com/p/370635512
https://zhuanlan.zhihu.com/p/60578464
https://blog.csdn.net/sinat_37781304/article/details/82729029?depth_1-
解决github pages无法访问
https://blog.csdn.net/qq_41509200/article/details/111998090-
https://www.cnblogs.com/mfrank/tag/Hexo/ hexo部署在GitHub密码避免输用户名和密码
https://blog.csdn.net/weixin_30716141/article/details/99869367解决github上图片不显示