你了解ElasticSearch吗
1、ElasticSearch是什么

2、es和solr区别


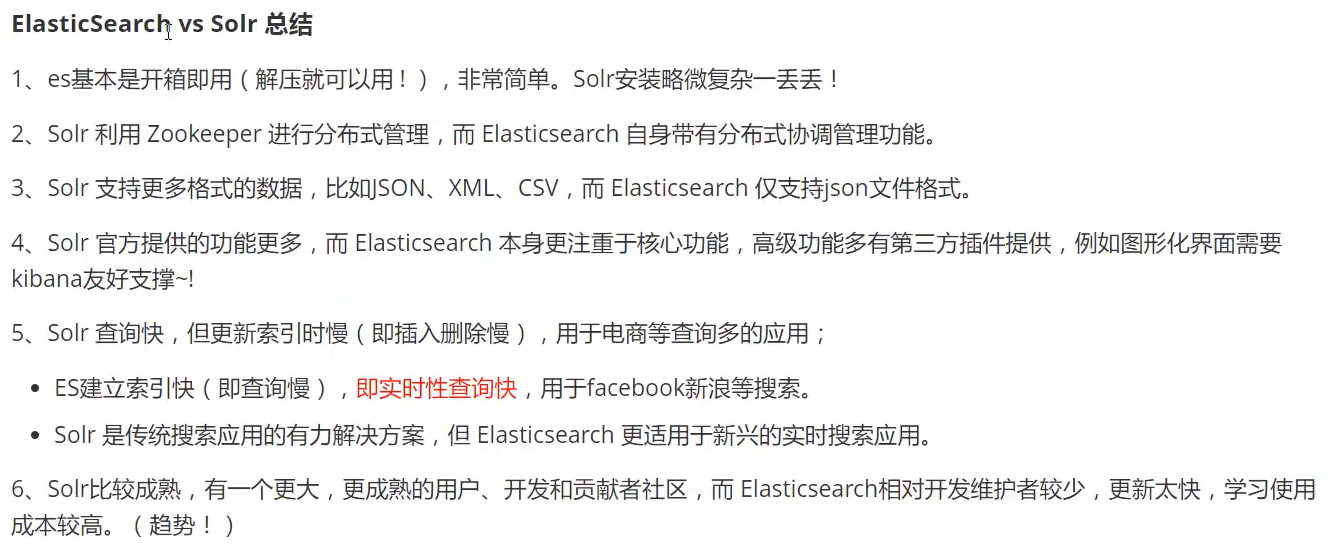
#es和solr比较总结:
1、当单纯的对已有数据进行搜索的时候,Solr更快;
2、当实时建立索引时,Solr会产生io阻塞,查询性能较差,es具有更明显的优势
3、随着数据量的增加,Solr的搜索效率会变得更低,而es却没有明显的变化
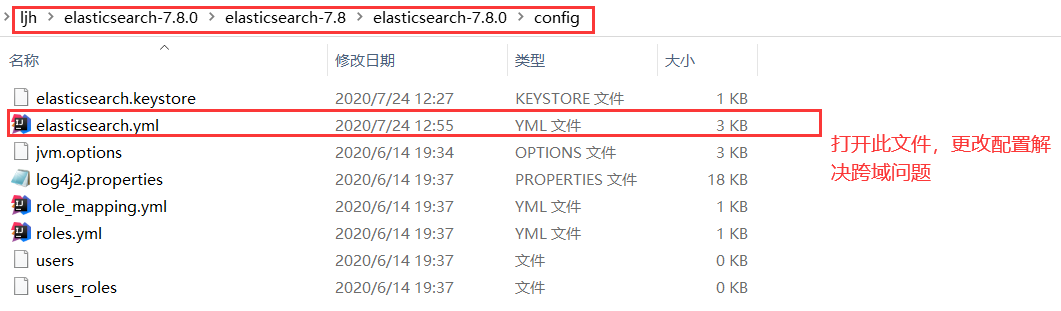
3、es安装及head插件安装
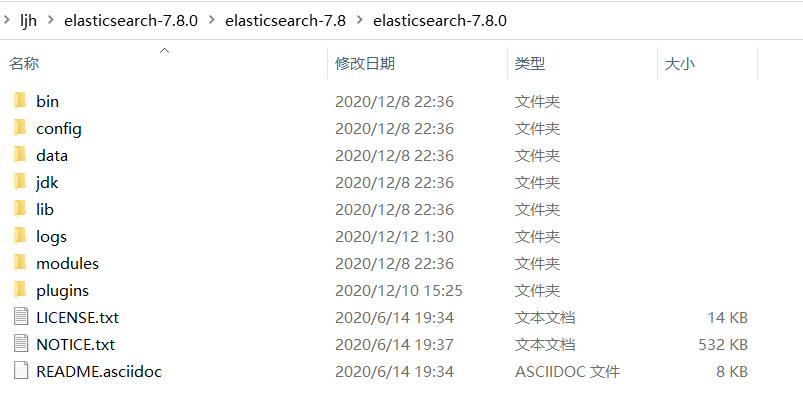
解压后
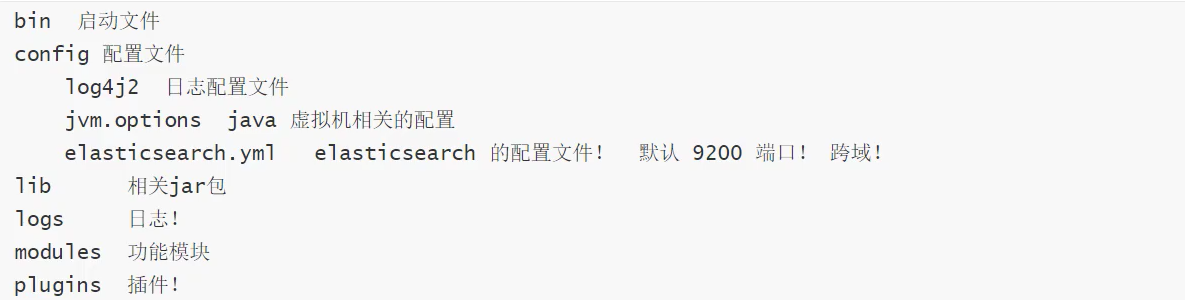
文件说明
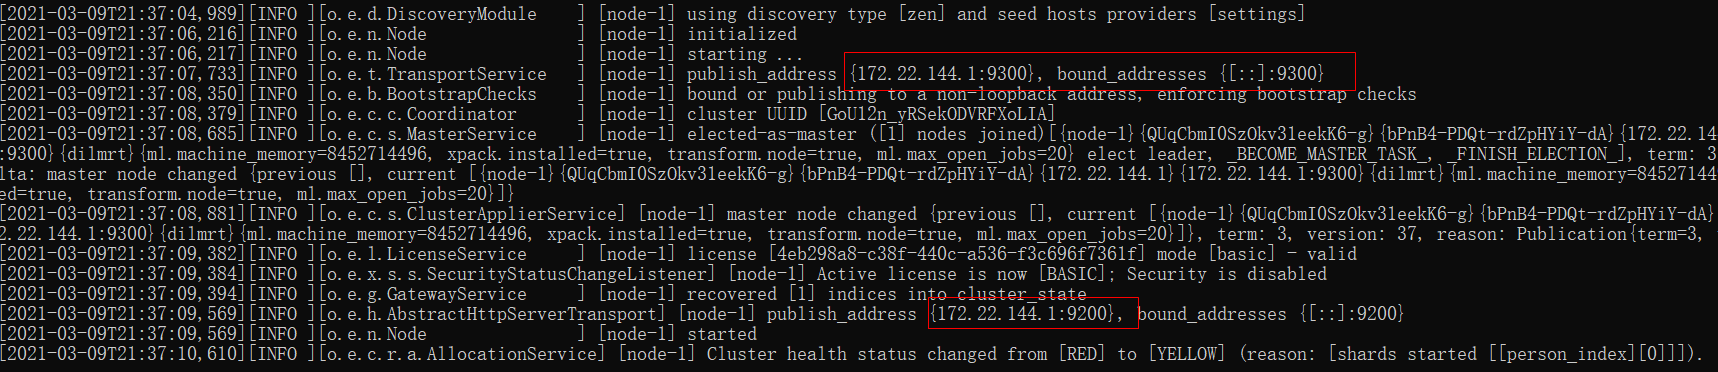
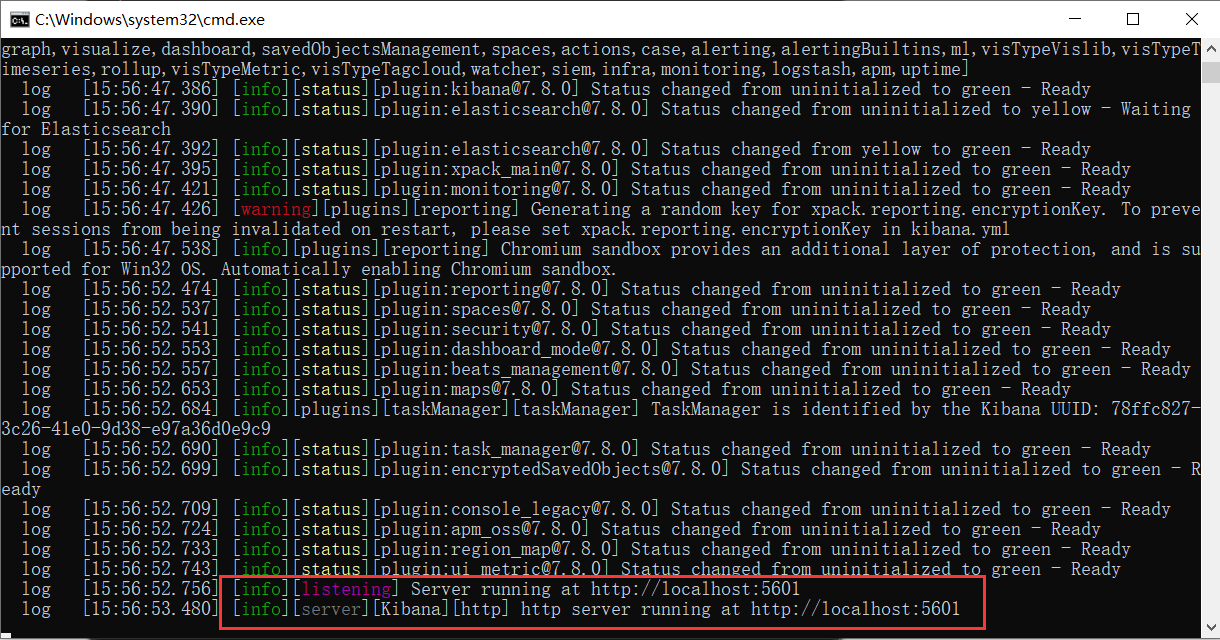
启动es,访问:172.22.144.1:9200
查看

安装可视化界面 head插件,基于vue(上面查看步骤返回json)
步骤:1、解压
2、进入elasticsearch-head-master文件夹cmd
3、输入:cnpm install 命令,安装插件
4、输入:npm run start 命令,启动head
5、访问IP:localhost:9100
head插件下载


来解决跨域问题
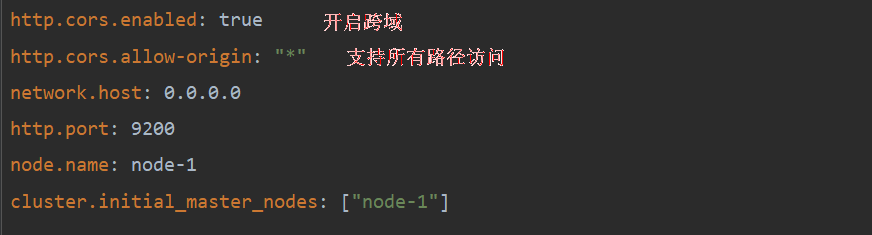
重启es,访问:localhost:9100
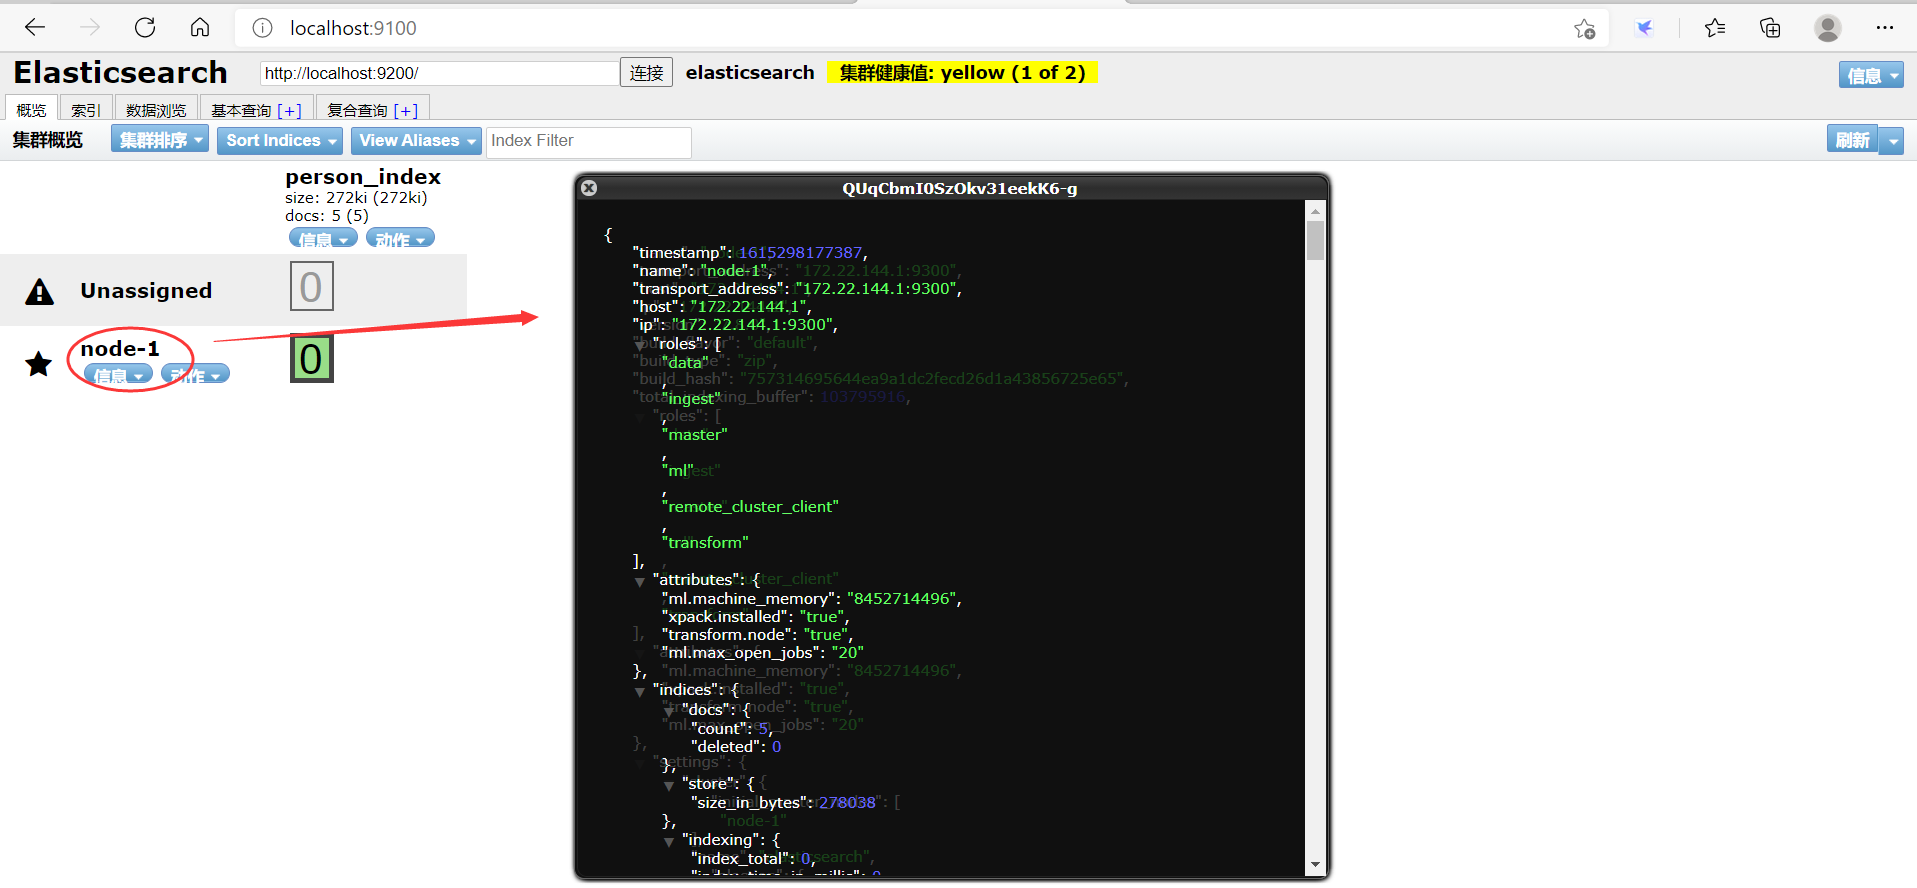
我们只把head作文es的数据展示工具,虽然能够通过此界面建立索引和查询,但不全,后面采用Kibana
4、Kibana的安装
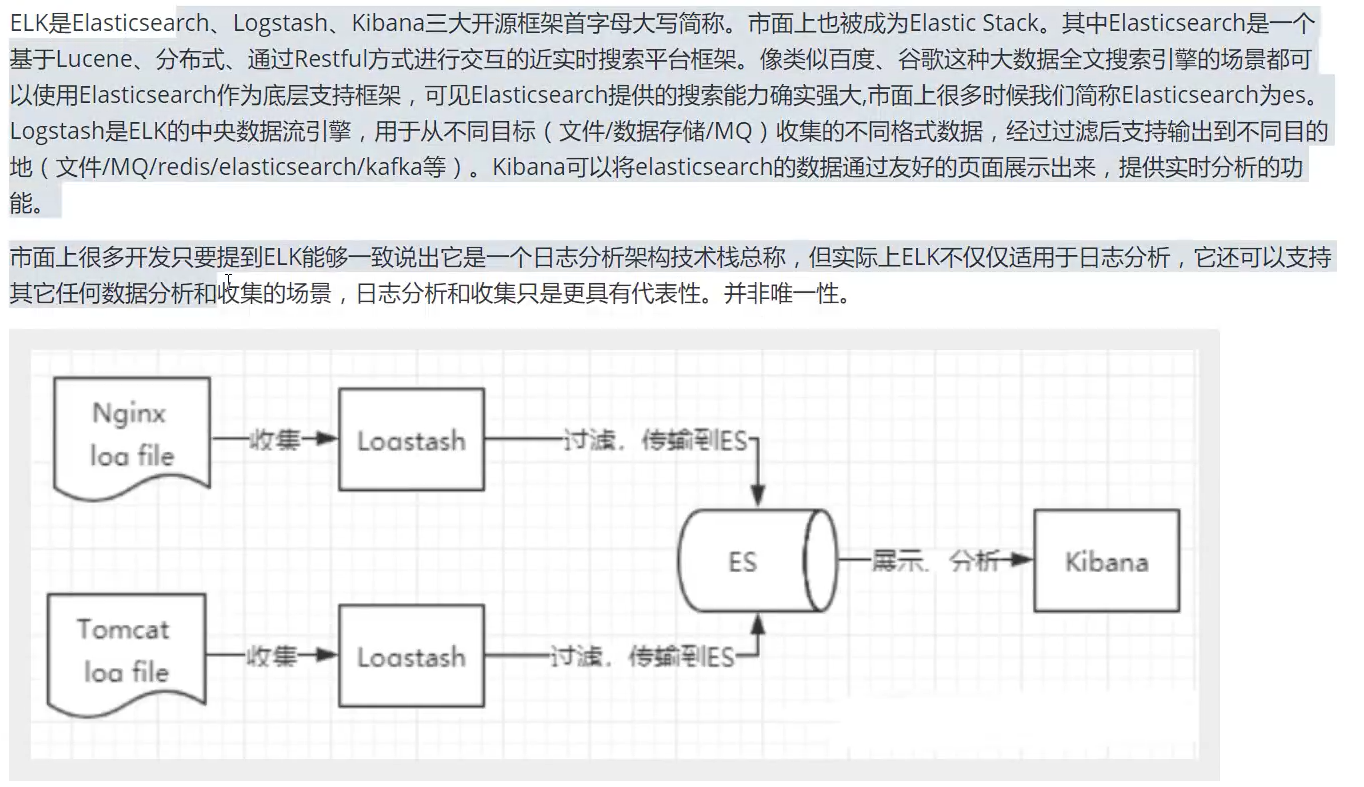
了解ELK
安装Kibana
下载的Kibana版本和es版本要一致;
下载慢的小伙伴们可以到 华为云的镜像去下载
速度很快,自己找对应版本就可以
ElasticSearch: https://mirrors.huaweicloud.com/elasticsearch/?C=N&O=D
logstash: https://mirrors.huaweicloud.com/logstash/?C=N&O=D
kibana: https://mirrors.huaweicloud.com/kibana/?C=N&O=D步骤:1、解压
2、进入kibana-7.8.0-windows-x86_64文件夹下bin目录,启动 kibana.bat
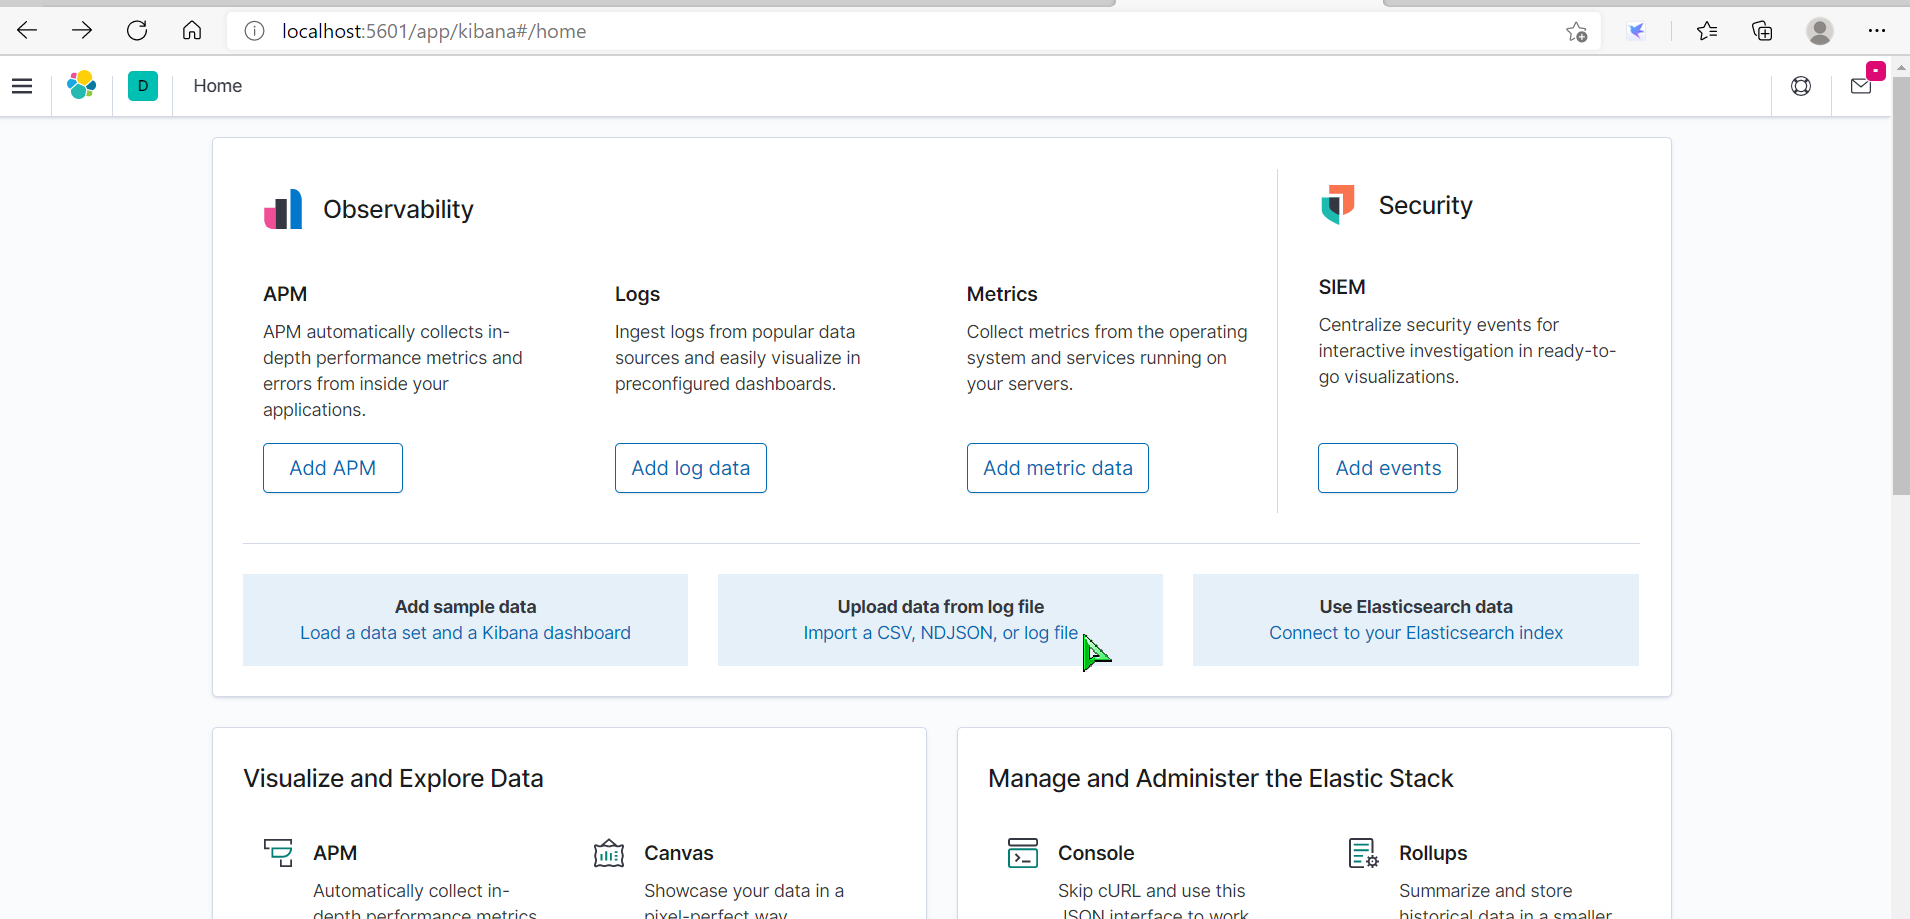
3、访问IP:localhost:5601
Kibana下载

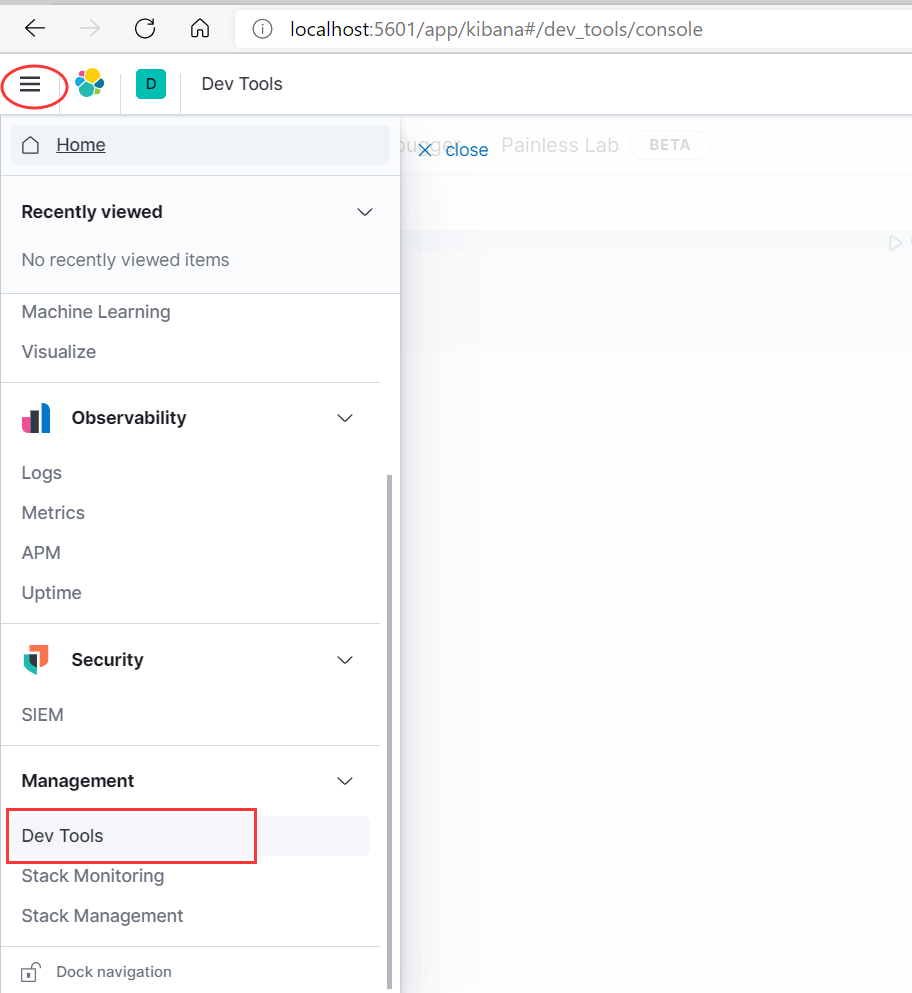
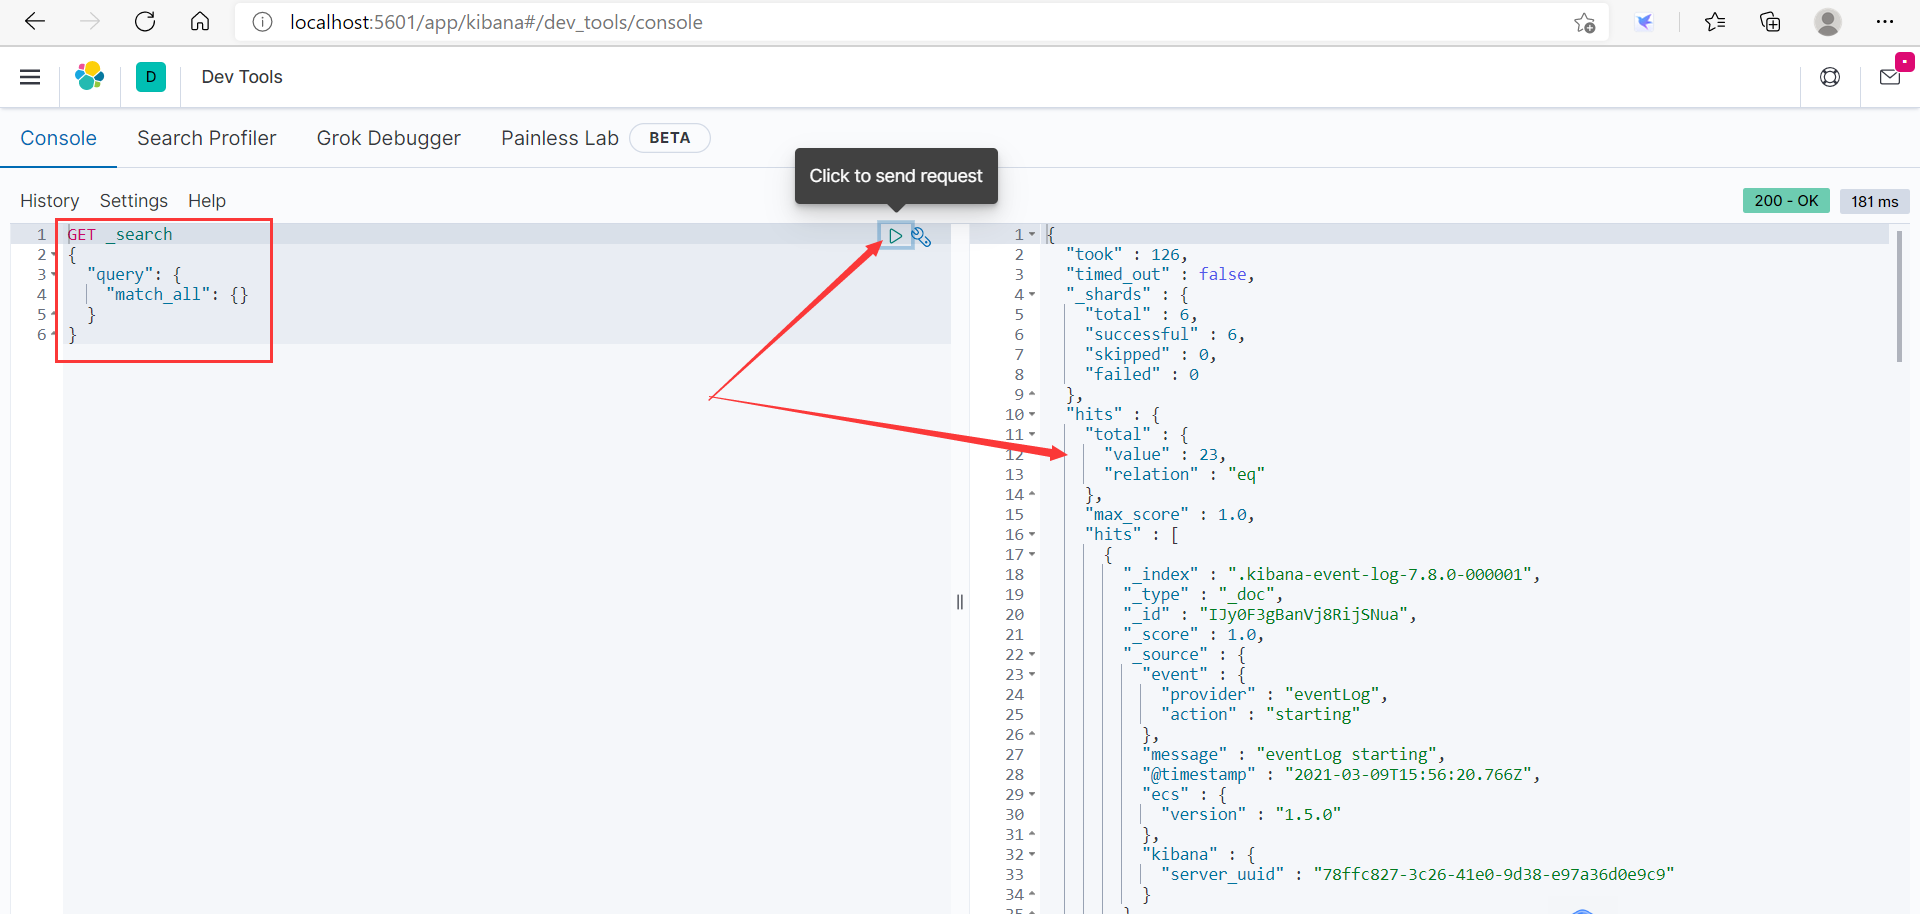
通过Kibana内置工具做测试
汉化Kibana
打开config下的文件kibana.yml,在后面加上 i18n.locale: “zh-cn” ,重启Kibana,访问:localhost:5601
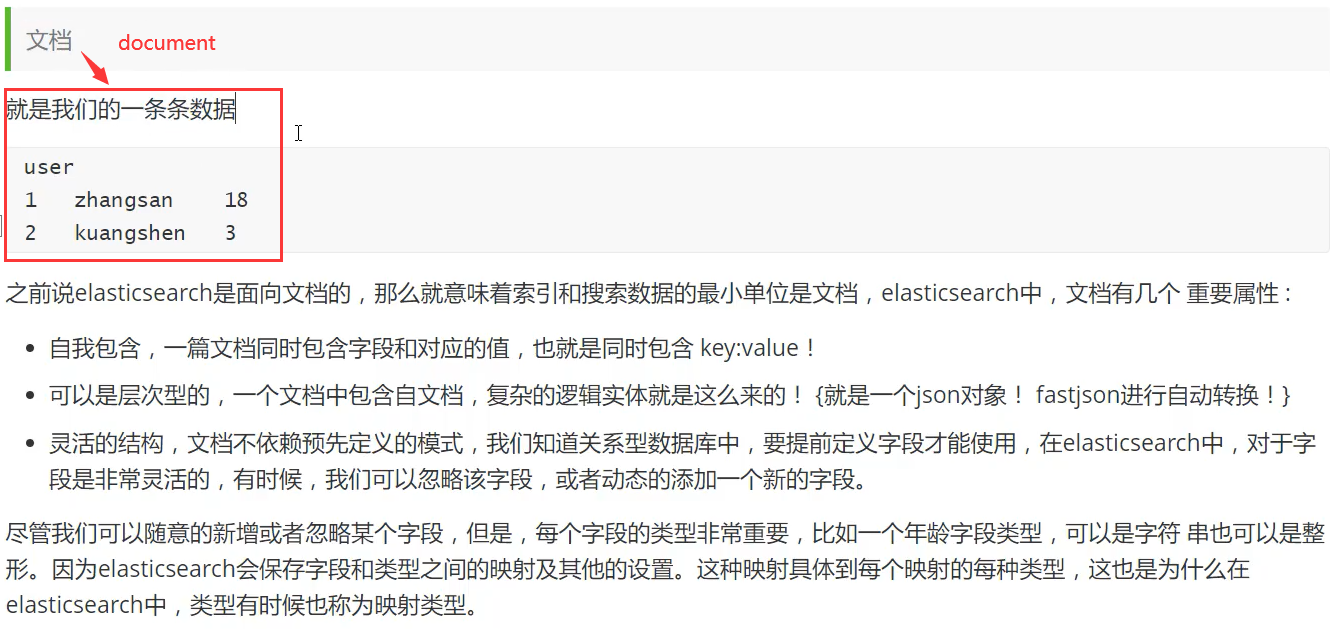
5、es核心概念理解
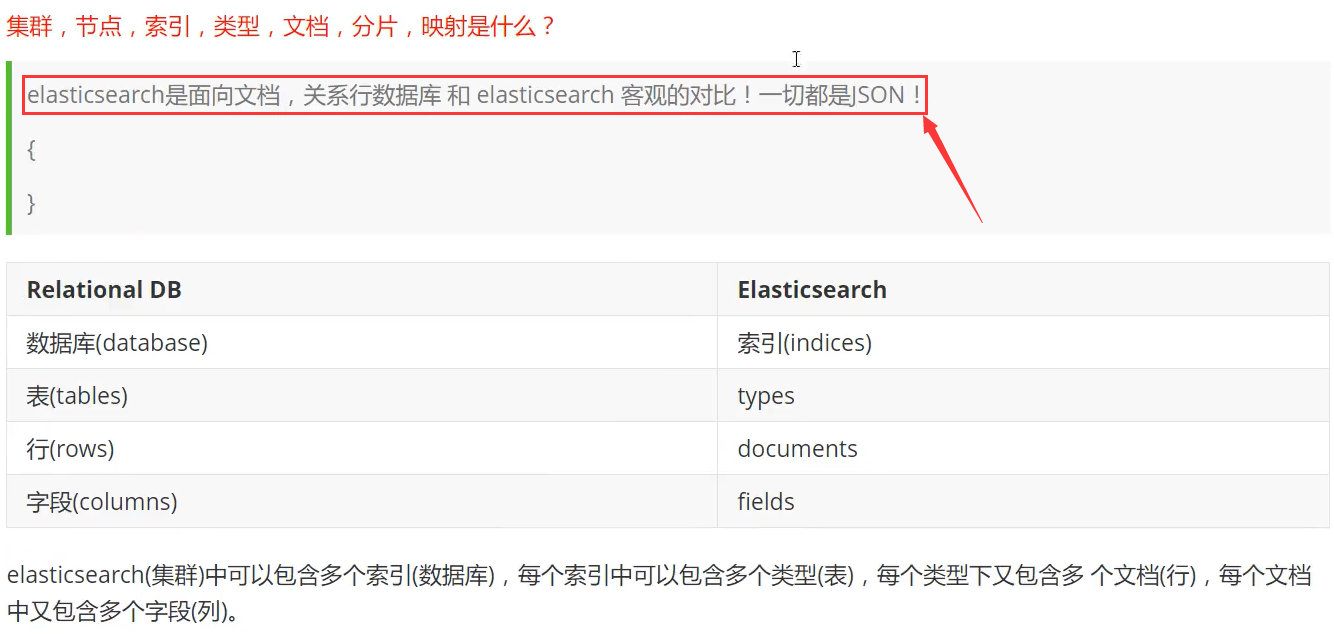
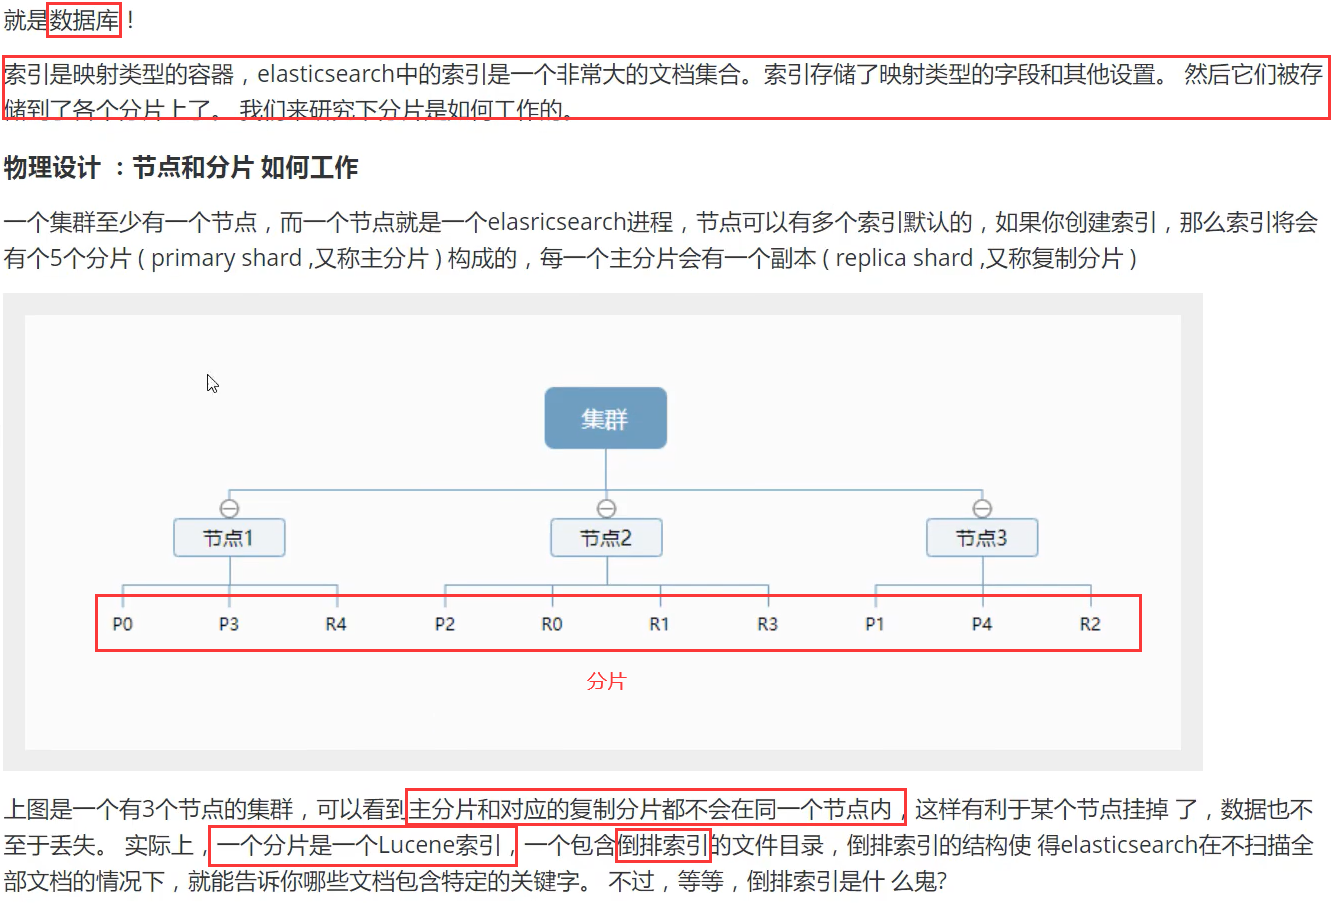
indices 索引 (对应数据库)
es是支持集群模式的,集群模式下每一个节点都代表一个es进程(我们自己下载启动的es就是一个节点),可放于不同的服务器上,每个节点都可以进行分片(默认是每个节点创建5个分片),每个分片上存储的就是索引,而索引就是文档(type->documents->fileds)的集合,也就是一段json。而分片对应主分片和复制分片,它两数据都是一样的,但存储在不同的节点下面,保证了万一一个节点挂掉,也不会影响数据的丢失。
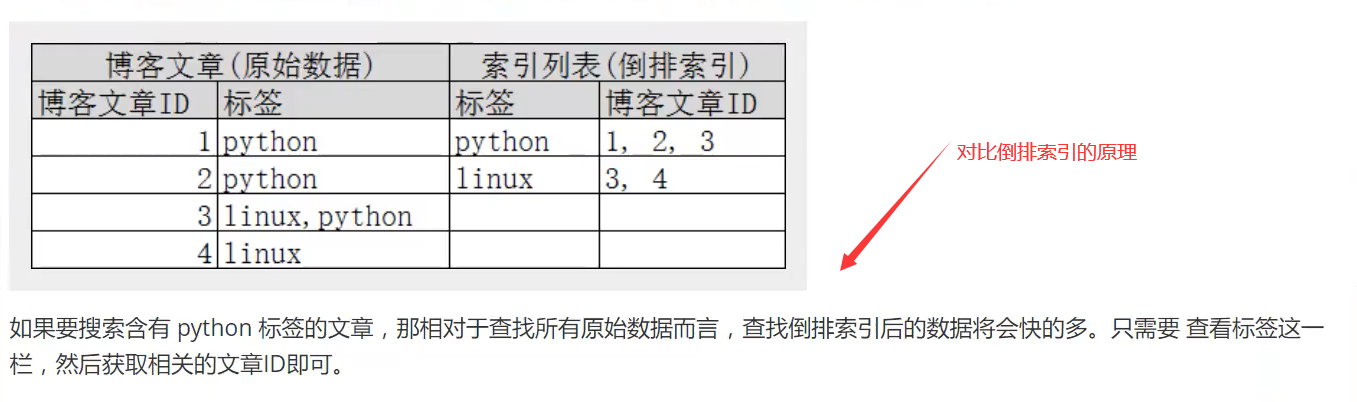
什么是倒排索引?
在数据库里面我们是根据编号去获取数据的,比如说:现在有编号1、2、3,对应的数据有a、ab、abc。我们要查询含a的数据就要连续查询3此;而倒排索引是:a、b、c对应编号是123、23、3,查询a的时候直接就对应到了123
type 类型 (相当于数据库里面的表,在定义表的时候,我们首先要定义表有那些字段,是什么数据类型)

documents 文档 (就是一条条的数据,对应数据库里面的行)
ElasticSearch索引和Lucene索引对比 【一个es索引包含多个Lucene索引(片)】

6、分词器详解
1、IK分词器
什么是IK分词器?
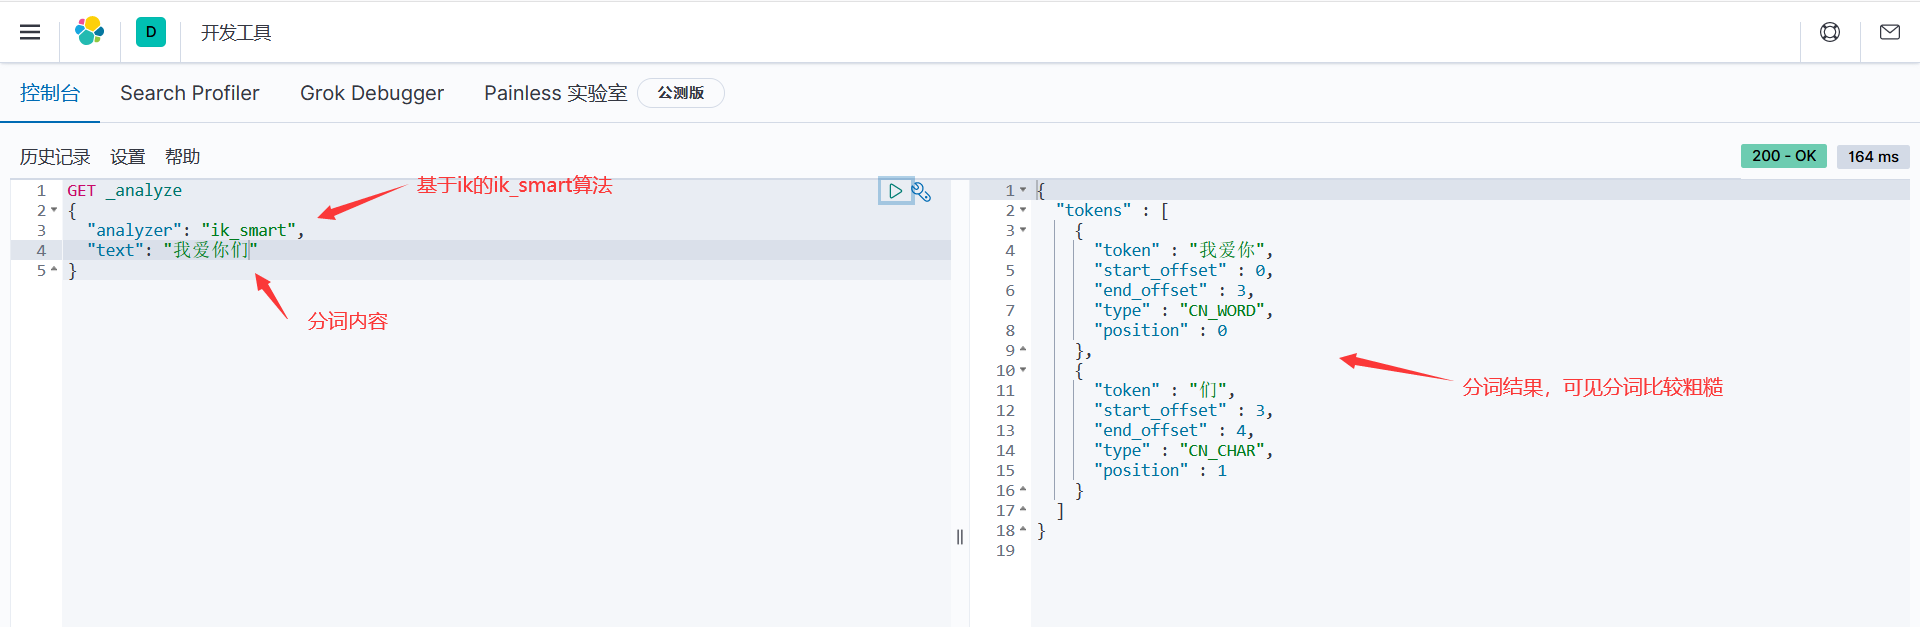
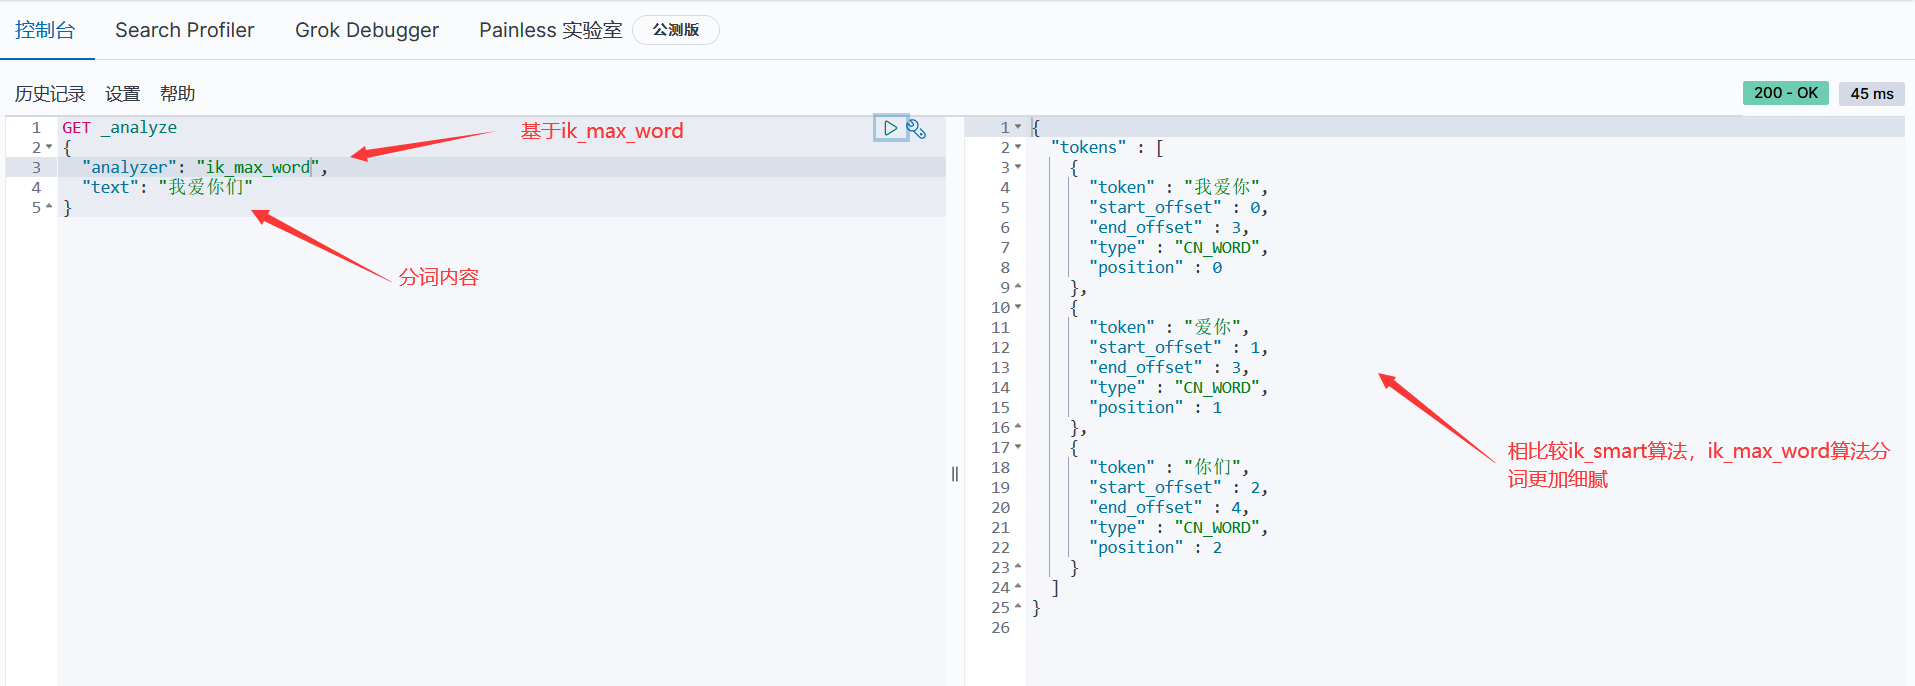
就是把我们进行收索的内容进行拆分,这里用到的是ik分词器插件,ik提供 ik_smart 和 ik_max_word 两种分词算法,前者粗分,后者精分

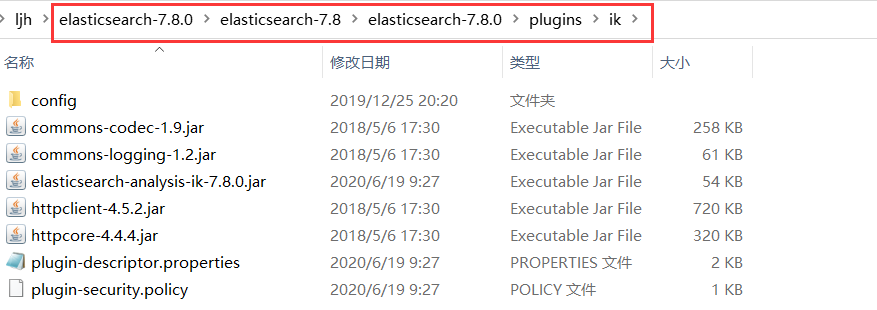
步骤:1、IK分词器插件下载,版本要对应
2、下载好后解压到elasticsearch-7.8.0的plugins文件夹下面
3、重启es,观察ik插件是否加载

4、利用bin目录下的elasticsearch-plugin.bat检查ik插件插件是否加载

5、使用Kibana进行测试(RestFul风格)
基于ik插件的ik_smart分词算法 _analyze表面分词器查询
基于ik插件的ik_max_word分词算法
6、当我们输入一些不连贯的词的时候,ik分词器会给我们划分成一个一个的,这个时候想避免可以在ik的confic文件中配置自己的 .dic文件。配置后重启es和Kibana
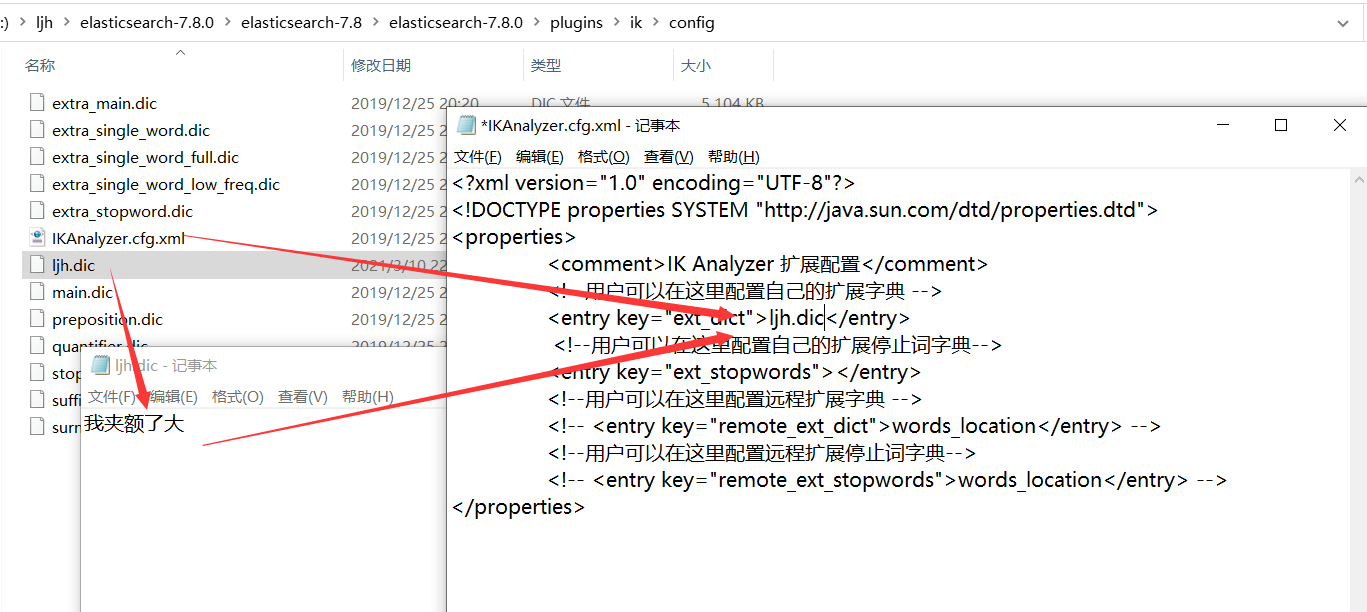

未配置前,分词:我夹额了大
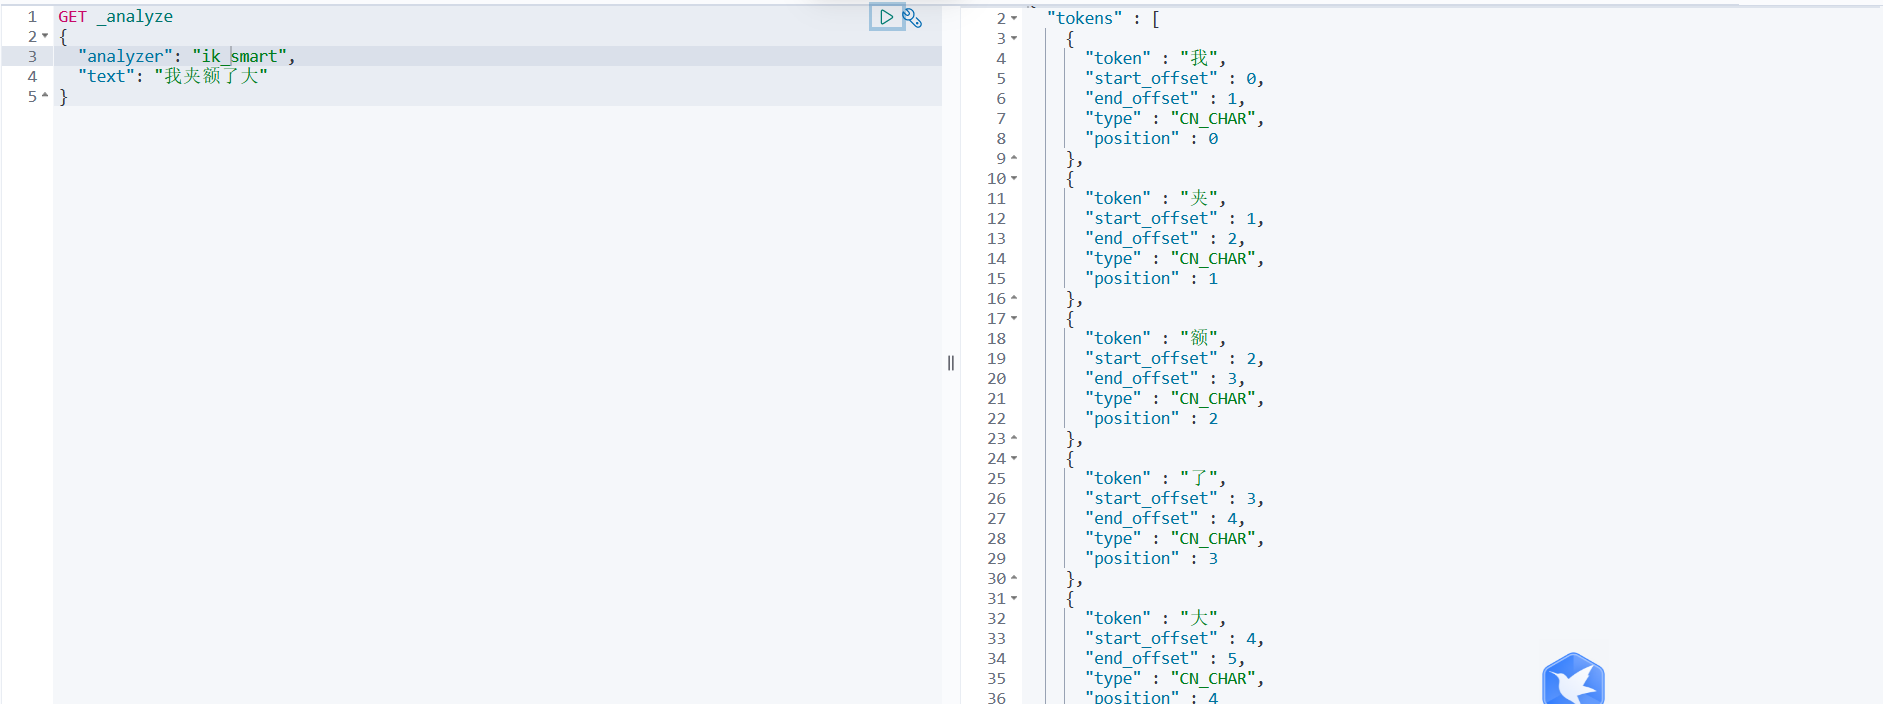
配置后,分词:我夹额了大

//在java里面通过分词器获取分词
    public List<String> getAnalyze(String text)
            throws Exception
    {
        List<String> list = new ArrayList<String>();
        text = text.length() > 100 ? text.substring(0, 100) : text;
        Request request = new Request("GET", "_analyze");
        JSONObject entity = new JSONObject();
        entity.put("analyzer", "ik_max_word");
        entity.put("text", text);
        request.setJsonEntity(entity.toJSONString());
        Response response = this.client.getLowLevelClient().performRequest(request);
        JSONObject tokens = JSONObject.parseObject(EntityUtils.toString(response.getEntity()));
        JSONArray arrays = tokens.getJSONArray("tokens");
        for (int i = 0; i < arrays.size(); i++)
        {
            JSONObject obj = JSON.parseObject(arrays.getString(i));
            list.add(obj.getString("token"));
        }
        return list;
    }
2、自定义分词插件
克隆下面
https://gitee.com/LJH130168/analyzer.git
3、指定分词器
settings是修改分片和副本数的。
mappings是修改字段和类型的,指定分词器
elasticsearch设置默认分词器和字段指定分词器
index的值只有三种(no,not_analyzed,analyzed)
no:不添加到索引
not_analyzed:添加到索引不分词
analyzed : 添加到索引并分词https://www.elastic.co/guide/en/elasticsearch/reference/2.4/mapping-index.html
#example one
PUT news
{
  "settings": {
    "index.analysis.analyzer.default.type": "ik_max_word"
    }
  },
  "mappings": {
    "_doc": {
      "properties": {
        "tags": {
          "type":     "text",
          "analyzer": "whitespace"
        }
      }
    }
  }
}

#example two
{
    "settings":{    #settings是修改分片和副本数的
           "number_of_shards":3,    #分片为3
           "number_of_replicas":0    #副本数为0
        },
    "mappings":{    #mappings是修改字段和类型的
          "tvcount":{
               "dynamic":"strict",
                   "_all":{"enabled":false},
                   "properties":{
                   "tvname":{"type":"string","index":"analyzed","analyzer":"ik_max_word","search_analyzer": "ik_max_word"},                  如,string类型,analyzed索引,ik_max_word分词器
                   "director":{"type":"string","index":"analyzed","analyzer":"ik_max_word","search_analyzer": "ik_max_word"},
           "actor":{"type":"string","index":"analyzed","analyzer":"ik_max_word","search_analyzer": "ik_max_word"},
           "allnumber":{"type":"string","index":"not_analyzed"},
           "tvtype":{"type":"string","index":"analyzed","analyzer":"ik_max_word","search_analyzer": "ik_max_word"},
           "description":{"type":"string","index":"analyzed","analyzer":"ik_max_word","search_analyzer": "ik_max_word"},
           "pic":{"type":"string","index":"not_analyzed"}
                   }
          }
        }
 }
java创建mapping和setting
package com.wenbronk.elasticsearch.usage.index; import com.wenbronk.elasticsearch.usage.highLevel.RestHighLevelClientParent; import org.elasticsearch.ElasticsearchException; import org.elasticsearch.action.ActionListener; import org.elasticsearch.action.admin.indices.create.CreateIndexRequest; import org.elasticsearch.action.admin.indices.create.CreateIndexResponse; import org.elasticsearch.action.admin.indices.delete.DeleteIndexRequest; import org.elasticsearch.action.admin.indices.delete.DeleteIndexResponse; import org.elasticsearch.action.support.ActiveShardCount; import org.elasticsearch.action.support.IndicesOptions; import org.elasticsearch.common.settings.Settings; import org.elasticsearch.common.unit.TimeValue; import org.elasticsearch.common.xcontent.XContentBuilder; import org.elasticsearch.common.xcontent.XContentFactory; import org.elasticsearch.common.xcontent.XContentType; import org.elasticsearch.rest.RestStatus; import org.junit.jupiter.api.Test; import java.io.IOException; public class Index_1_Create extends RestHighLevelClientParent { /** * index 使用java客户端不好创建, 可以在kibana中进行创建 * 注意mapping一旦创建, 不可更改 */ @Test public void createIndices() throws IOException { CreateIndexRequest request = new CreateIndexRequest("twitter"); // add partition request.source("{\n" + " \"settings\" : {\n" + " \"number_of_shards\" : 3,\n" + " \"number_of_replicas\" : 2\n" + " },\n" + " \"mappings\" : {\n" + " \"tweet\" : {\n" + " \"properties\" : {\n" + " \"message\" : { \"type\" : \"text\" }\n" + " }\n" + " }\n" + " },\n" + " \"aliases\" : {\n" + " \"twitter_alias\" : {}\n" + " }\n" + "}", XContentType.JSON); // 配置可选参数 request.timeout(TimeValue.timeValueMinutes(2)); // request.timeout("2m"); request.masterNodeTimeout(TimeValue.timeValueMinutes(1)); // request.masterNodeTimeout("1m"); // request.waitForActiveShards(2); request.waitForActiveShards(ActiveShardCount.DEFAULT); // 使用异步的方式创建 client.indices().createAsync(request, new ActionListener<CreateIndexResponse>() { @Override public void onResponse(CreateIndexResponse createIndexResponse) { boolean acknowledged = createIndexResponse.isAcknowledged(); boolean shardsAcknowledged = createIndexResponse.isShardsAcknowledged(); } @Override public void onFailure(Exception e) { System.out.println(e.getCause()); } }); } }java动态指定mapping(映射)并指定分词器
public void testAddIndex() throws IOException {
      // 操作索引的对象
      IndicesClient indices = client.indices();
      // 创建索引的请求
      CreateIndexRequest request = new CreateIndexRequest("ysx_course");
      request.settings(Settings.builder().put("number_of_shards", "1").put("number_of_replicas", "0"));
      // 创建映射
      request.mapping("doc", "{\n" +
              "                \"properties\": {\n" +
              "                    \"description\": {\n" +
              "                        \"type\": \"text\",\n" +
              "                        \"analyzer\": \"ik_max_word\",\n" +
              "                        \"search_analyzer\": \"ik_smart\"\n" +
              "                    },\n" +
              "                    \"name\": {\n" +
              "                        \"type\": \"text\",\n" +
              "                        \"analyzer\": \"ik_max_word\",\n" +
              "                        \"search_analyzer\": \"ik_smart\"\n" +
              "                    },\n" +
              "\"pic\":{                    \n" +
              "\"type\":\"text\",                        \n" +
              "\"index\":false                        \n" +
              "},                    \n" +
              "                    \"price\": {\n" +
              "                        \"type\": \"float\"\n" +
              "                    },\n" +
              "                    \"studymodel\": {\n" +
              "                        \"type\": \"keyword\"\n" +
              "                    },\n" +
              "                    \"timestamp\": {\n" +
              "                        \"type\": \"date\",\n" +
              "                        \"format\": \"yyyy-MM‐dd HH:mm:ss||yyyy‐MM‐dd||epoch_millis\"\n" +
              "                    }\n" +
              "                }\n" +
              "            }", XContentType.JSON);


      // 执行创建操作
      CreateIndexResponse response = indices.create(request);
      // 得到响应
      boolean b = response.isAcknowledged();
      System.out.println(b);
  }
Elasticsearch 理解mapping中的store属性
默认情况下(store为no),对字段值进行索引以使其可搜索,但不存储它们 (store)。 这意味着可以查询该字段,但是无法检索原始字段值。在这里我们必须理解的一点是: 如果一个字段的mapping中含有store属性为true,那么有一个单独的存储空间为这个字段做存储,而且这个存储是独立于
_source的存储的。它具有更快的查询。存储该字段会占用磁盘空间。如果需要从文档中提取(即在脚本中和聚合),它会帮助减少计算。在聚合时,具有store属性的字段会比不具有这个属性的字段快。 此选项的可能值为false和true。
7、Restful风格操作
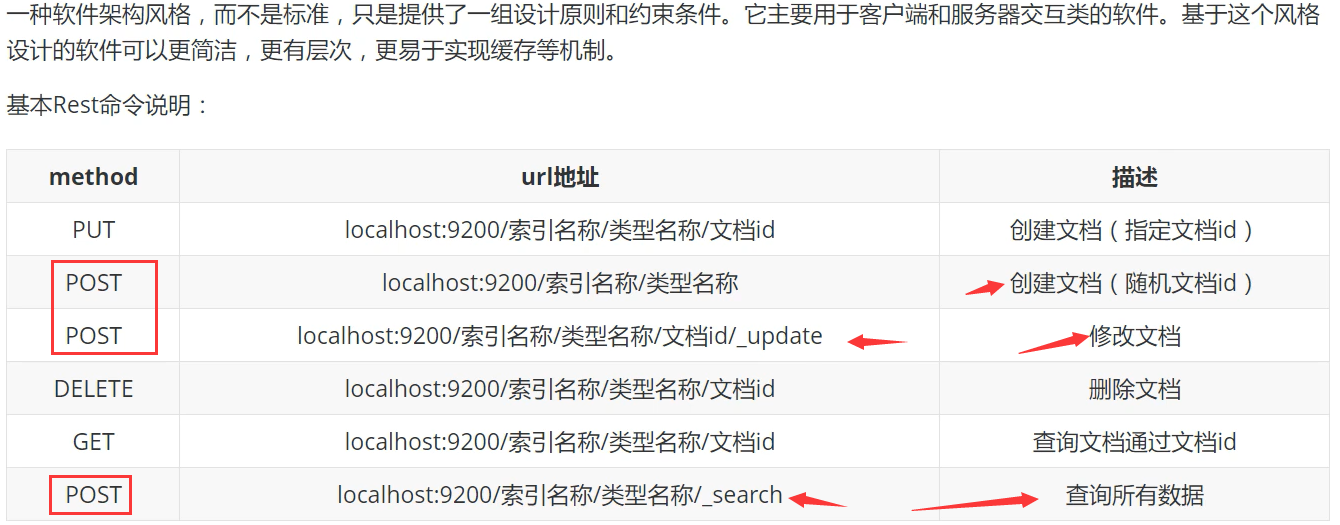
基础测试:
1、创建索引
PUT /索引名/类型名/文档ID
{请求体}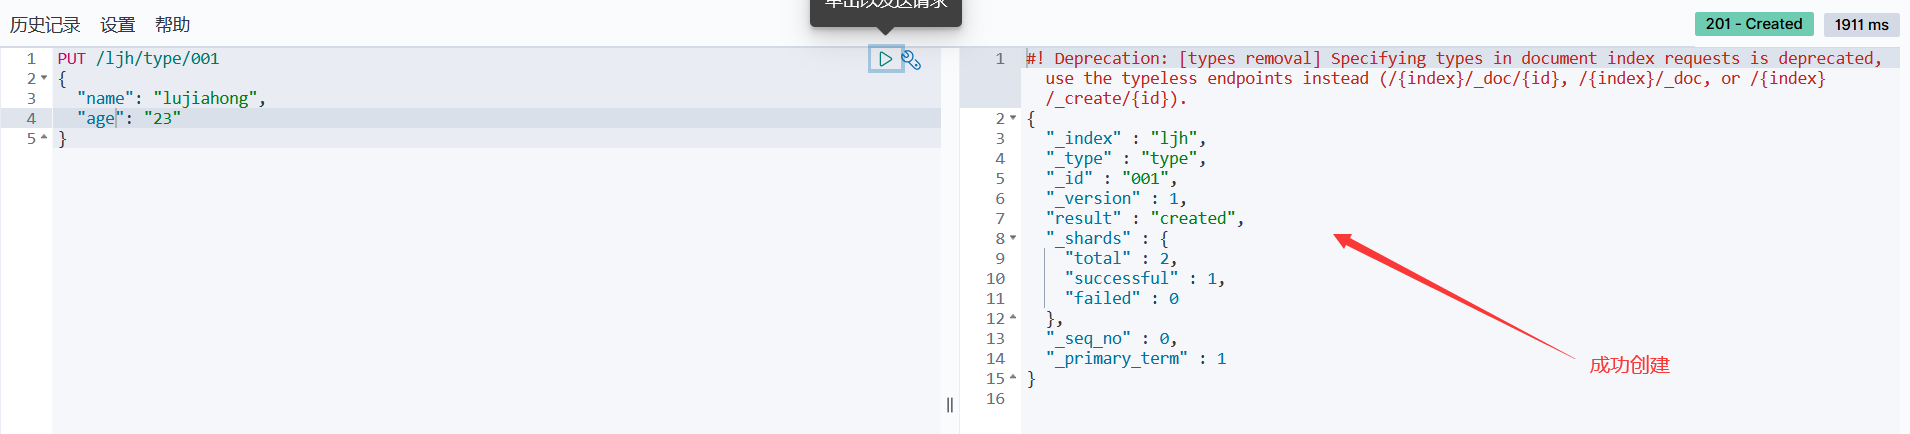
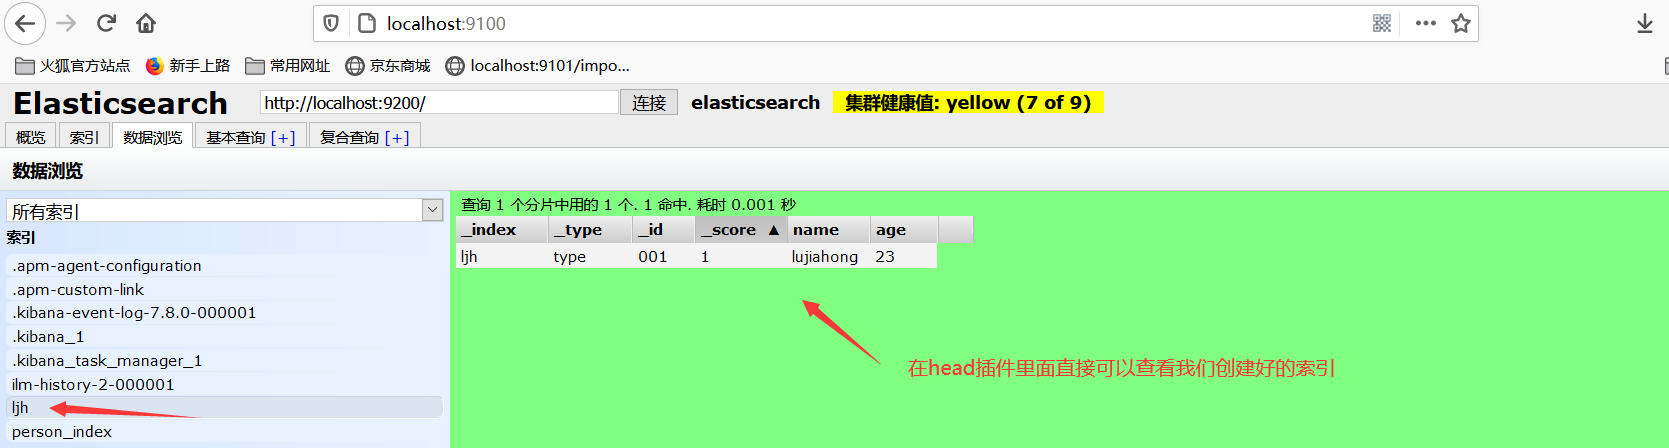
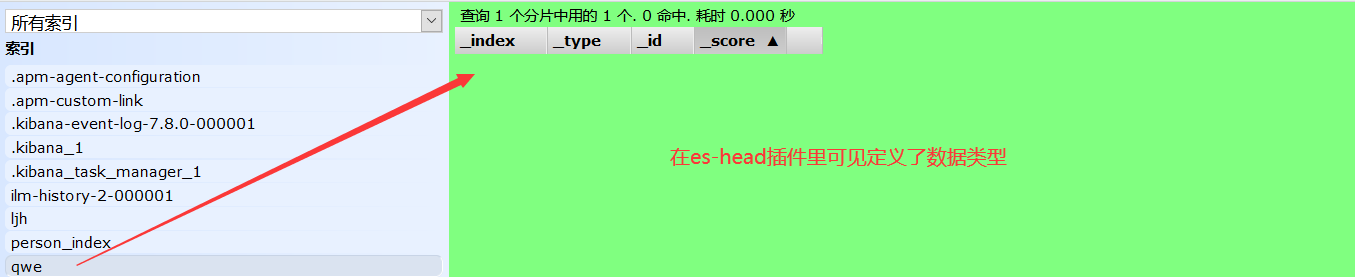
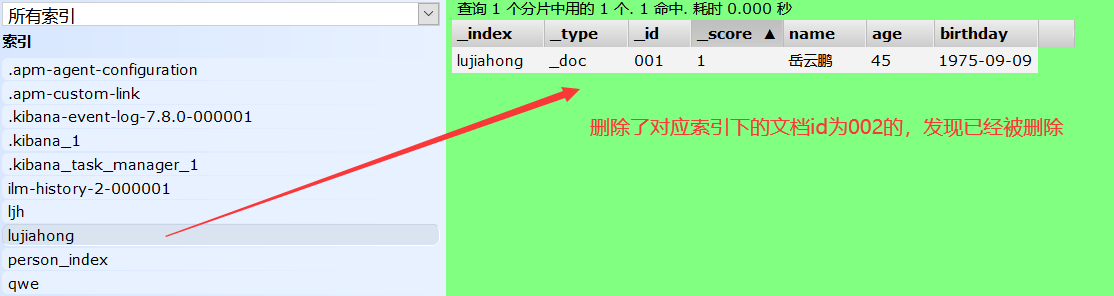
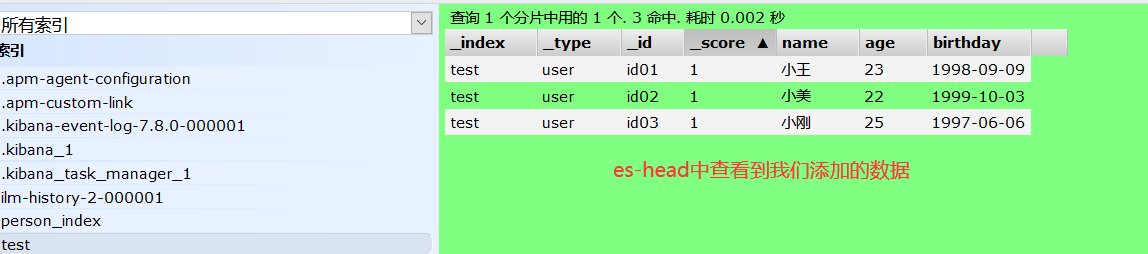
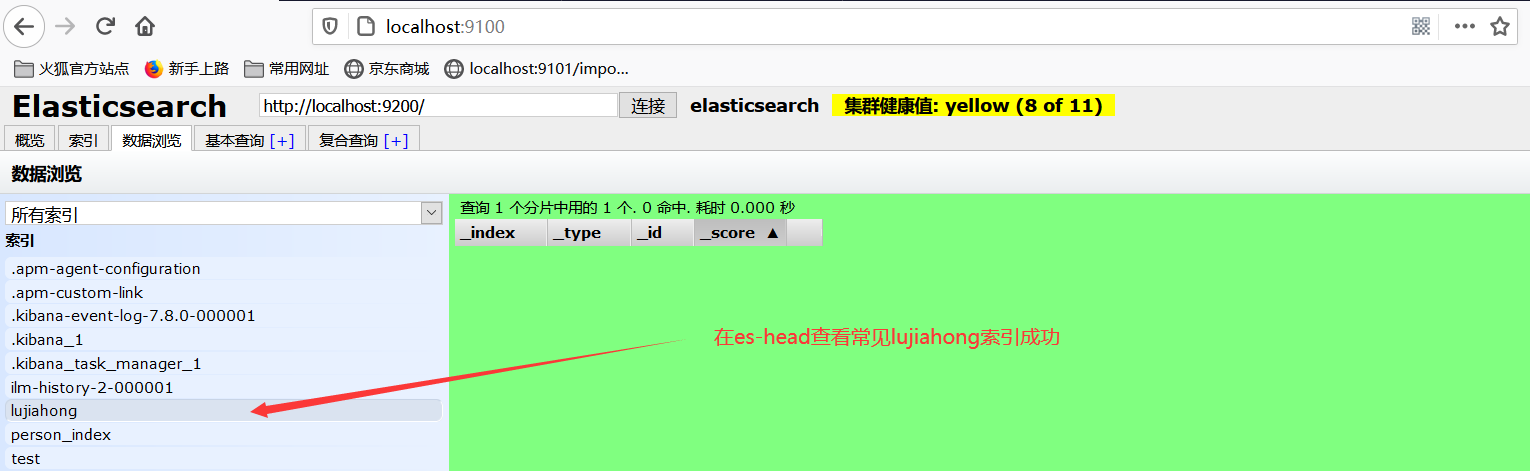
2、在es-head插件里直接查看创建好的索引
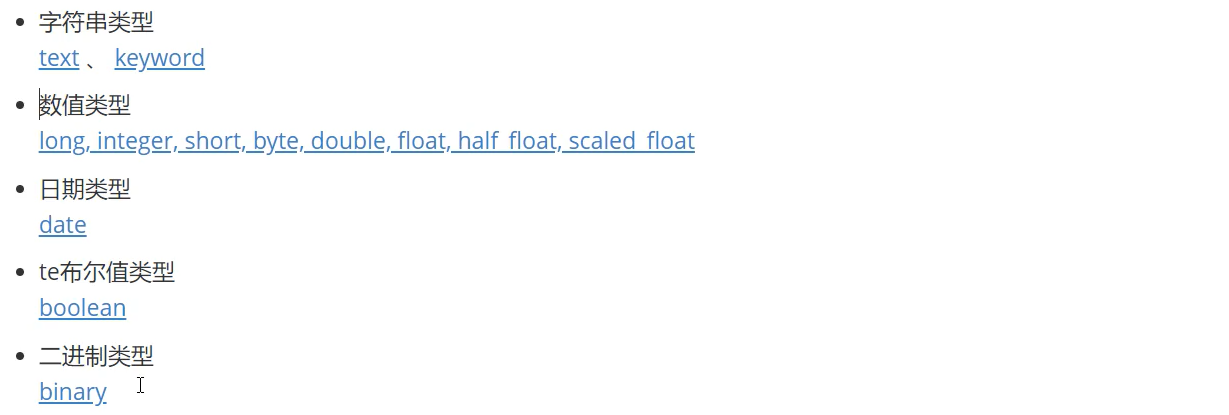
3、看一下es定义fileds的数据类型 ==官方文档==
4、上面没指定字段类型,下面来指定一下
PUT /qwe
{
  "mappings": {
    "properties": {
      "name":{
        "type": "text"
      },
      "age":{
        "type": "long"
      },
      "birthday":{
        "type": "date"
      }
    }
  }
}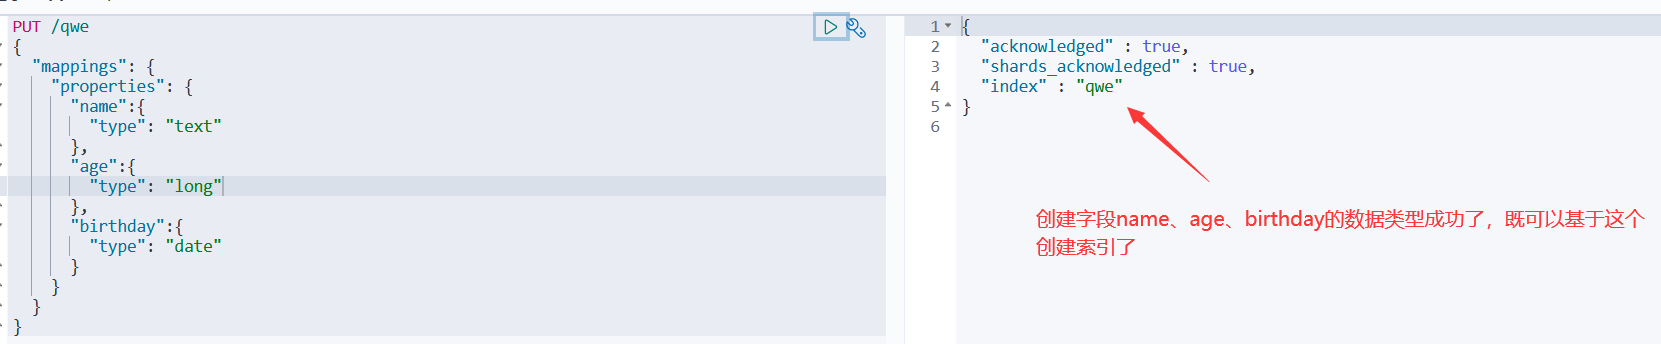
5、通过get请求获取创建的规则信息
GET /qwe
6、通过 _doc 类型名,可以默认让es给我们指定相关字段的数据类型,如下:
PUT /lujiahong/_doc/001
{
  "name":"陈奕迅",
  "age":45,
  "birthday":"1975-09-09"
}

GET /lujiahong/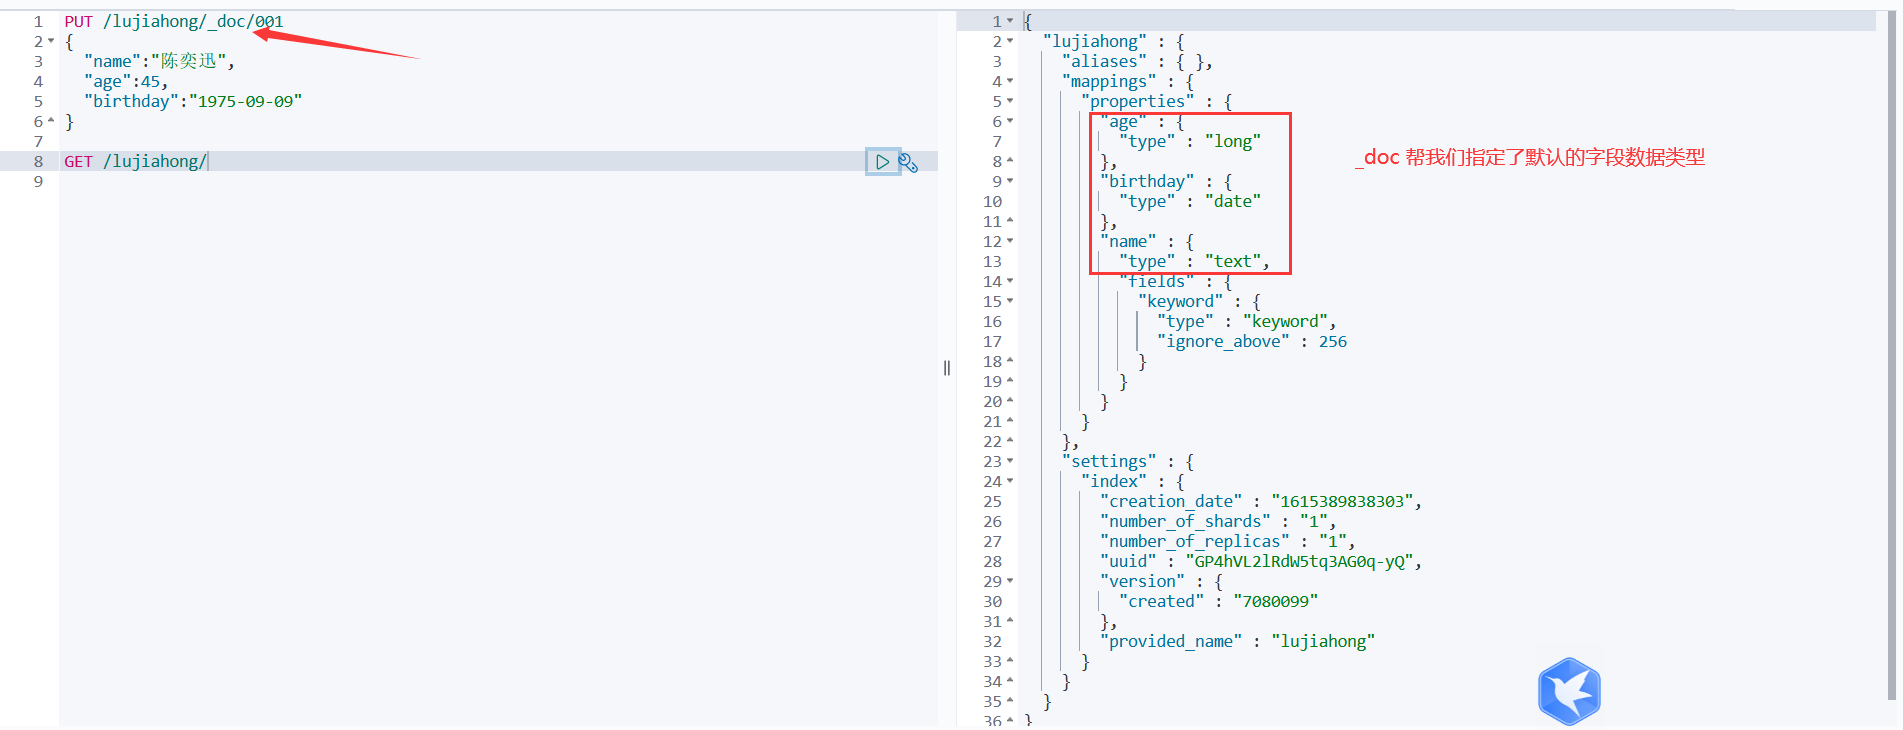
7、扩展命令
#获取当前es的健康状态
GET _cat/health
#获取当前es的相关信息
GET _cat/indices?v
#在Kibana里面dev_tool里面输入GET _cat/ 会跳出很多命令,ge

8、修改索引
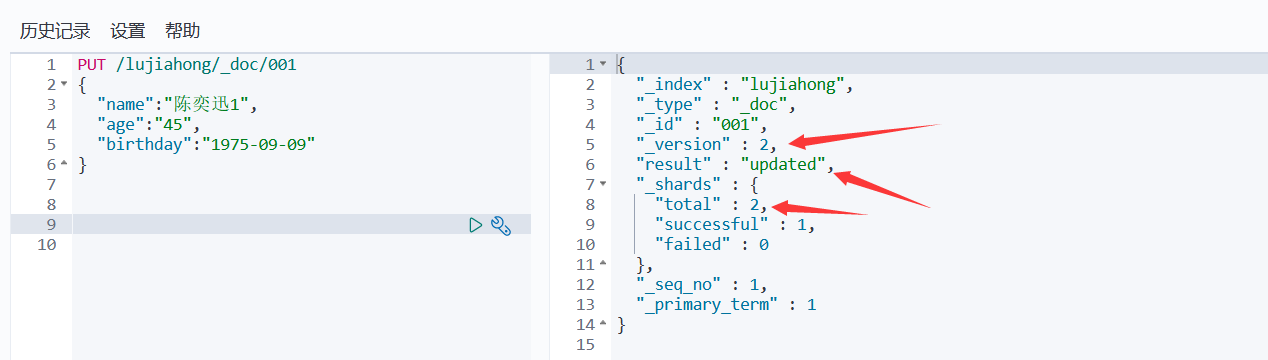
方法一:还是用put提交方式,改变值,运行后会发现版本号变了,以及状态变为了update
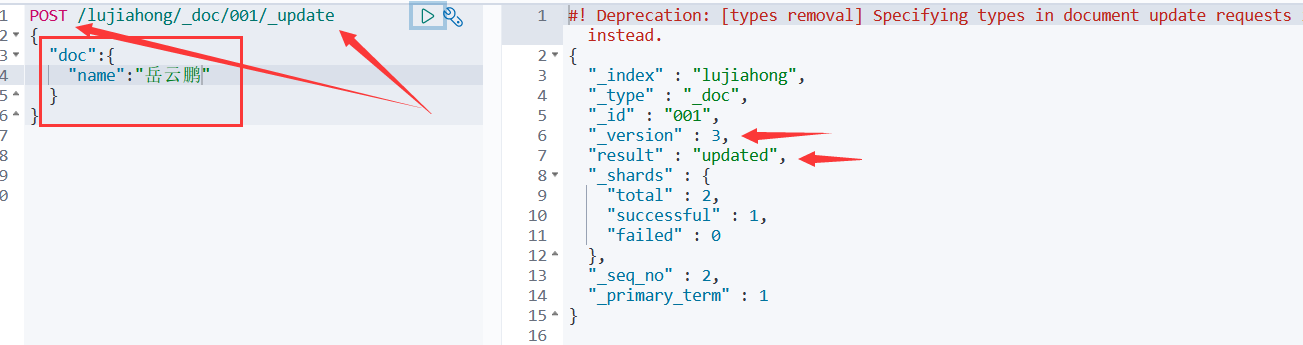
方法二:采用post提交方式,文档id后面加上 _update

9、删除索引
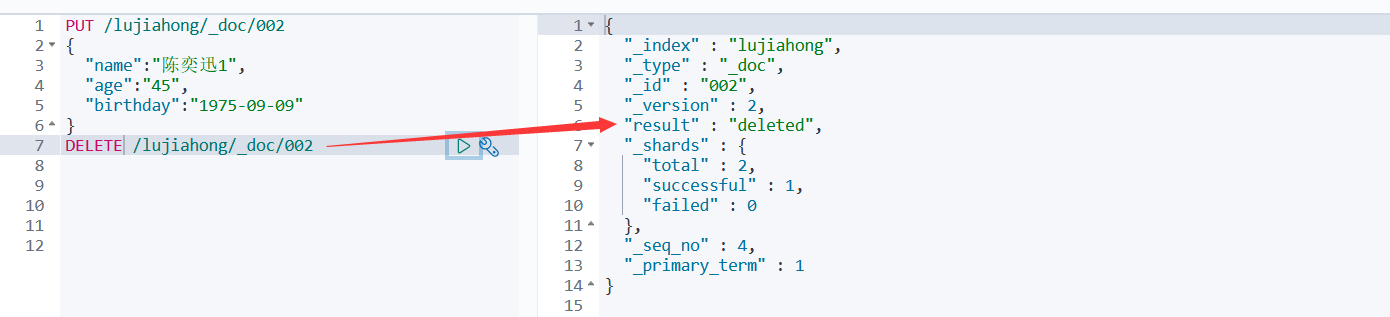
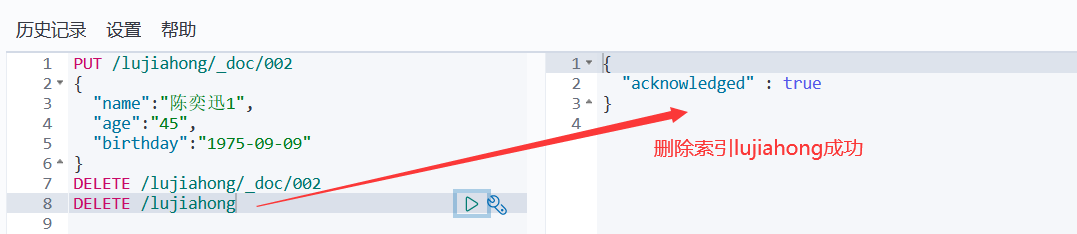
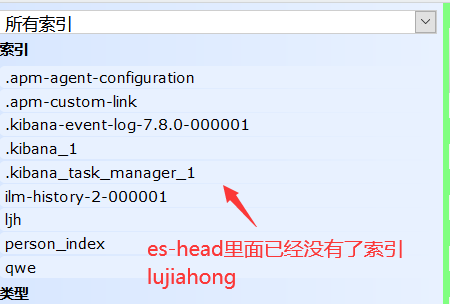
#删除索引
DELETE /索引名
#删除索引下的文档
DELETE /索引名/类型名/文档id
8、关于文档的基本操作
基本操作:
1、添加索引(在一个索引里面添加多个文档)PUT /索引名/类型名/文档id 类型名可以不写,默认 _doc
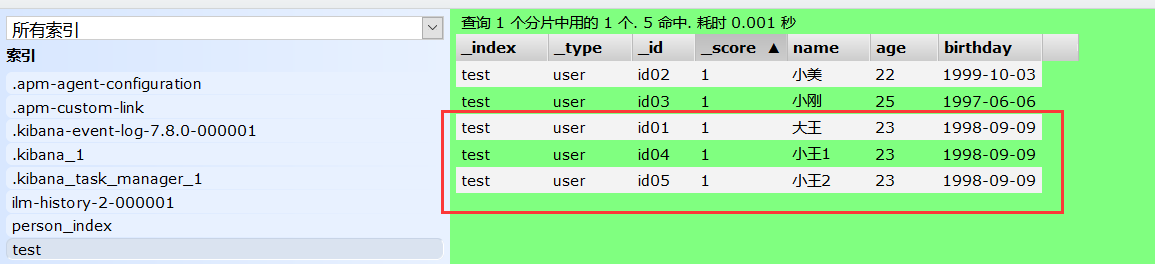
PUT /test/user/id01
{
  "name":"小王",
  "age":23,
  "birthday":"1998-09-09",
  "tags":["吃饭","睡觉","打游戏"]
}
PUT /test/user/id02
{
  "name":"小美",
  "age":22,
  "birthday":"1999-10-03",
  "tags":["化妆","睡觉","美容"]
}
PUT /test/user/id03
{
  "name":"小刚",
  "age":25,
  "birthday":"1997-06-06",
  "tags":["健身","跑步","踢足球"]
}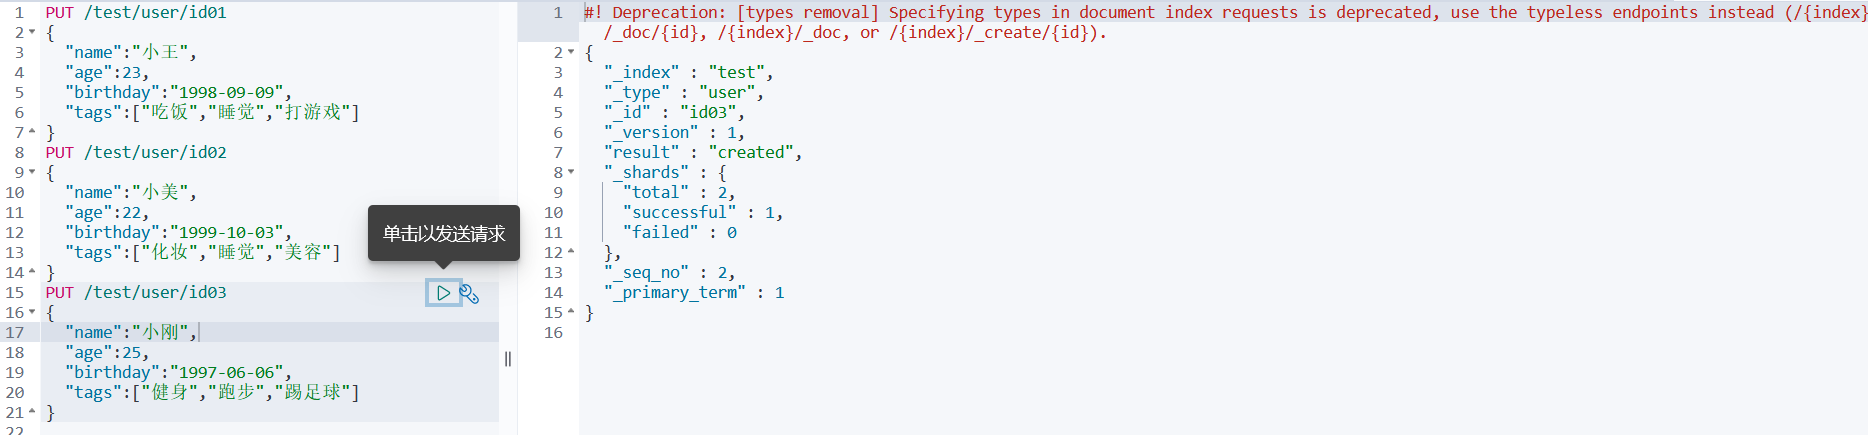
2、查询索引
方式一: GET /索引名 为当前查询索引下的数据类型、创建时间等基本信息
GET /test
方式二: GET /索引名/类型名/文档id 为当前查询索引下的指定的文档id所对应的数据数据
GET /test/user/id01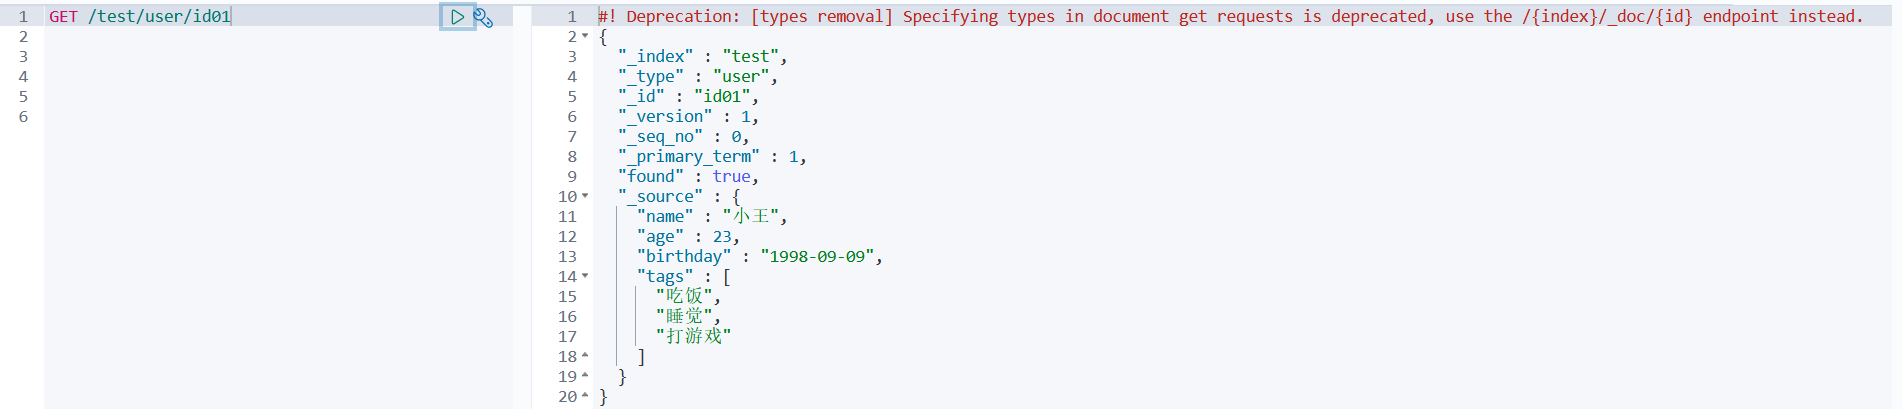
方式三: GET /索引名/类型名/_search?q=查询条件 (_search代表搜索,q即为query代表查询)
#查询到指定查询条件的文档
GET /test/user/_search?q=name:大王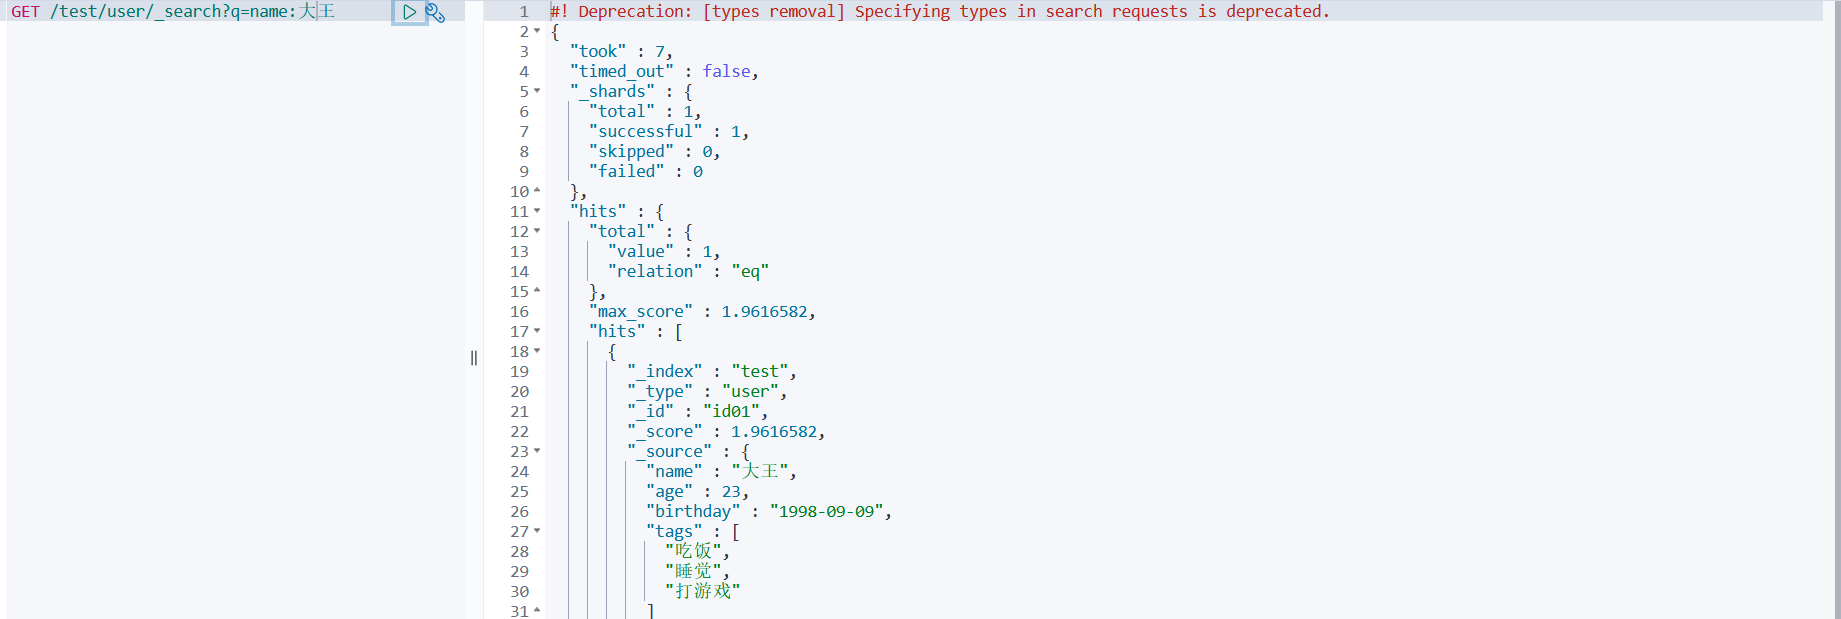
3、更新索引
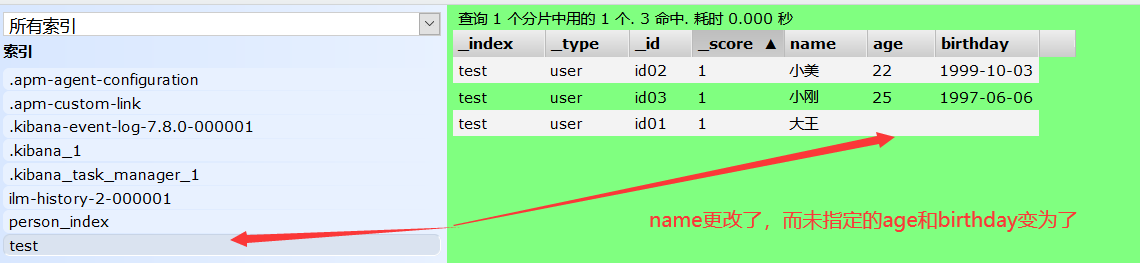
方式一: PUT /索引名/类型名/文档id{指定修改的类容,未指定的内容就会变为空}
PUT /test/user/id01
{
  "name":"大王"
}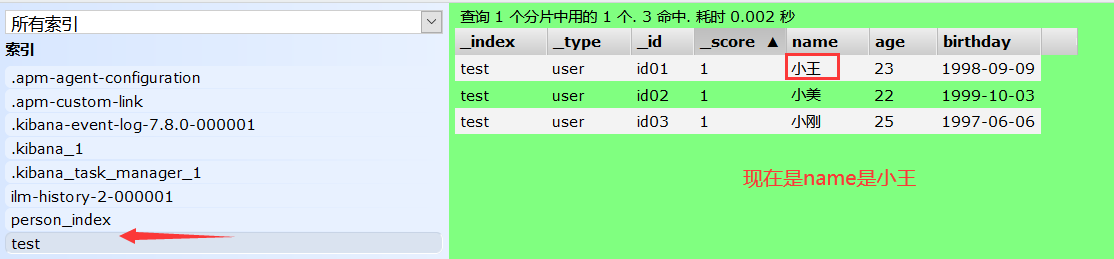
方式二: POST /索引名/类型名/文档id/_update{指定修改的类容,而未指定的内容不会变为空}
POST /test/user/id01/_update
{
  "doc":{
    "name":"大王"
  }
}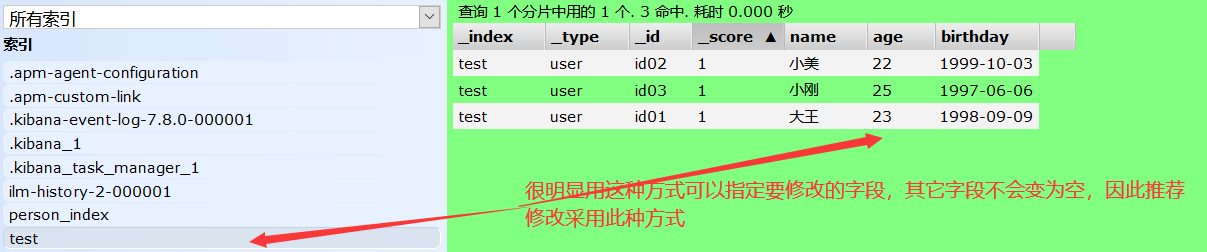
9、es的复杂查询
es本来就是用来做全文检索的因此要求的功能肯定比sql语言五花八门,常见的es查询有:
排序、分页、高亮、模糊、精准
现在索引 test 多加几条文档,方便复杂查询
方式一:做查询匹配(模糊) 最匹配(match)的最前面,根据分值确定
#查询语句
GET /test/user/_search   #要查询的索引
{                        #要查询的参数体json
"query":{   		    #要查询的内容
 "match": {           #匹配
   "name":"王1"		#字段。如果字段是数组,可以用空格隔开,来实现匹配查询
 }
}
}

#查询结果
#! Deprecation: [types removal] Specifying types in search requests is deprecated.
{
"took" : 1,
"timed_out" : false,
"_shards" : {
 "total" : 1,
 "successful" : 1,
 "skipped" : 0,
 "failed" : 0
},
"hits" : {                     #hits在java里面对应一个map对象,也叫Hits
 "total" : {                  #获取的总量
   "value" : 3,			    #查询到的3条数据
   "relation" : "eq"			#关系是匹配相等的
 },
 "max_score" : 1.7466556,	 #查询到的文档都有一个分值,最大分值放在最前面,也就是权重
 "hits" : [
   {
     "_index" : "test",
     "_type" : "user",
     "_id" : "id04",
     "_score" : 1.7466556,
     "_source" : {
       "name" : "小王1",
       "age" : 23,
       "birthday" : "1998-09-09",
       "tags" : [
         "吃饭",
         "睡觉",
         "打游戏"
       ]}},
   {
     "_index" : "test",
     "_type" : "user",
     "_id" : "id01",
     "_score" : 0.57843524,
     "_source" : {
       "name" : "大王",
       "age" : 23,
       "birthday" : "1998-09-09",
       "tags" : [
         "吃饭",
         "睡觉",
         "打游戏"
       ]}},
   {
     "_index" : "test",
     "_type" : "user",
     "_id" : "id05",
     "_score" : 0.4889865,
     "_source" : {
       "name" : "小王2",
       "age" : 23,
       "birthday" : "1998-09-09",
       "tags" : [
         "吃饭",
         "睡觉",
         "打游戏"
       ]}}]}}
方式二:查询我需要的字段 _source
GET /test/user/_search
{
"query":{
 "match": {
   "name":"王1"
 }
},
"_source":["name","age"]  #查询结果中的key也是_sourch,里面的value就是json字段,因此查询的时候我
}                           #们指定我们要查询的字段name和age,那么结果中也就只有name和age的值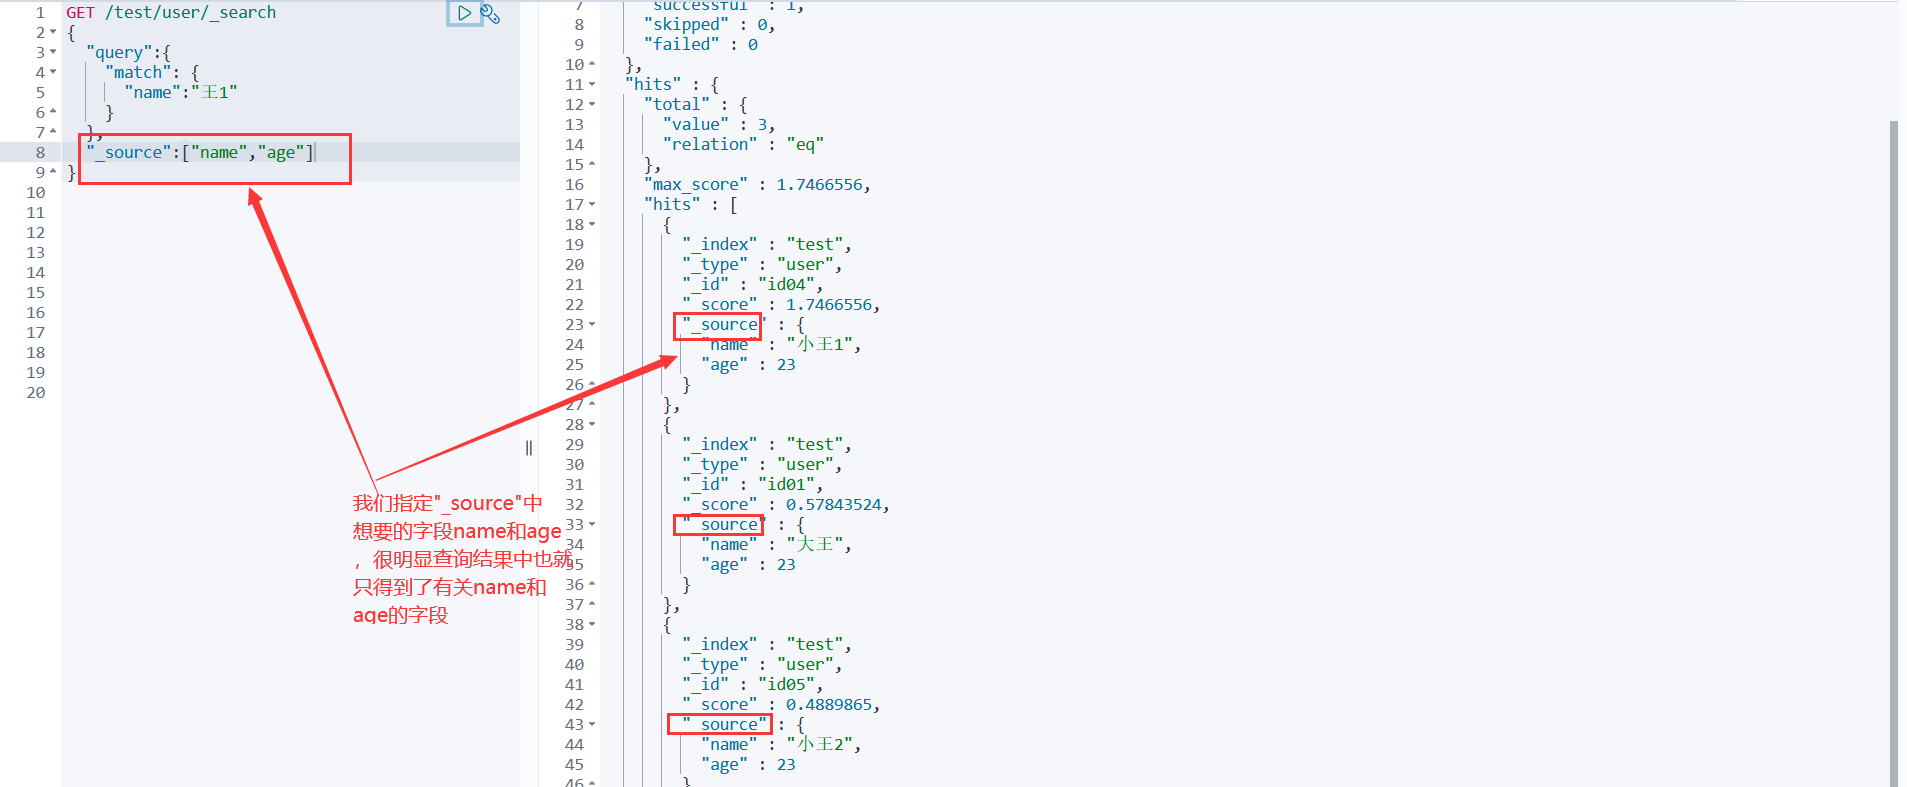
方式三:做排序 sort order
GET /test/user/_search
{
"query":{
 "match": {
   "name":"王1"
 }
},
"_source":"age"
,
"sort":[              #排序
 {
   "age":{           #按年龄排序
     "order":"asc"   #asc做升序排序。desc做降序排序
   }}]
}
方式四:分页查询 from size
GET /test/user/_search
{
"query":{
 "match": {
   "name":"王1"
 }},
"_source":"age"
,
"sort":[
 {
   "age":{
     "order":"asc"
   }}],
"from":0,      #相当于sql语句中limit中的第一个参数
"size":2       #相当于sql语句中limit中的第二个参数
}
#form 和 size 在java中给定就是对应到 new 对象().form
**方式五:布尔值查询 ** must must_not should 实现多条件查询
GET /test/user/_search
{
"query":{
 "bool": {
   "must": [             #must相当于sql语句中的and,要求name和age都要匹配的文档
     {                   #must_not相当于sql语句中的!=,不满足满足name和age 的文档
       "match": {        #should相当于sql语句中的or,满足name和age其中一个即可的文档
         "name": "大王"
       }
     },
     {
       "match": {
         "age": "23"
       }}]}}}
**方式五:过滤器 ** filter
GET /test/user/_search
{
"query":{
 "bool": {
   "must": [
     {
       "match": {
         "name": "王"
       }}],
   "filter": [         #过滤
     {
       "range": {      #范围
         "age": {      #指定年龄字段
           "gte": 10,  #大于等于10岁  gt->大于
           "lte": 20   #小于等于20岁  lt->小于
         }}}]}}}
**方式六:精确查询 ** term

#如果通过mapping定义了字段的数据类型,定义为text数据类型的字段支持分词查询,定义为keyword数据类型的字段不支持分词查询
GET /test/user/_search
{
"query":{
 "term": {      #term对于keyword数据类型的字段,不会分词(为王和刚),直接查询(王刚)匹配的文档
   "name":"王刚"
 }}}
方式七:多个值匹配精确查询
POST /test/_search
{
  "query": {
    "bool": {
      "should": [
        {
          "term": {
            "age": 22
          }
        },
         {
          "term": {			#精确匹配多个值的查询
            "age": 23
          }}] }}}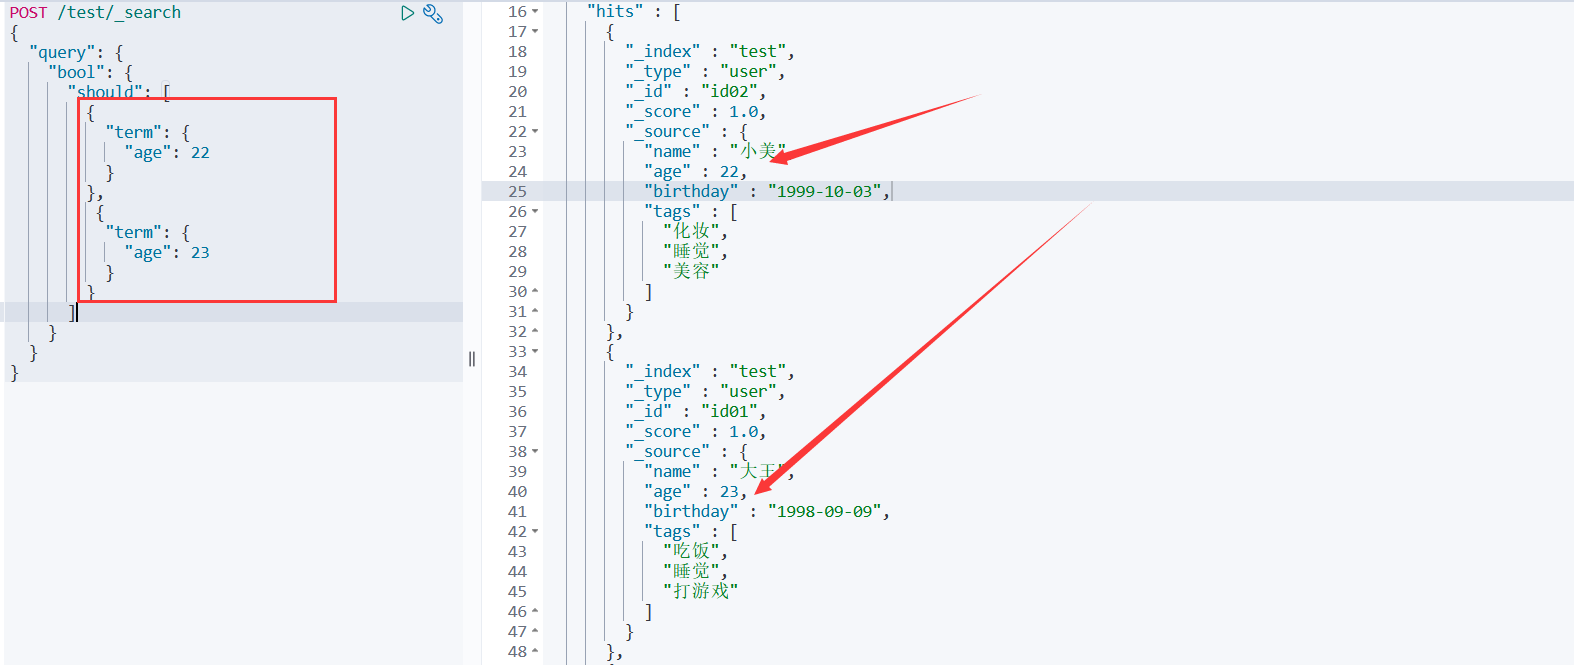
高亮查询!
GET /test/user/_search
{
  "query":{
    "match": {
      "name": "王"
    }
  },
  "highlight":{    #highlight开启高亮模式,对于java中的一个对象
    "pre_tags": "<p class='key' style='color:red'>", #自定义高亮模式标签
    "post_tags": "<p/>", #指定自定义的标签
    "fields": {	  #指定高亮模式的字段,所查询的字段数据默认会被em标签诠释而高亮,否则以自定义标签诠释
      "name": {}
    }}}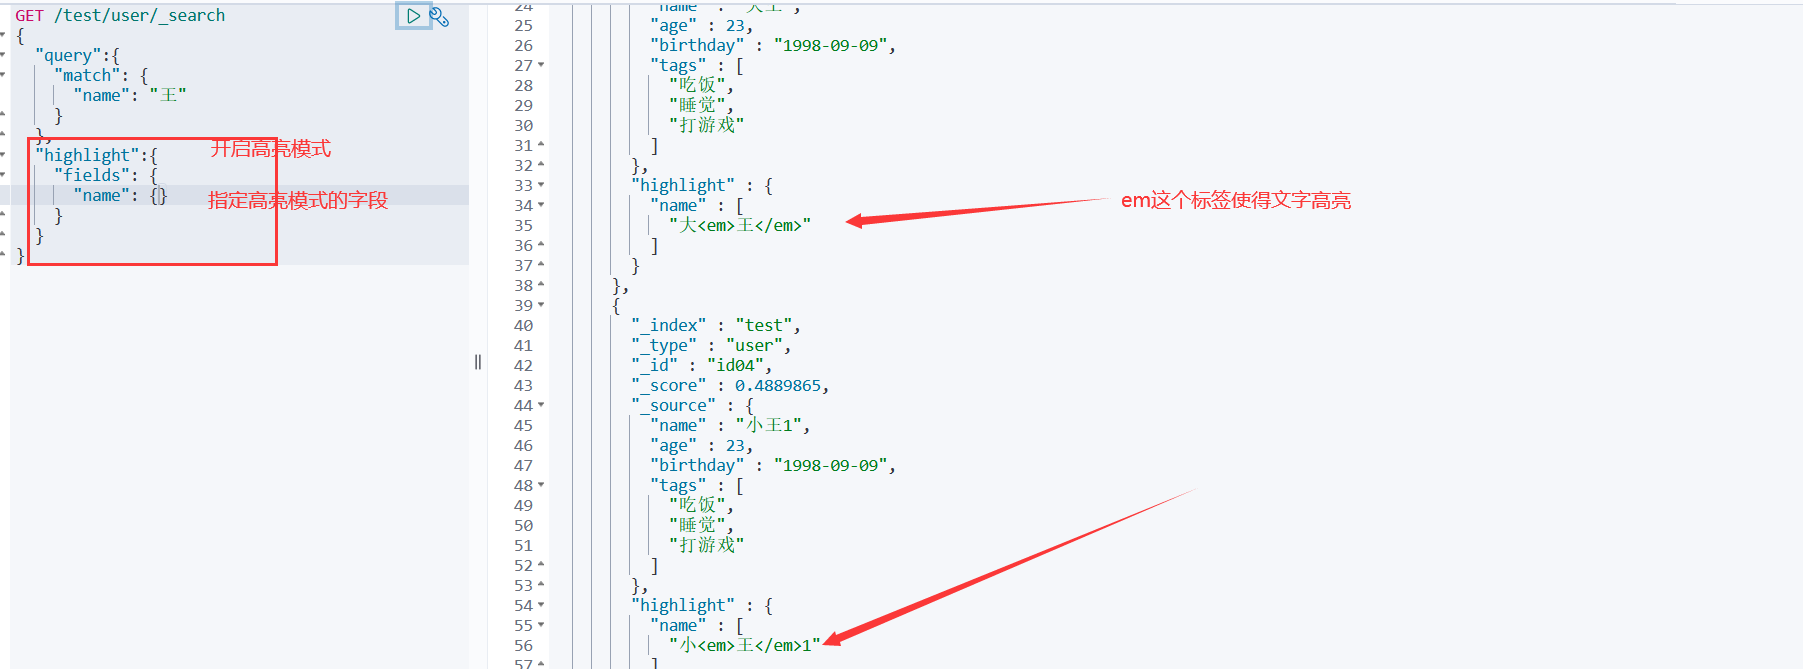
10、SpringBoot集成es
es客户端(Restful风格)官方文档
https://www.elastic.co/guide/en/elasticsearch/client/java-rest/master/java-rest-high.html按官方文档进行以下步骤:
步骤一:找maven依赖
<dependency> <groupId>org.elasticsearch.client</groupId> <artifactId>elasticsearch-rest-high-level-client</artifactId> <version>8.0.0</version> </dependency>步骤二:找对象
RestHighLevelClient client = new RestHighLevelClient(
        RestClient.builder(
                new HttpHost("localhost", 9200, "http"),
                new HttpHost("localhost", 9201, "http"))); //集群的话构建多个
client.close();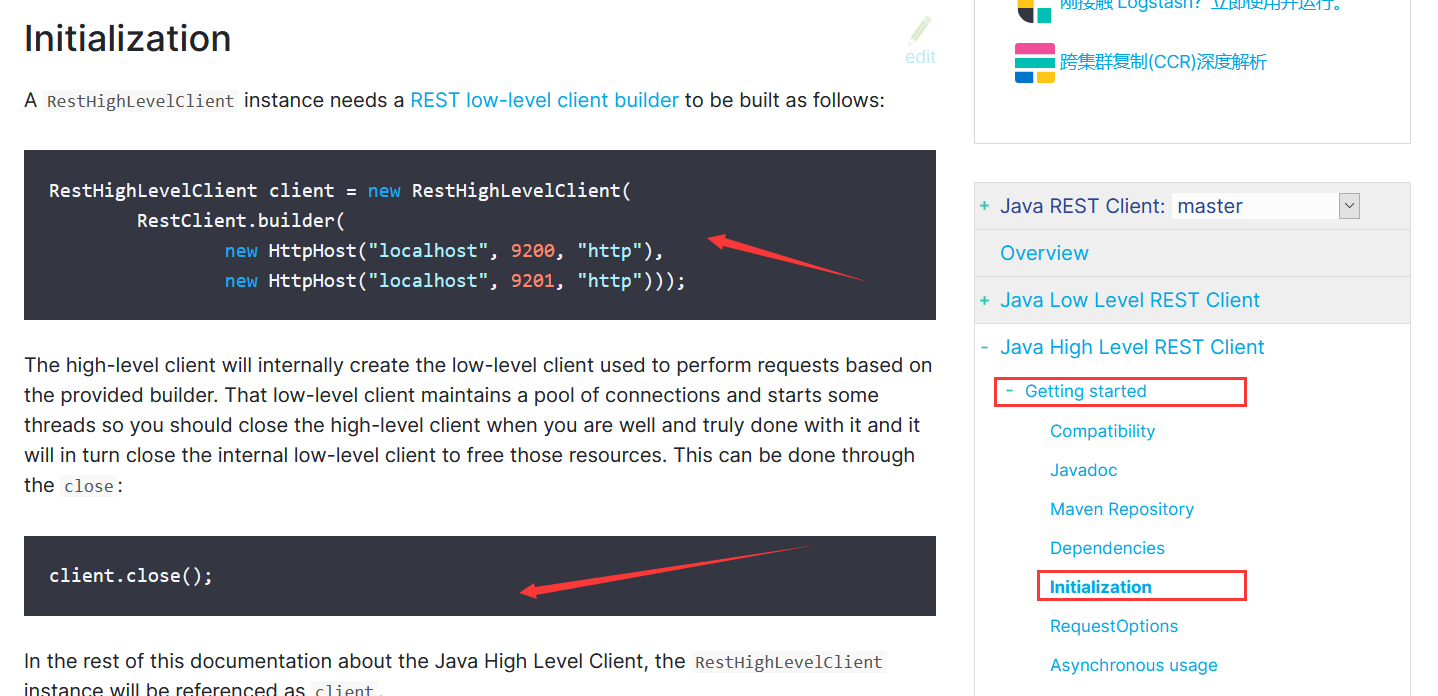
步骤三:分析类中的方法
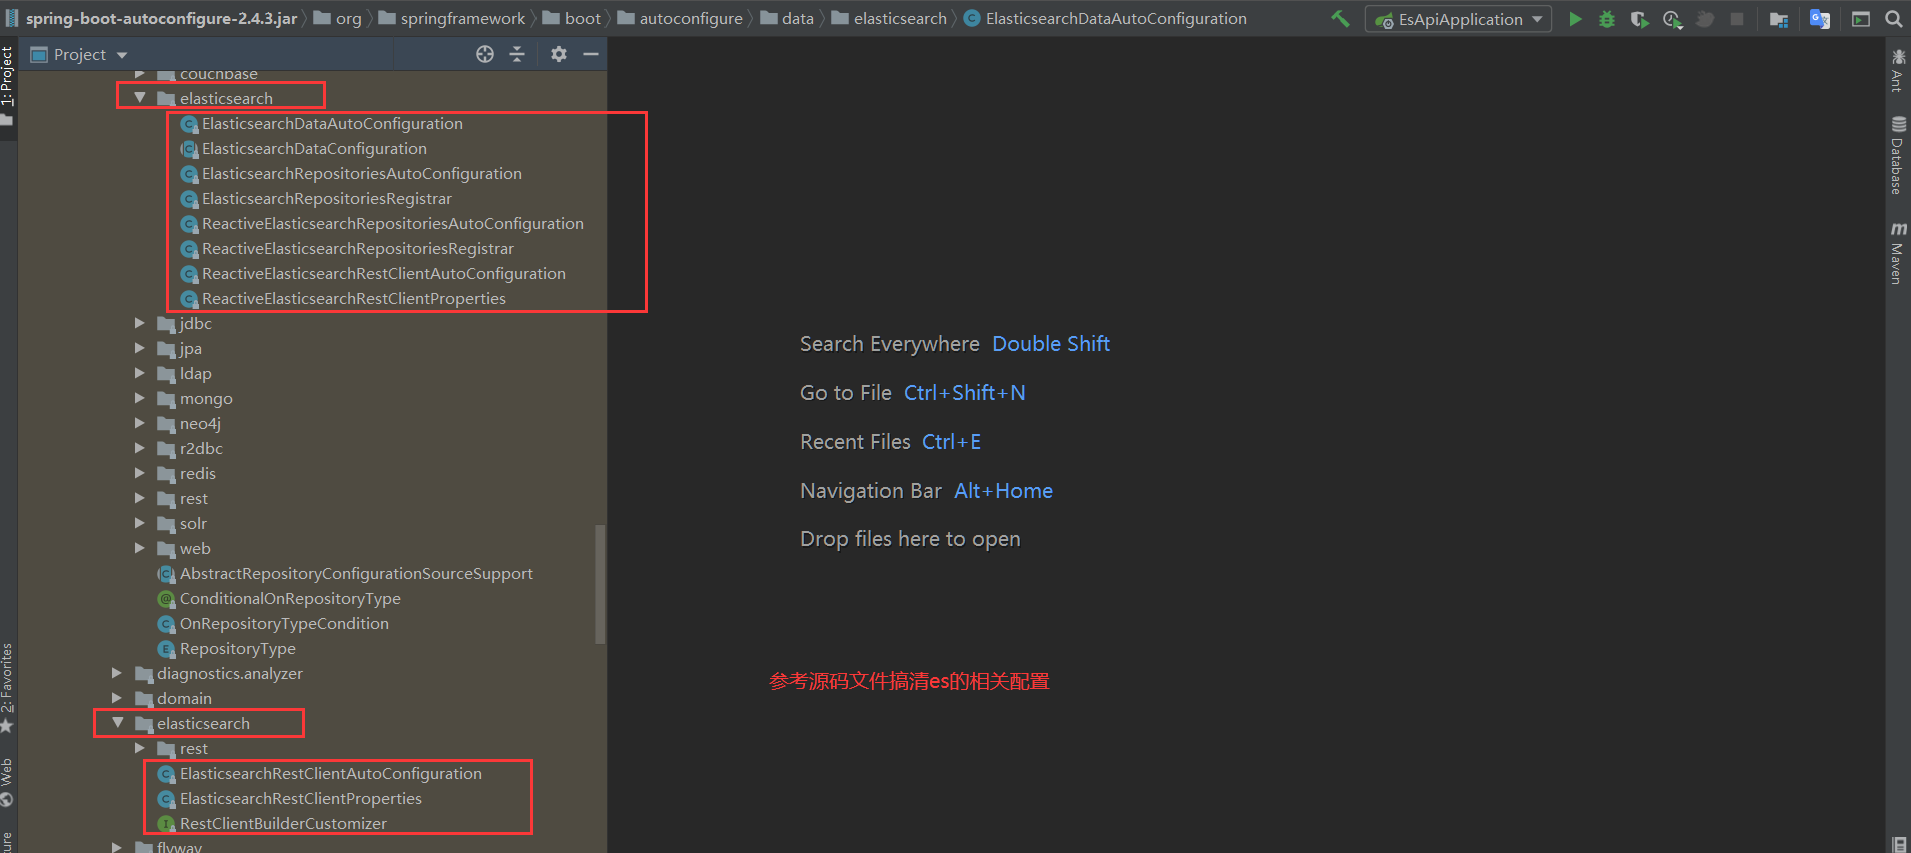
//es配置文件
@Configuration
public class ElasticSearchConfig {
    @Bean
    public RestHighLevelClient restHighLevelClient(){
        RestHighLevelClient client = new RestHighLevelClient(
                RestClient.builder(
                        new HttpHost("localhost", 9200, "http")));
         return client;
    }
}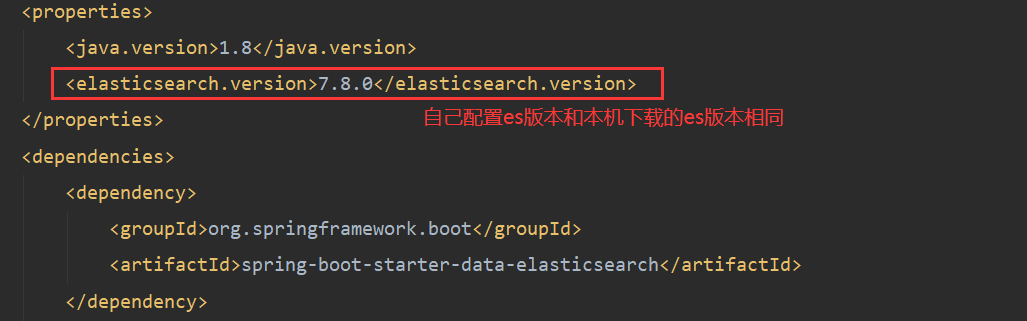
11、关于索引API的操作
@SpringBootTest
class EsApiApplicationTests {
@Autowired
@Qualifier("restHighLevelClient")
RestHighLevelClient client;
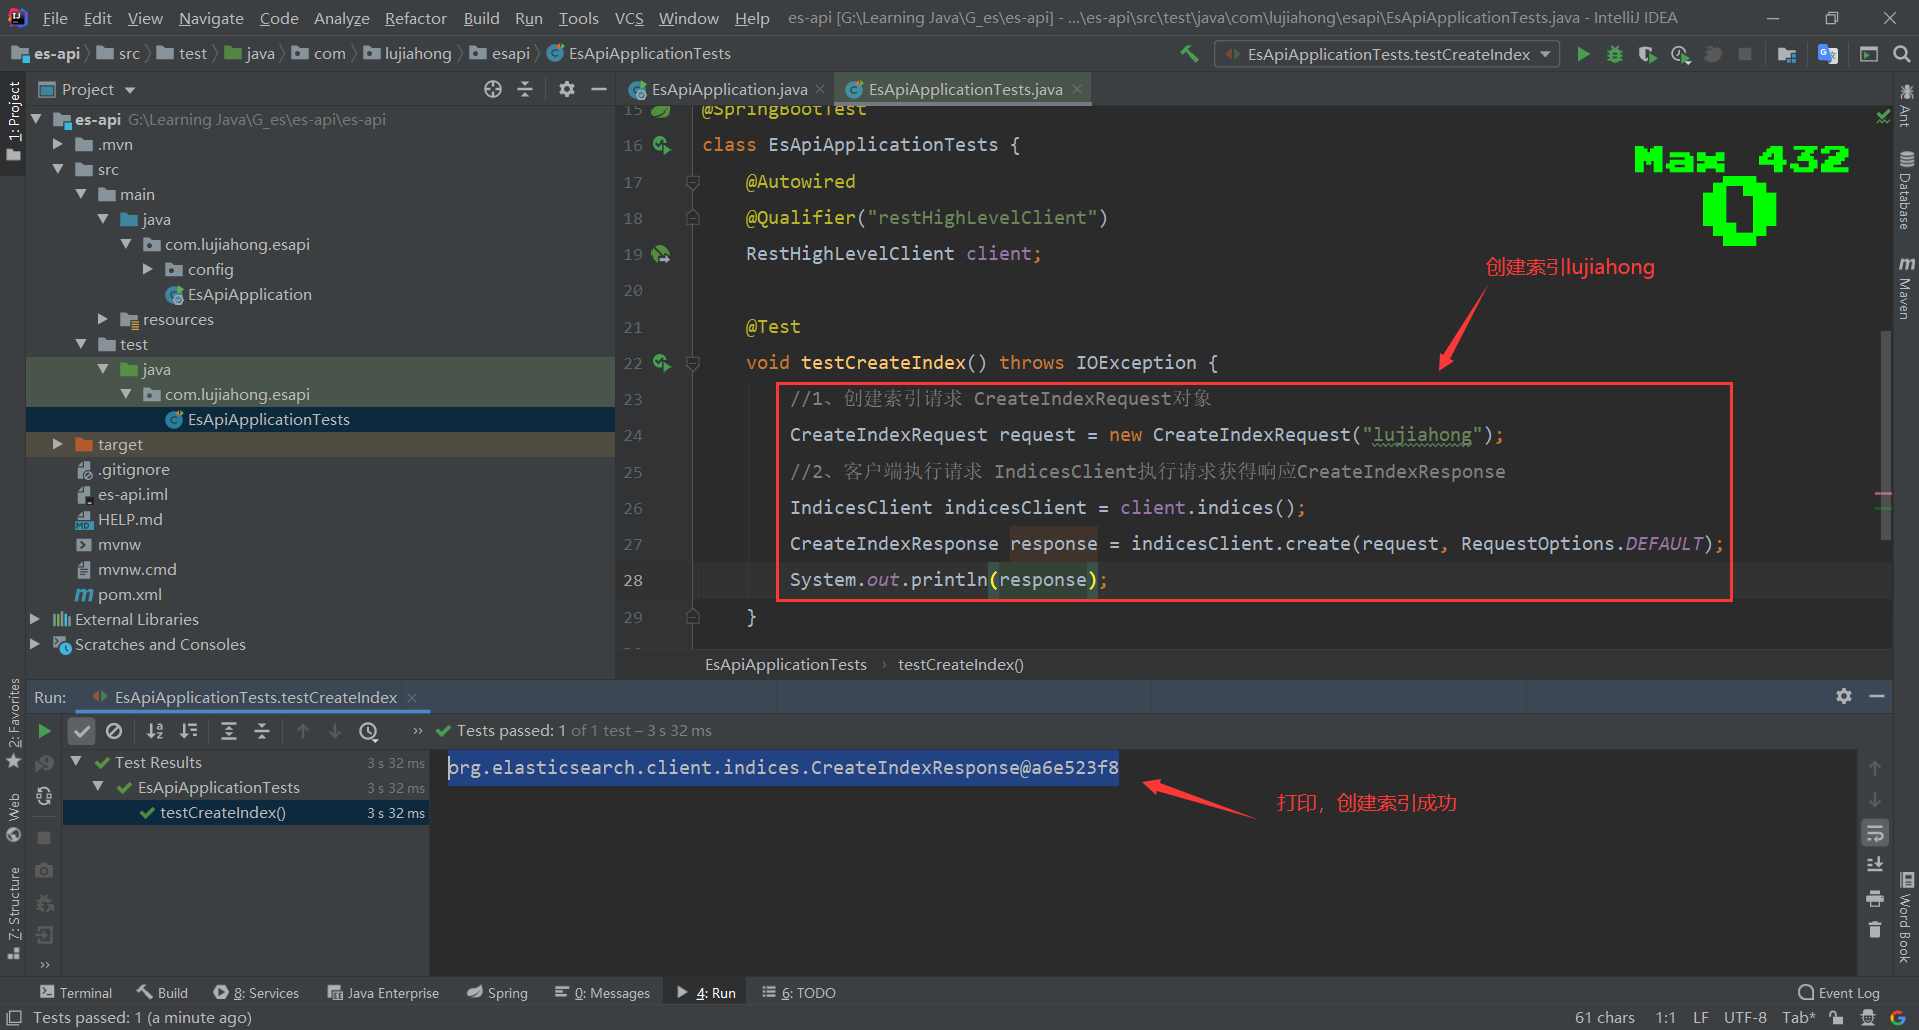
//1、测试索引的创建 形如devtool中的:PUT /lujiahong
@Test
void testCreateIndex() throws IOException {
//1、创建索引请求 CreateIndexRequest对象
CreateIndexRequest request = new CreateIndexRequest("lujiahong");
//2、客户端执行请求 IndicesClient执行请求获得响应CreateIndexResponse
IndicesClient indicesClient = client.indices();
CreateIndexResponse response = indicesClient.create(request, RequestOptions.DEFAULT);
System.out.println(response.isAcknowledged());
}
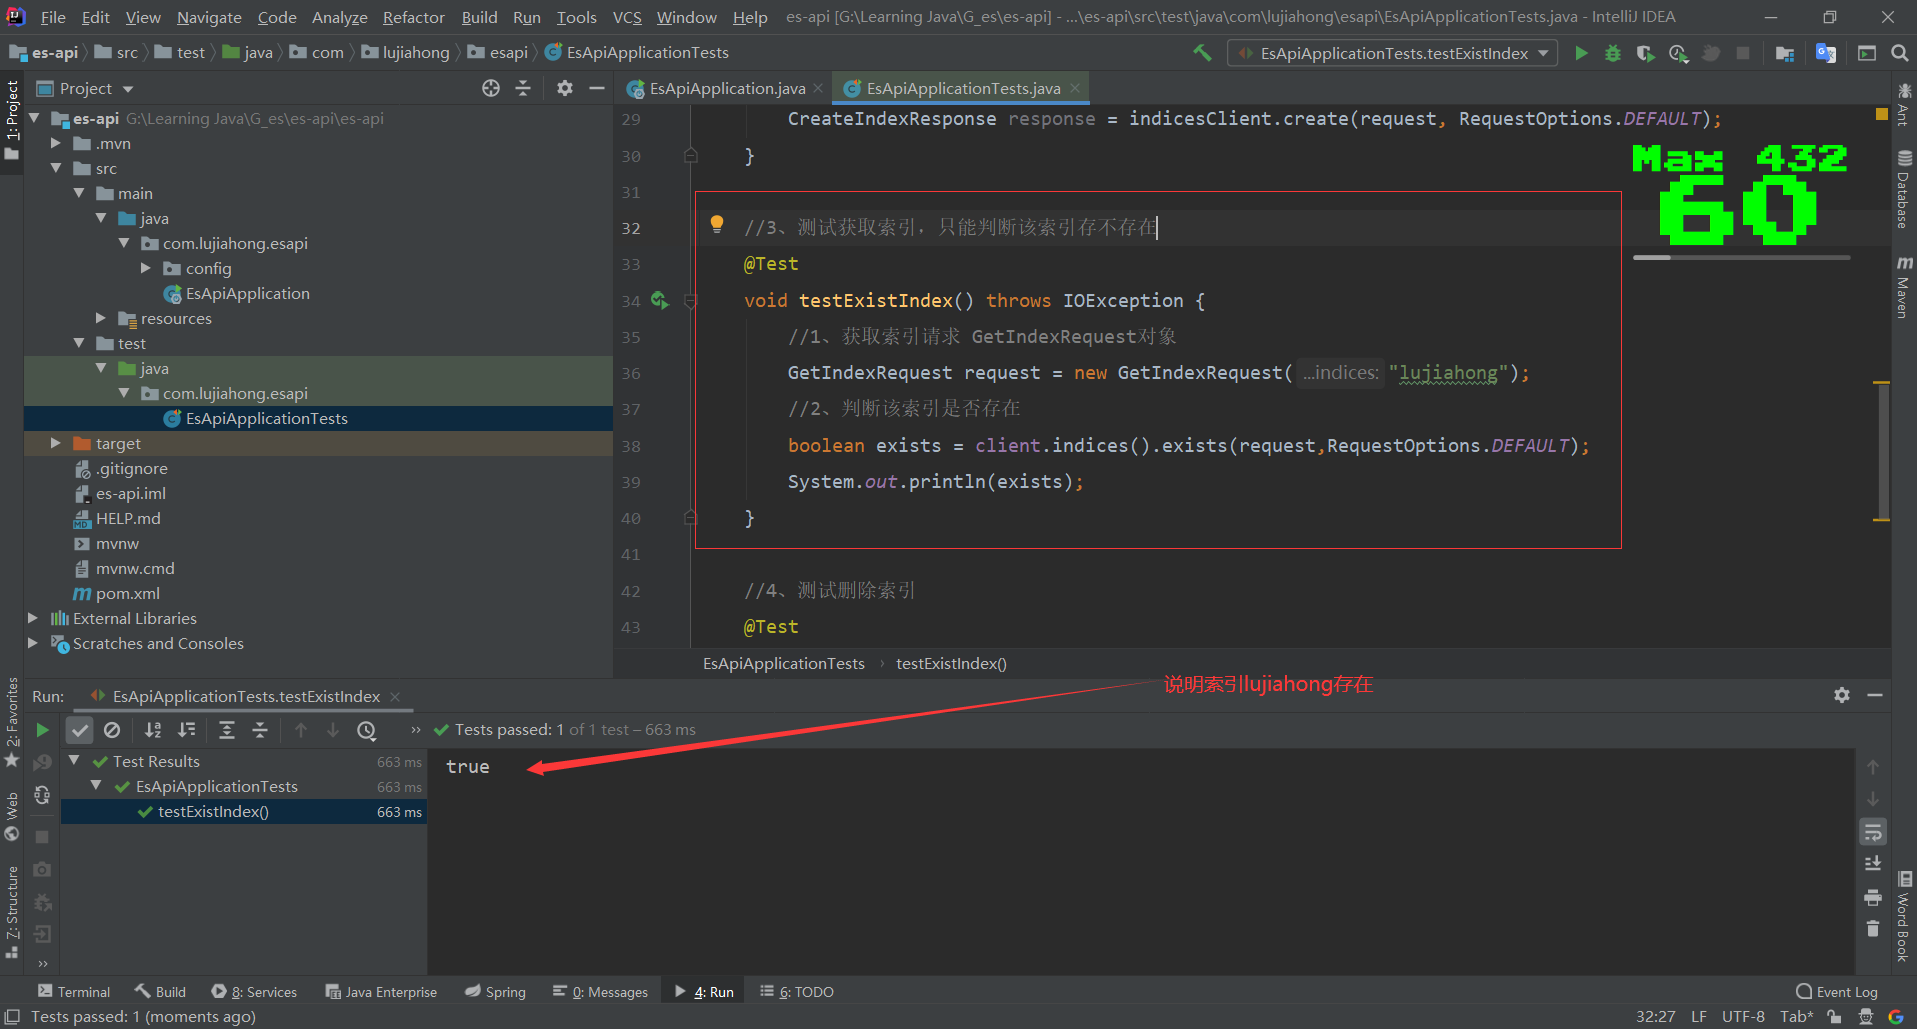
//2、测试获取索引,只能判断该索引存不存在 形如devtool中的:GET /lujiahong
@Test
void testExistIndex() throws IOException {
//1、获取索引请求 GetIndexRequest对象
GetIndexRequest request = new GetIndexRequest("lujiahong");
//2、判断该索引是否存在
boolean exists = client.indices().exists(request,RequestOptions.DEFAULT);
System.out.println(exists);
}
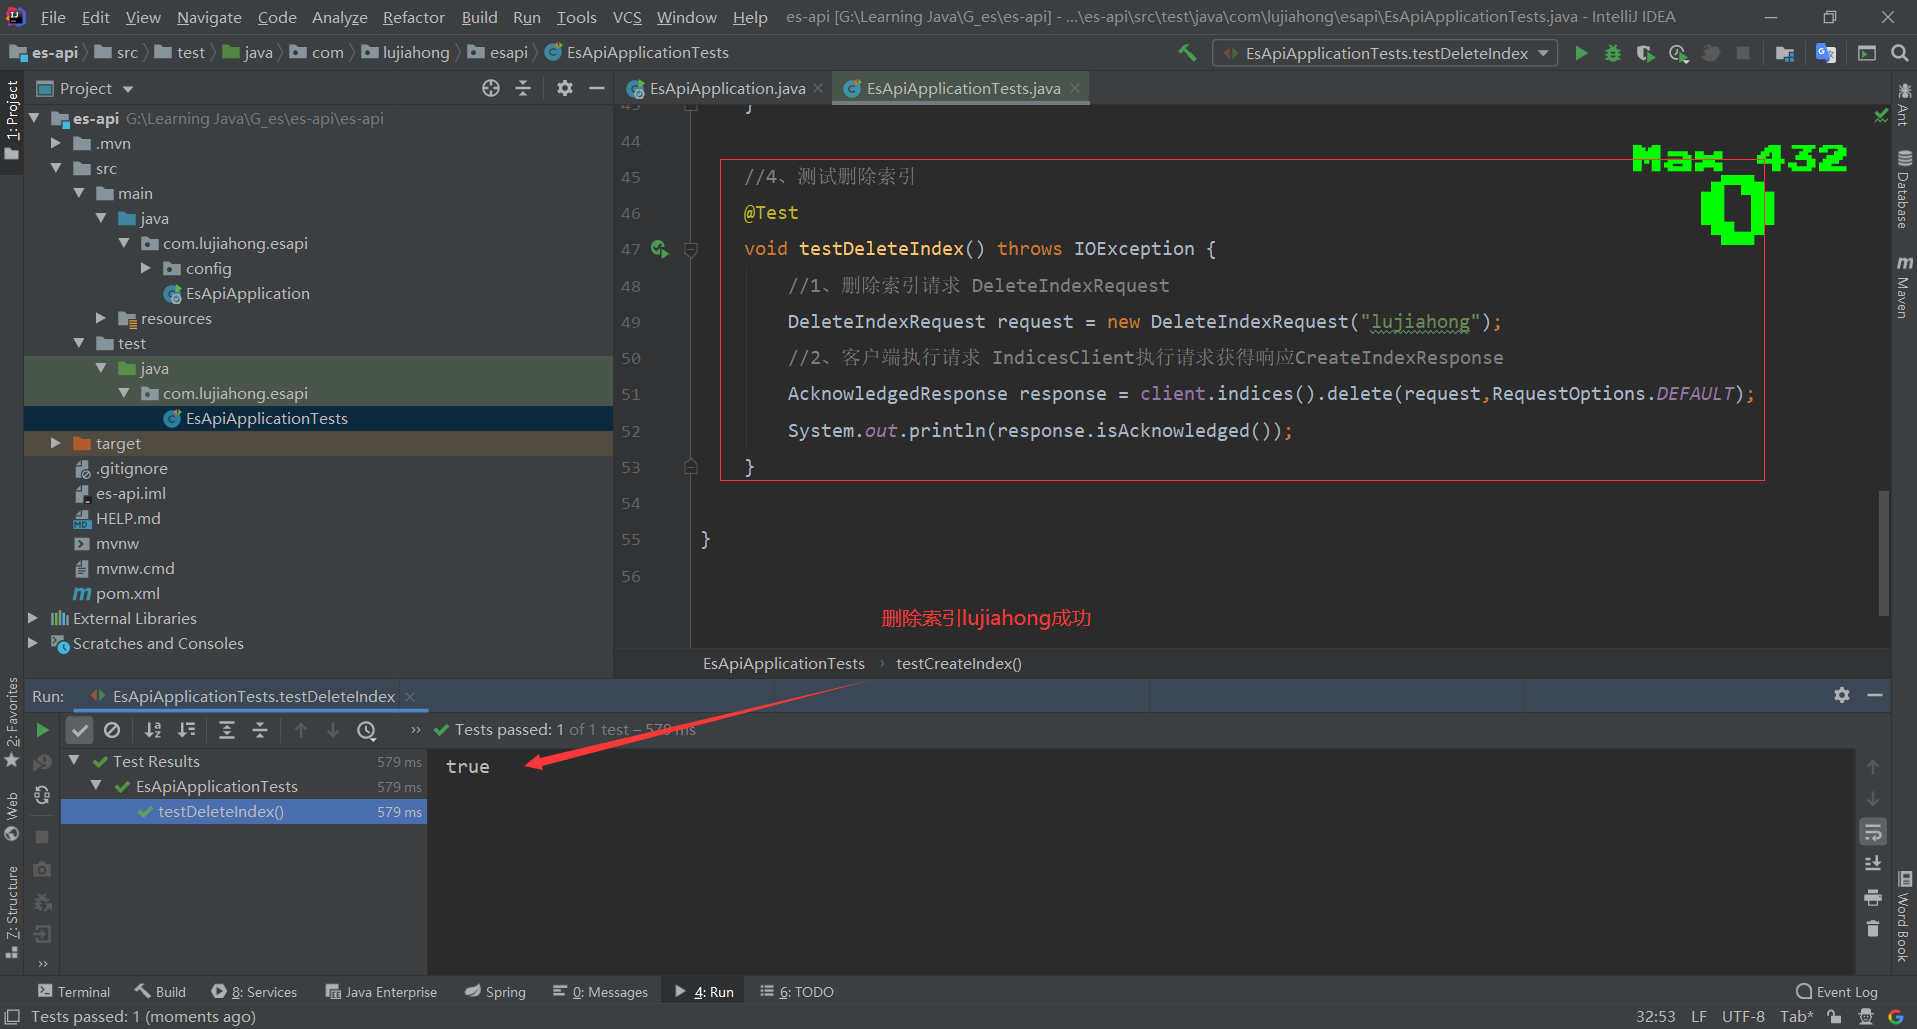
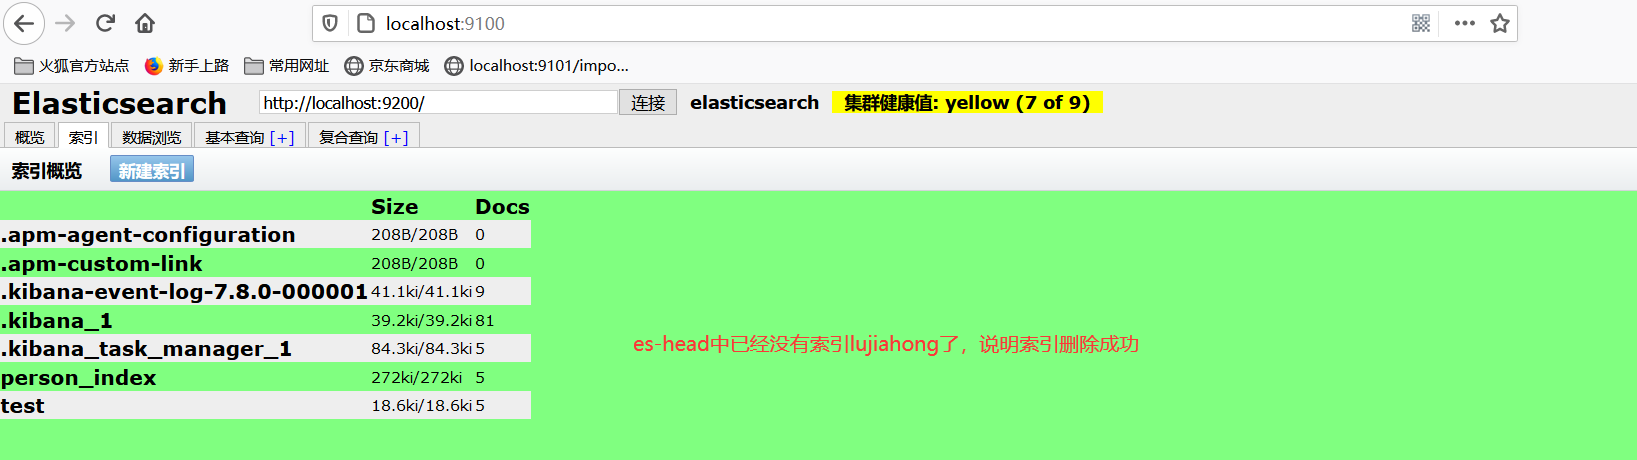
//3、测试删除索引 形如devtool中的:DELETE /lujiahong
@Test
void testDeleteIndex() throws IOException {
//1、删除索引请求 DeleteIndexRequest
DeleteIndexRequest request = new DeleteIndexRequest("lujiahong");
//2、客户端执行请求 IndicesClient执行请求获得响应CAcknowledgedResponse
AcknowledgedResponse response = client.indices().delete(request,RequestOptions.DEFAULT);
System.out.println(response.isAcknowledged());
}
//4、测试添加文档 形如devtool中的:PUT /lujiahong/_doc/文档id
@Test
void testAddDoc() throws IOException {
//1、创建User对象
User user = new User("小王",22);
//2、创建请求
IndexRequest request = new IndexRequest("lujiahong");
//3、设置文档id
request.id("001");
//4、超时设置
request.timeout(TimeValue.timeValueSeconds(1));
//5、将数据放入请求json格式
request.source(JSON.toJSONString(user), XContentType.JSON);
//6、客户端发送请求,获取响应结果
IndexResponse response = client.index(request,RequestOptions.DEFAULT);
//7、对应命令返回的状态
System.out.println(response.status());
//8、对应命令返回的数据
System.out.println(response.toString());
}
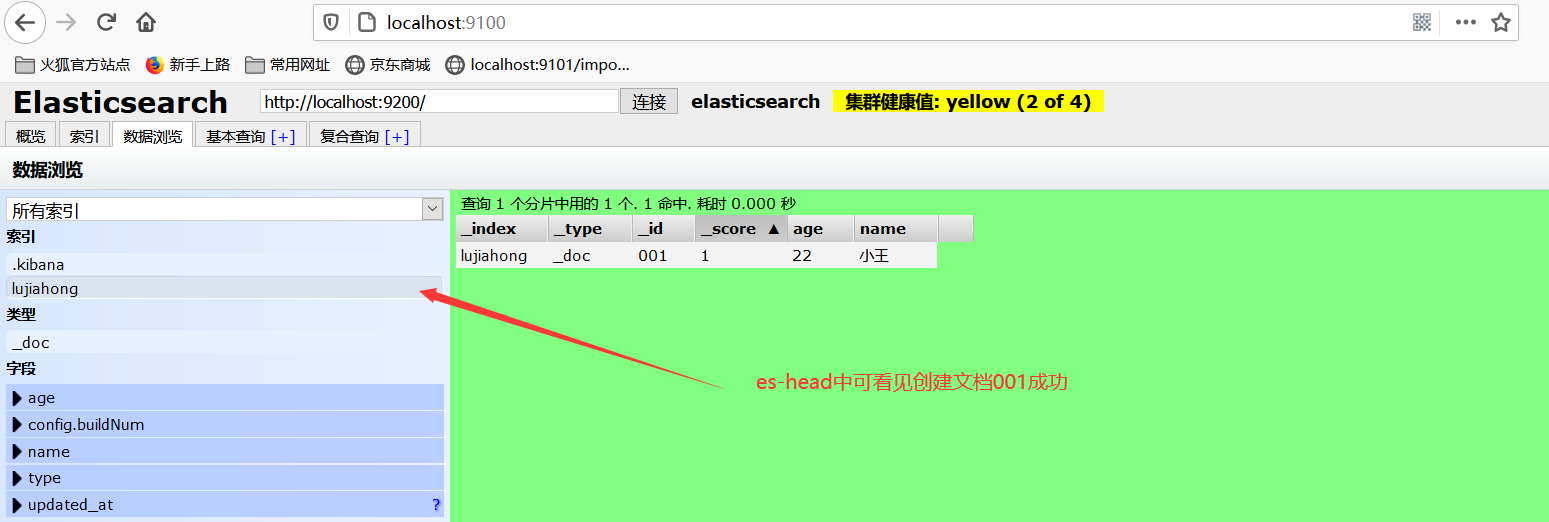
//5、测试获取文档 形如devtool中的:GET /lujiahong/_doc/001
@Test
void testExistDoc() throws IOException {
//1、获取文档请求 GetRequest对象
GetRequest request = new GetRequest("lujiahong","001");
//2、此设置不获取返回的_source的上下文
request.fetchSourceContext(new FetchSourceContext(false));
//3、判断该文档是否存在
boolean exists = client.exists(request,RequestOptions.DEFAULT);
//4、获取文档信息
GetResponse response = client.get(request,RequestOptions.DEFAULT);
System.out.println(exists);
System.out.println(response);
System.out.println(response.getSourceAsString());
}
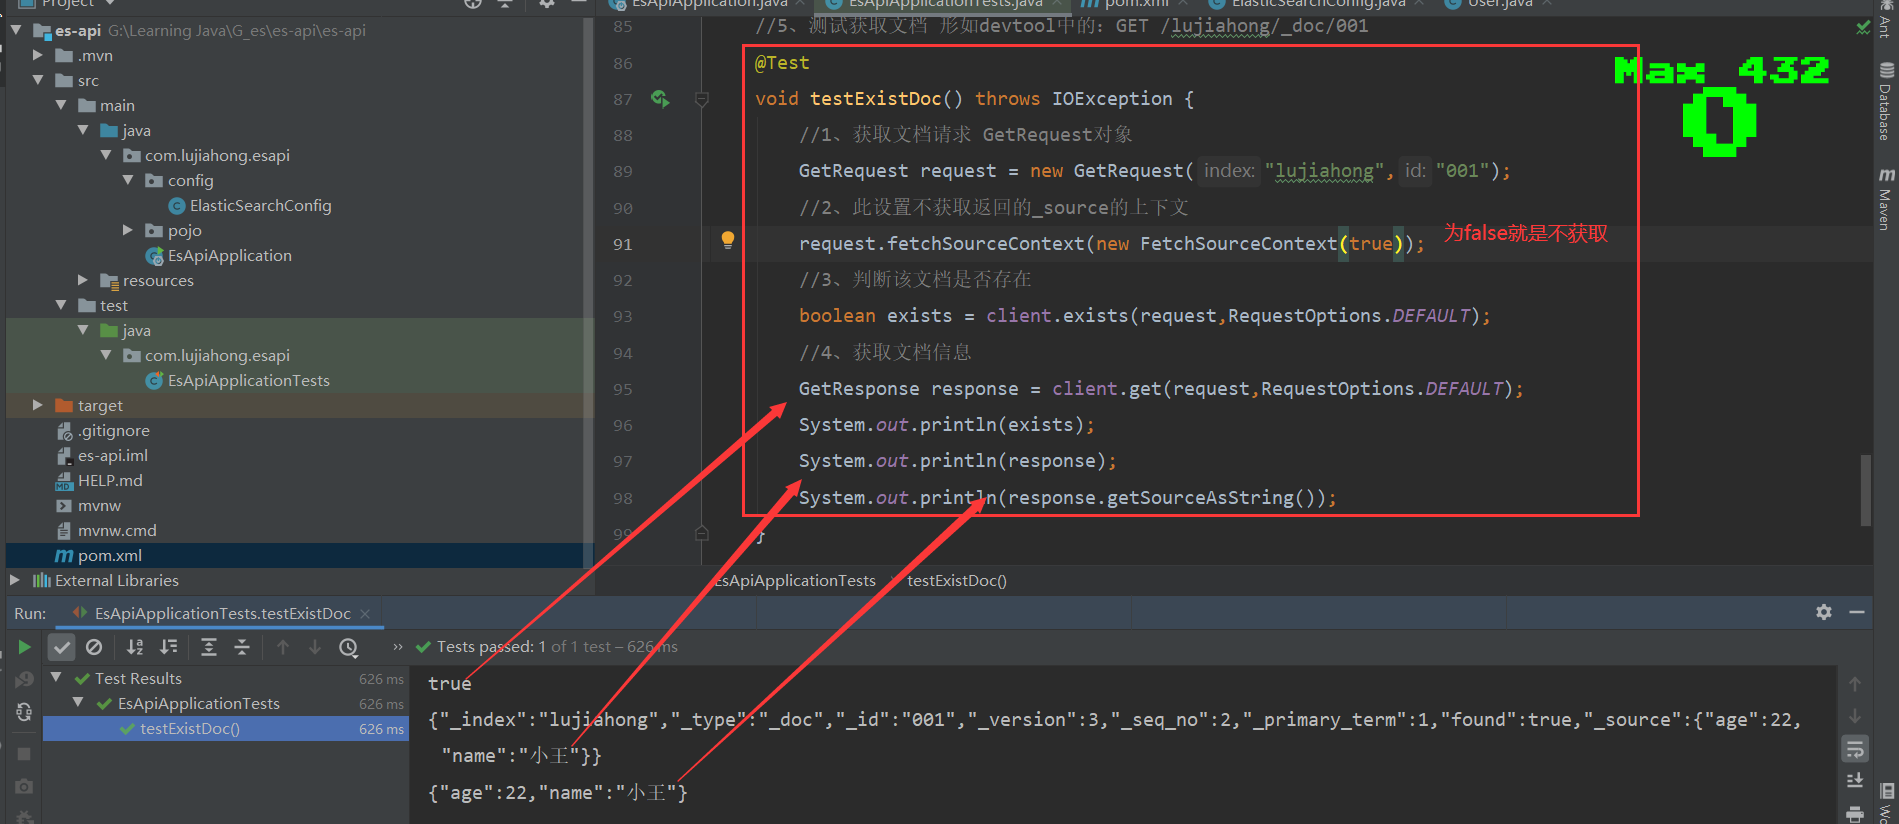
//5、测试修改文档 形如devtool中的:UPDATE /lujiahong/_doc/001
@Test
void testUpdateDoc() throws IOException {
//1、获取要修改文档请求 UpdateRequest对象
UpdateRequest request = new UpdateRequest("lujiahong","001");
//2、超时设置
request.timeout("1s");
//3、更新对象
User user = new User("大王",33);
//4、更新数据放入请求,XContentType.JSON告诉它我传入的是一个json数据
request.doc(JSON.toJSONString(user),XContentType.JSON);
//5、获取响应
UpdateResponse response = client.update(request,RequestOptions.DEFAULT);
System.out.println(response.status());
}
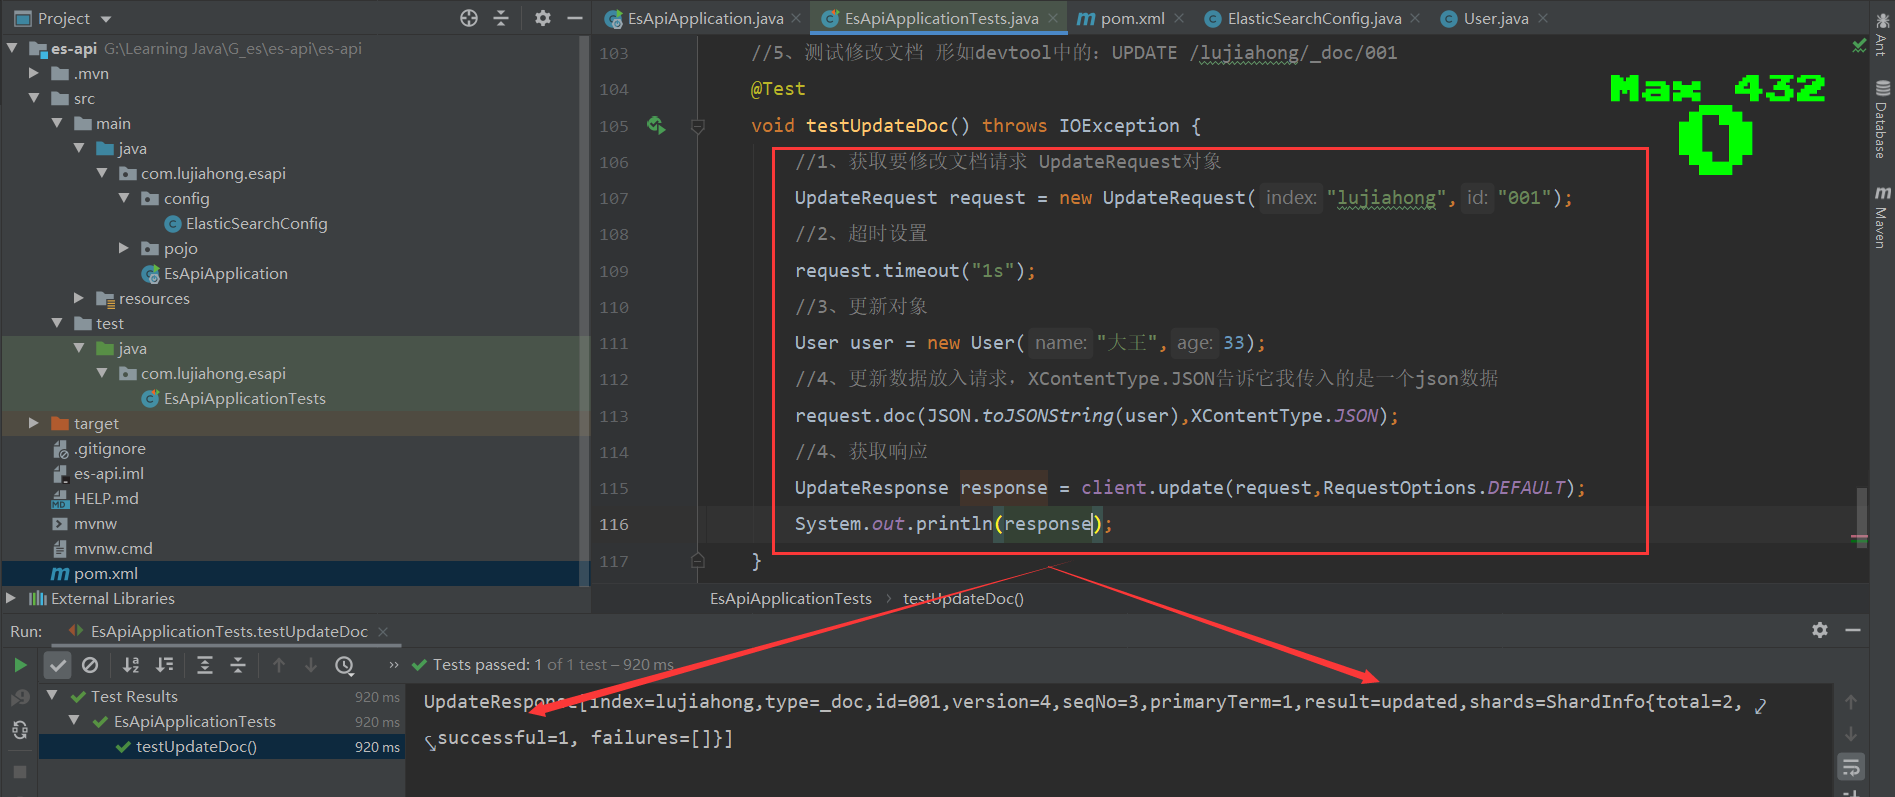
//6、测试删除文档 形如devtool中的:DELETE /lujiahong/_doc/001
@Test
void testDeleteDoc() throws IOException {
//1、获取求 DeleteRequest对象
DeleteRequest request = new DeleteRequest("lujiahong","001");
//2、超时设置,超过1s就不执行删除操作了
request.timeout("1s");
//3、获取响应
DeleteResponse response = client.delete(request,RequestOptions.DEFAULT);
System.out.println(response.status());
}
//7、批量添加文档
@Test
void testBulkRequest() throws IOException {
//1、获取求 BulkRequest对象
BulkRequest request = new BulkRequest("lujiahong");
//2、超时设置,超过10s就不执行删除操作了
request.timeout("10s");
//3、集合数据
List<User> list = new ArrayList<>();
for(int i=0; i<10; i++){
list.add(new User("大鳄"+i,20+i));
}
//4、添加数据
//这里的es中的_id,为方便后期的修改和删除指定文档,若es的索引里面存的是数据库里面的数据,建议把_id设置为所添加数据的数据库主键id
for(int i=0; i<list.size(); i++){
request.add(new IndexRequest("lujiahong")
.id(String.valueOf(i+1))//id可以不指定,会随机生成id
.source(JSON.toJSONString(list.get(i)), XContentType.JSON));
}
//3、获取响应
BulkResponse response = client.bulk(request,RequestOptions.DEFAULT);
System.out.println(response.hasFailures());
}
//8、批量查看文档
@Test
void testSearchRequest() throws IOException {
//1、获取求 SearchRequest对象
SearchRequest request = new SearchRequest("lujiahong");
//2、构建搜索条件
SearchSourceBuilder builder = new SearchSourceBuilder();
//精确匹配,通过工具类QueryBuilders来实现,详细查看文档https://blog.csdn.net/qq_28114159/article/details/106359213
TermQueryBuilder termQueryBuilder = QueryBuilders.termQuery("name","大");
builder.query(termQueryBuilder);
//分页
builder.from(0).size(5);
builder.timeout(new TimeValue(60, TimeUnit.SECONDS));
//3、把查询条件放入request
request.source(builder);
//4、获取响应
SearchResponse response = client.search(request,RequestOptions.DEFAULT);
SearchHits value = response.getHits();
System.out.println(JSON.toJSONString(value));
for(SearchHit documentFields:value.getHits()){
System.out.println(documentFields.getSourceAsMap());
}
}
}1、测试创建索引
2、测试获取索引
3、测试删除索引
12、关于文档API的操作
//引入User实体类
@Data
@AllArgsConstructor
@NoArgsConstructor
public class User {
    private String name;
    private int age;
}
<!--es存入的是json格式数据,引入阿里巴巴fastjson-->
<dependency>
<groupId>com.alibaba</groupId>
<artifactId>fastjson</artifactId>
<version>1.2.75</version>
</dependency>1、测试创建文档 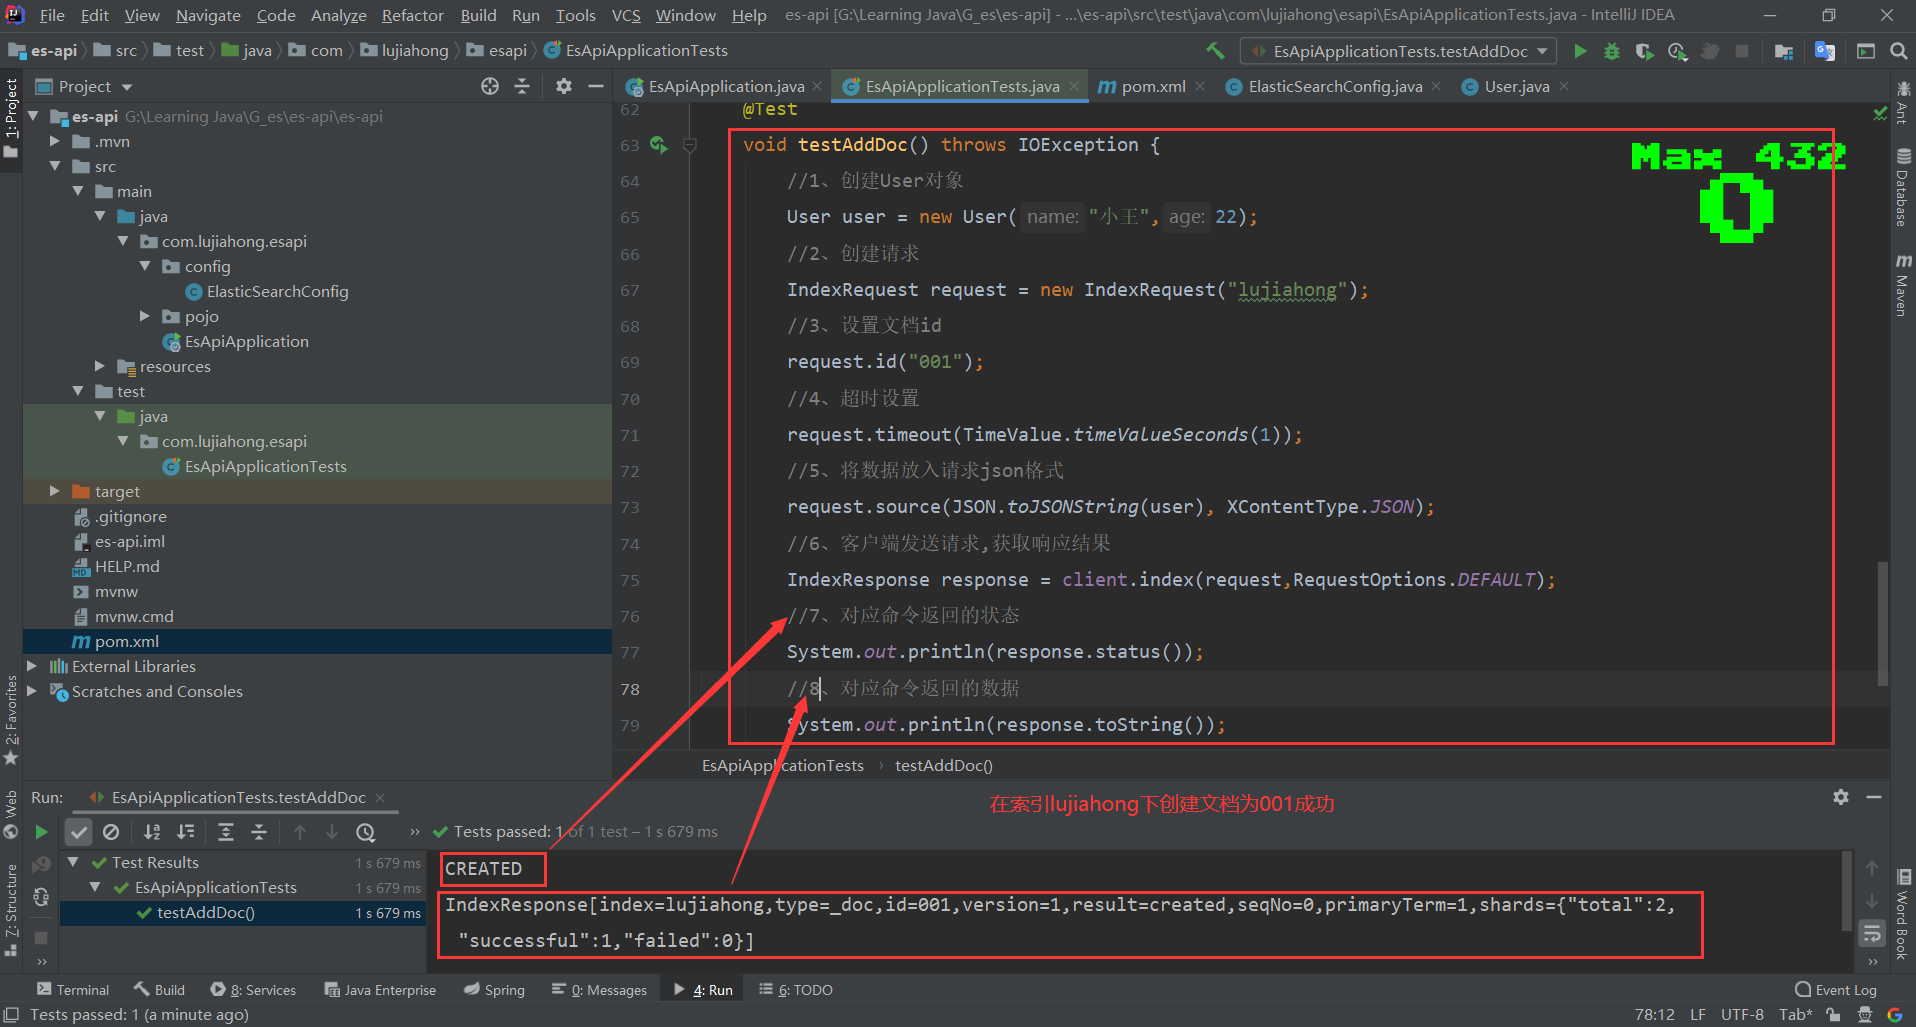
2、测试查看文档
3、测试修改文档
4、测试删除文档
5、测试批量添加文档

6、测试批量查看文档
/精确匹配,通过工具类QueryBuilders来实现,详细查看文档
https://blog.csdn.net/qq_28114159/article/details/106359213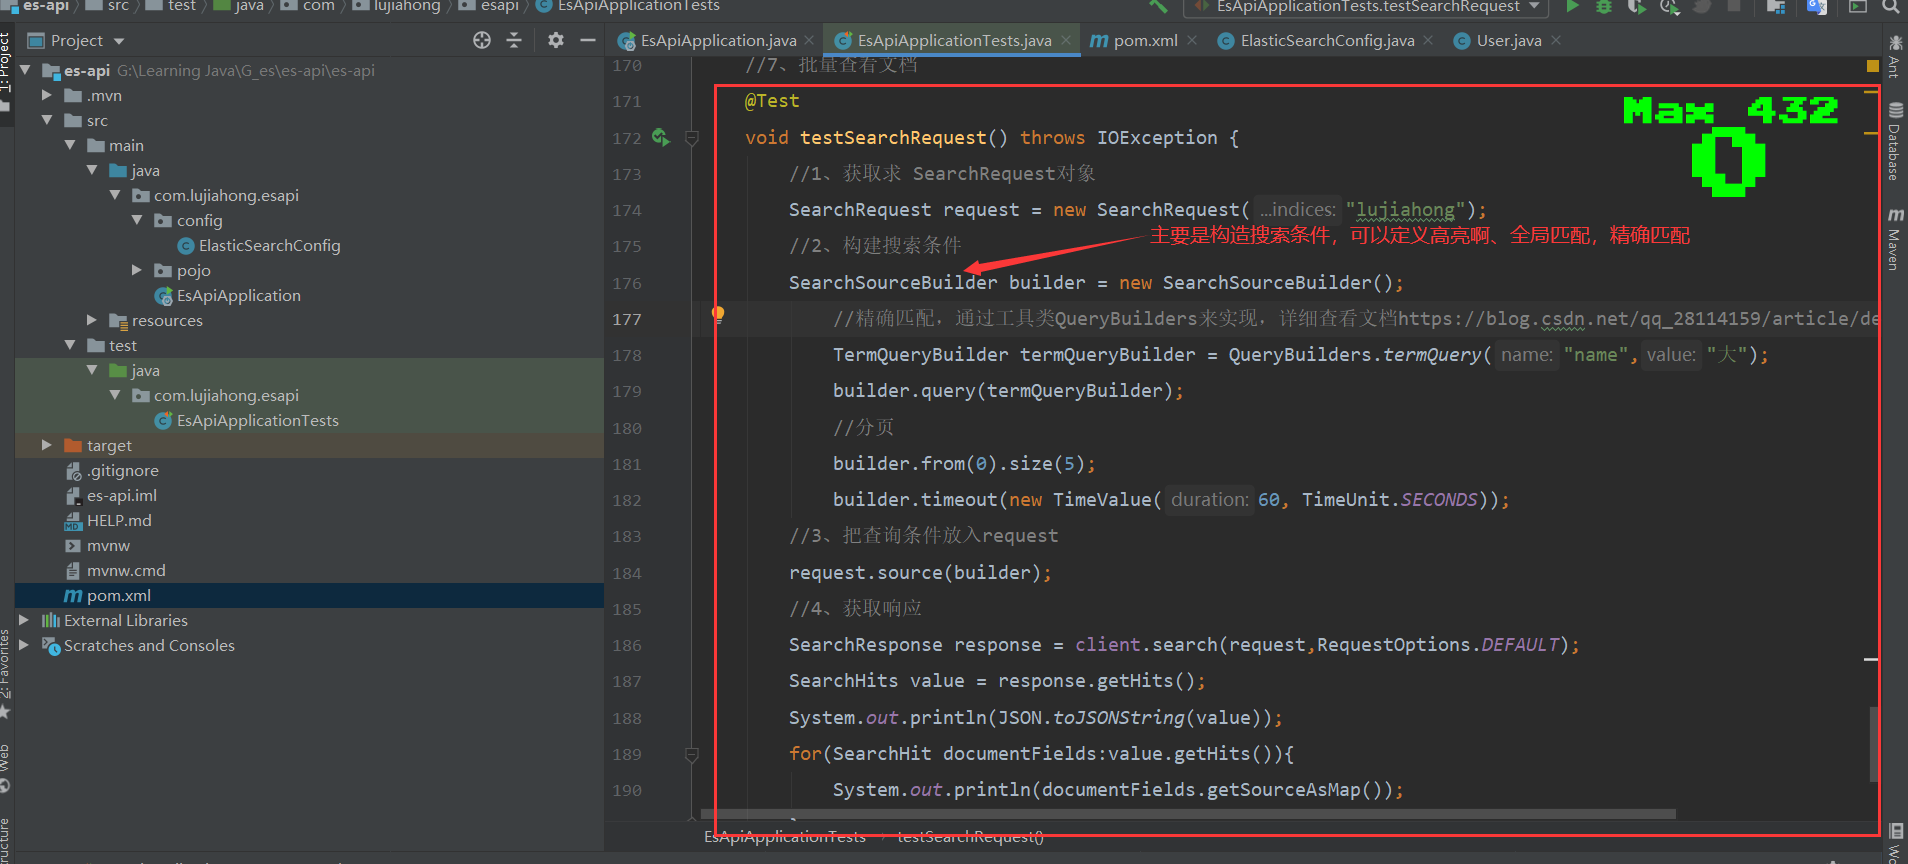
13、实战
1、项目搭建
2、爬虫
爬虫——爬取数据(获取请求返回的页面信息,筛选出我们想要的数据就可以了),java中通过jsoup包,导入下方依赖即可
<!--解析网页用jsoup,解析视频用tika-->
<dependency>
	<groupId>org.jsoup</groupId>
	<artifactId>jsoup</artifactId>
	<version>1.10.2</version>
</dependency>
/**
* 把爬取的数据封装成一个对象
*/
@Data
@AllArgsConstructor
@NoArgsConstructor
public class Content {
private String title;
private String img;
private String price;
}/**
* 网页解析工具类
*/
@Component
public class HtmlParseUtil {
public static <element> void main(String[] args) throws Exception {
//搜索关于java的网页
HtmlParseUtil.parseJdHtml("java").forEach(System.out::println);
}
public static List<Content> parseJdHtml(String keywords) throws Exception {
//获得请求:
//1、请求地址
String requestURL = "https://search.jd.com/Search?keyword="+keywords;
//2、解析网页(Jsoup返回的Document就是浏览器中的Document对象,满足js里面的所有用法)
Document document = Jsoup.parse(new URL(requestURL),30000);
//3、获取当前浏览器里面数据(id名从浏览器开发者工具获取,下同)
Element element = document.getElementById("J_goodsList");
//4、获取所有的li元素
Elements elements = element.getElementsByTag("li");
//5、获取元素中的内容
List<Content> list = new ArrayList<>();
for(Element el:elements){
//关于图片特别多的网站,所有的图片都是延迟加载的!source-data-lazy-img
String img = el.getElementsByTag("img").eq(0).attr("data-lazy-img");
String price = el.getElementsByClass("p-price").eq(0).text();
String title = el.getElementsByClass("p-name").eq(0).text();
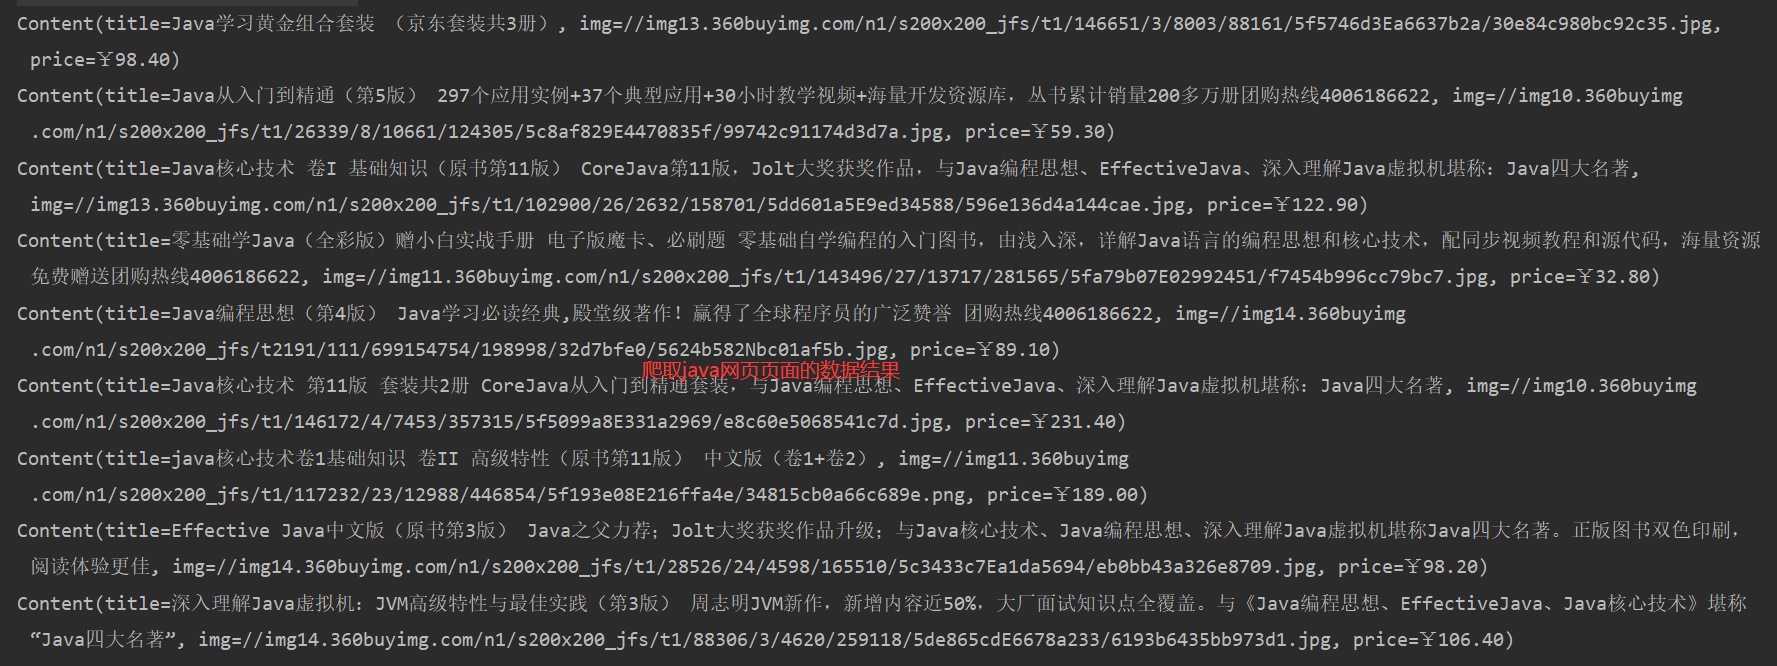
list.add(new Content(title,img,price));
}
return list;
}
}
3、业务编写
ContentService
//解析文档批量放入es索引
Boolean parseContent(String keywords)
//从es索引中读取文档
List<Map<String,Object>> searchPage(String keyWords,Integer pageNo,Integer pageSize)
/**
* 业务编写
*/
@Service
public class ContentService {
@Autowired
@Qualifier("restHighLevelClient")
RestHighLevelClient client;
//1、解析数据放入es索引中
public Boolean parseContent(String keywords) throws Exception {
//创建索引
CreateIndexRequest indexRequest = new CreateIndexRequest("jd_list");
CreateIndexResponse indexResponse = client.indices().create(indexRequest, RequestOptions.DEFAULT);
System.out.println("==================="+indexResponse.isAcknowledged());
//爬取keywords数据
List<Content> list = HtmlParseUtil.parseJdHtml(keywords);
//查询数据放入es中
BulkRequest bulkRequest = new BulkRequest();
bulkRequest.timeout("2m");
//向es索引jd_list中添加文档
for (int i = 0; i < list.size() ; i++) {
bulkRequest.add(new IndexRequest("jd_list").id(String.valueOf(i+1)).source(JSON.toJSONString(list.get(i)), XContentType.JSON));
}
BulkResponse bulkResponses = client.bulk(bulkRequest,RequestOptions.DEFAULT);
return !bulkResponses.hasFailures();
}
//2、获取所解析数据实现搜索功能
public List<Map<String,Object>> searchPage(String keyWords,Integer pageNo,Integer pageSize) throws IOException {
//条件搜索
SearchRequest searchRequest = new SearchRequest("jd_list");
SearchSourceBuilder builder = new SearchSourceBuilder();
//精准匹配
TermQueryBuilder termQueryBuilder = QueryBuilders.termQuery("title",keyWords);
builder.query(termQueryBuilder);
builder.from(pageNo==null?1:pageNo).size(pageSize==null?5:pageSize);
builder.timeout(new TimeValue(60, TimeUnit.SECONDS));
//执行搜索
searchRequest.source(builder);
SearchResponse searchResponse = client.search(searchRequest,RequestOptions.DEFAULT);
//解析结果
List<Map<String,Object>> list = new ArrayList<>();
for (SearchHit documentFields : searchResponse.getHits().getHits()) {
list.add(documentFields.getSourceAsMap());
}
return list;
}
//3、获取所解析数据实现搜索功能——高亮搜索字段
public List<Map<String,Object>> searchPageHighlighter(String keyWords,Integer pageNo,Integer pageSize) throws IOException {
//条件搜索
SearchRequest searchRequest = new SearchRequest("jd_list");
SearchSourceBuilder builder = new SearchSourceBuilder();
//精准匹配
TermQueryBuilder termQueryBuilder = QueryBuilders.termQuery("title",keyWords);
builder.query(termQueryBuilder);
builder.from(pageNo==null?1:pageNo).size(pageSize==null?5:pageSize);
builder.timeout(new TimeValue(60, TimeUnit.SECONDS));
//高亮
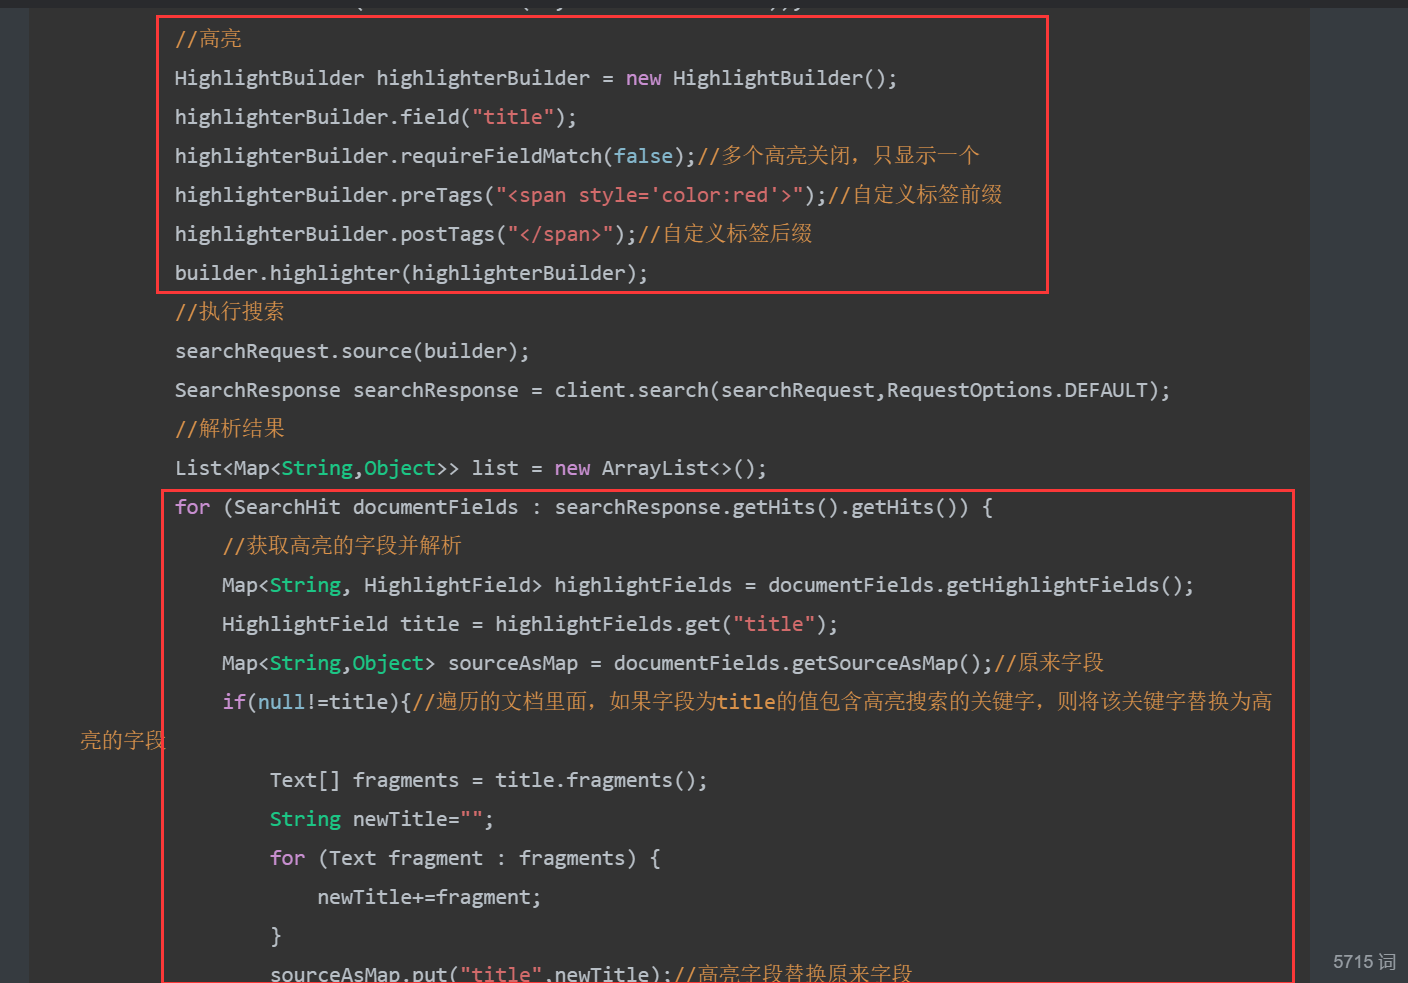
HighlightBuilder highlighterBuilder = new HighlightBuilder();
highlighterBuilder.field("title");
highlighterBuilder.requireFieldMatch(false);//多个高亮关闭,只显示一个
highlighterBuilder.preTags("<span style='color:red'>");//自定义标签前缀
highlighterBuilder.postTags("</span>");//自定义标签后缀
builder.highlighter(highlighterBuilder);
//执行搜索
searchRequest.source(builder);
SearchResponse searchResponse = client.search(searchRequest,RequestOptions.DEFAULT);
//解析结果
List<Map<String,Object>> list = new ArrayList<>();
for (SearchHit documentFields : searchResponse.getHits().getHits()) {
//获取高亮的字段并解析
Map<String, HighlightField> highlightFields = documentFields.getHighlightFields();
HighlightField title = highlightFields.get("title");
Map<String,Object> sourceAsMap = documentFields.getSourceAsMap();//原来字段
if(null!=title){//遍历的文档里面,如果字段为title的值包含高亮搜索的关键字,则将该关键字替换为高亮的字段
Text[] fragments = title.fragments();
String newTitle="";
for (Text fragment : fragments) {
newTitle+=fragment;
}
sourceAsMap.put("title",newTitle);//高亮字段替换原来字段
}
list.add(sourceAsMap);
}
return list;
}
}ContentController
@RestController
public class ContentController {
    @Autowired
    private ContentService service;

    //解析关键字keywords的网页数据(文档),批量放入es索引jd_list,(爬取数据到es中)
    @GetMapping("/parse/{keywords}")
    public Boolean parse(@PathVariable String keywords) throws Exception {
        return service.parseContent(keywords);
    }

    //按title中含有关键字keywords的文档从es索引jd_list分页查询
    @GetMapping("/search/{keywords}/{pageNo}/{pageSize}")
    public List<Map<String, Object>> parse(@PathVariable String keywords,
                                           @PathVariable Integer pageNo,
                                           @PathVariable Integer pageSize) throws Exception {
        return service.searchPage(keywords,pageNo,pageSize);
    }

     //实现高亮
    @GetMapping("/searchHighlighter/{keywords}/{pageNo}/{pageSize}")
    public List<Map<String, Object>> parseHighlighter(@PathVariable String keywords,
                                           @PathVariable Integer pageNo,
                                           @PathVariable Integer pageSize) throws Exception {
        return service.searchPageHighlighter(keywords,pageNo,pageSize);
    }
}
4、前后端交互
这里采用的是Vue前后端分离
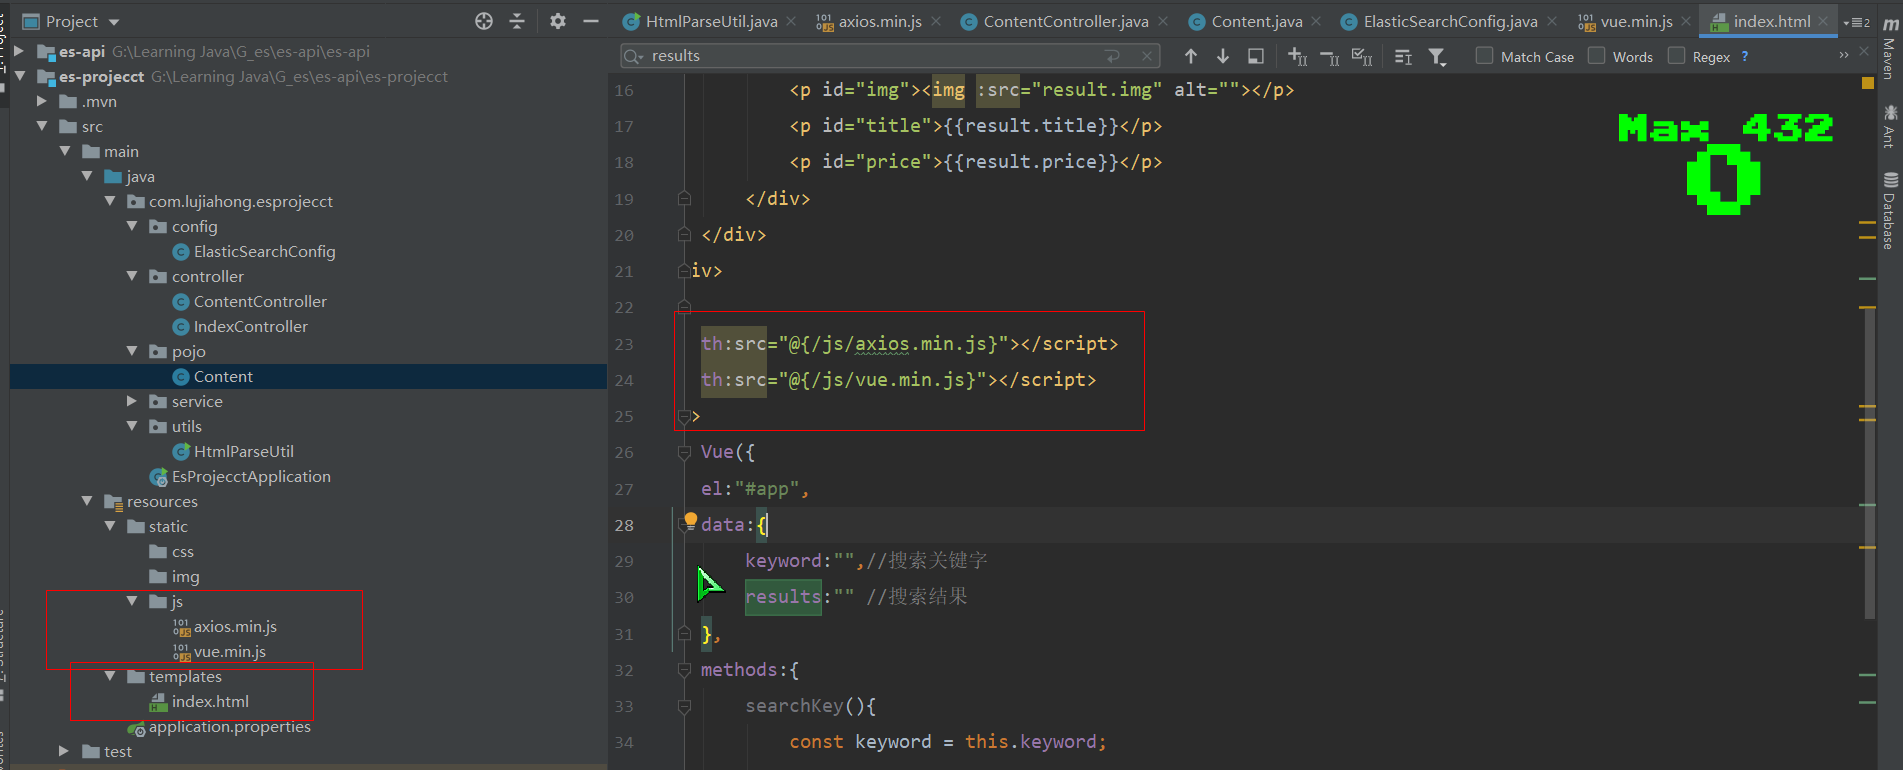
随便一个文件夹下cmd输入命令npm install vue和npm install axios获取vue.min.js和xios.min.js,前提安装好了Node.js,因为Vue基于它。把下载好的两个js文件放在static文件夹下,在templates的index.html里面引入即可
<!DOCTYPE html>
<html lang="en" xmlns:th="http://www.w3.org/1999/xhtml">
<head>
<meta charset="UTF-8">
<title>lujiahong</title>
</head>
<body>
<div id="app">
<div>
<input v-model="keyword" name="input">
<button @click.prevent="searchKey1" type="submit">搜索</button>
<button @click.prevent="searchKey2" type="submit">高亮搜索</button>
</div>
<hr>
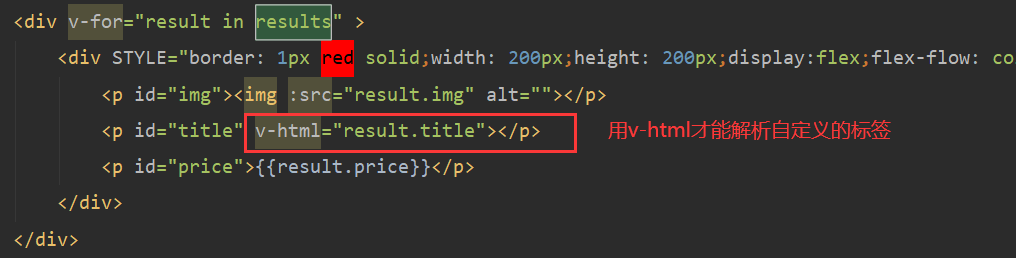
<div v-for="result in results" >
<div STYLE="border: 1px red solid;width: 200px;height: 200px;display:flex;flex-flow: column wrap">
<p id="img"><img :src="result.img" alt=""></p>
<p id="title" v-html="result.title"></p>
<p id="price">{{result.price}}</p>
</div>
</div>
</div>
</body>
<script th:src="@{/js/axios.min.js}"></script>
<script th:src="@{/js/vue.min.js}"></script>
<script>
new Vue({
el:"#app",
data:{
keyword:"",//搜索关键字
results:"" //搜索结果
},
methods:{
searchKey1(){
const keyword = this.keyword;
const pageNo = 1;
const pageSize = 10;
//对接后端接口
axios.get(`search/${keyword}/${pageNo}/${pageSize}`).then(res=>{
this.results=res.data;
})
},
searchKey2(){
const keyword = this.keyword;
const pageNo = 1;
const pageSize = 10;
axios.get(`searchHighlighter/${keyword}/${pageNo}/${pageSize}`).then(res=>{
this.results=res.data;
})
}
}
})
</script>
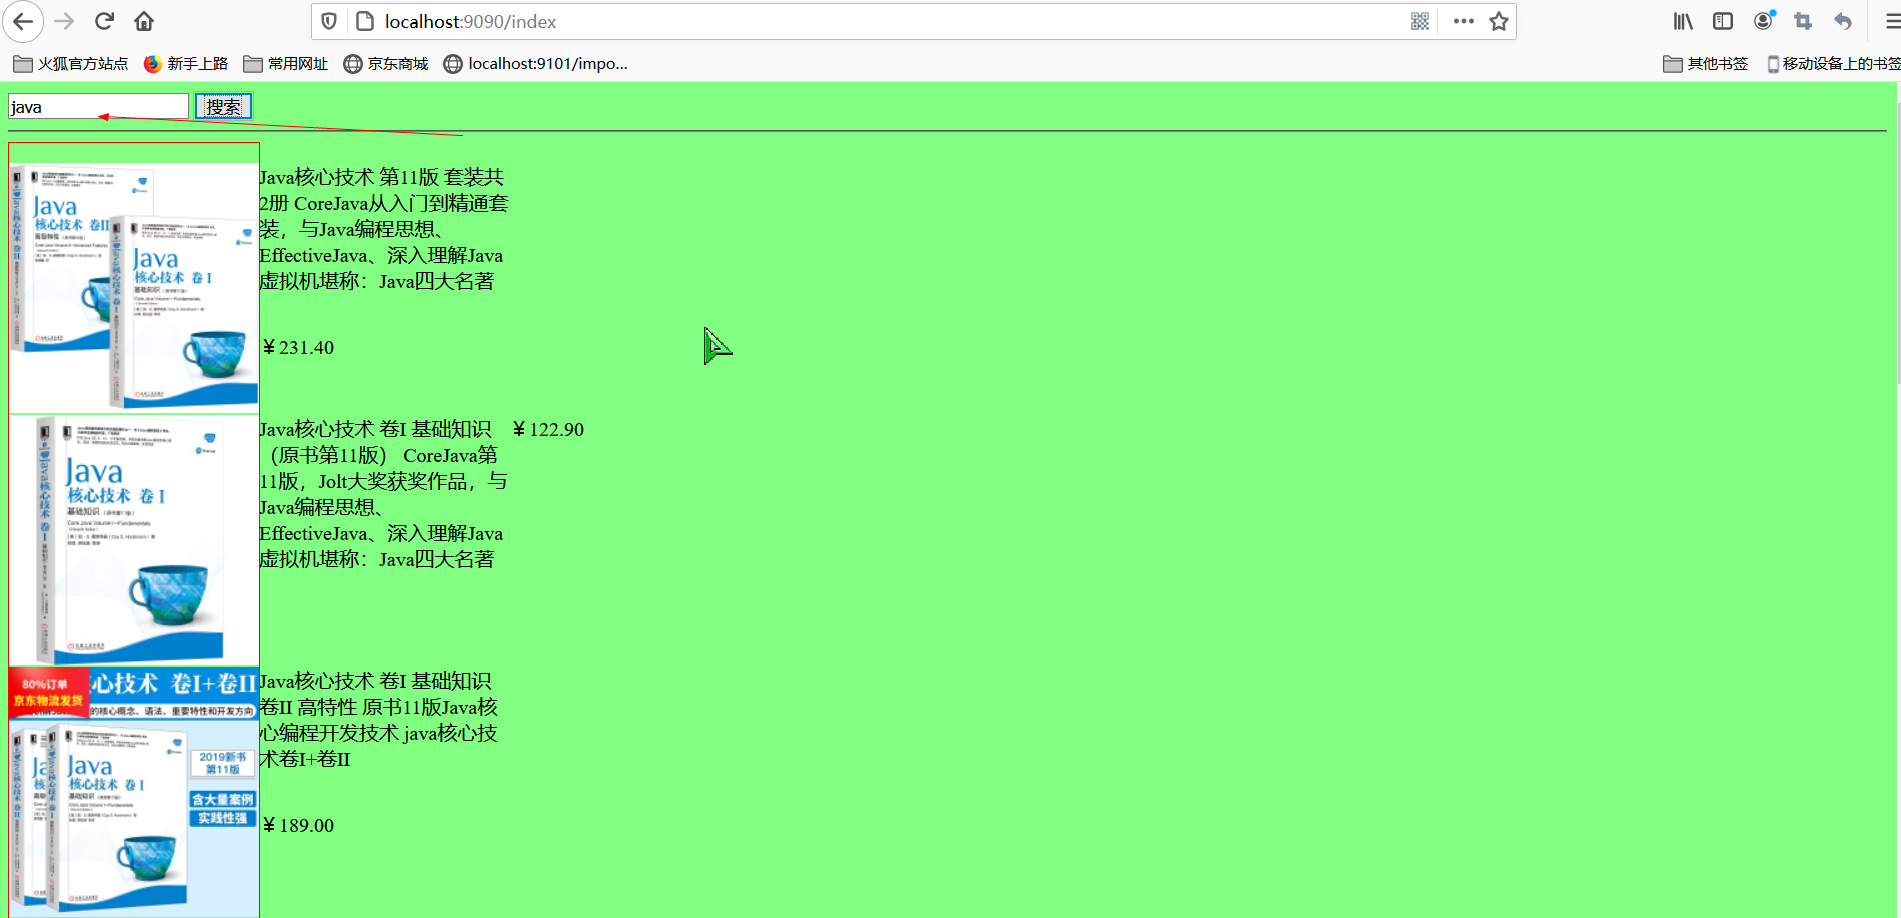
</html>搜索java,获取到es存放好已经爬取的数据
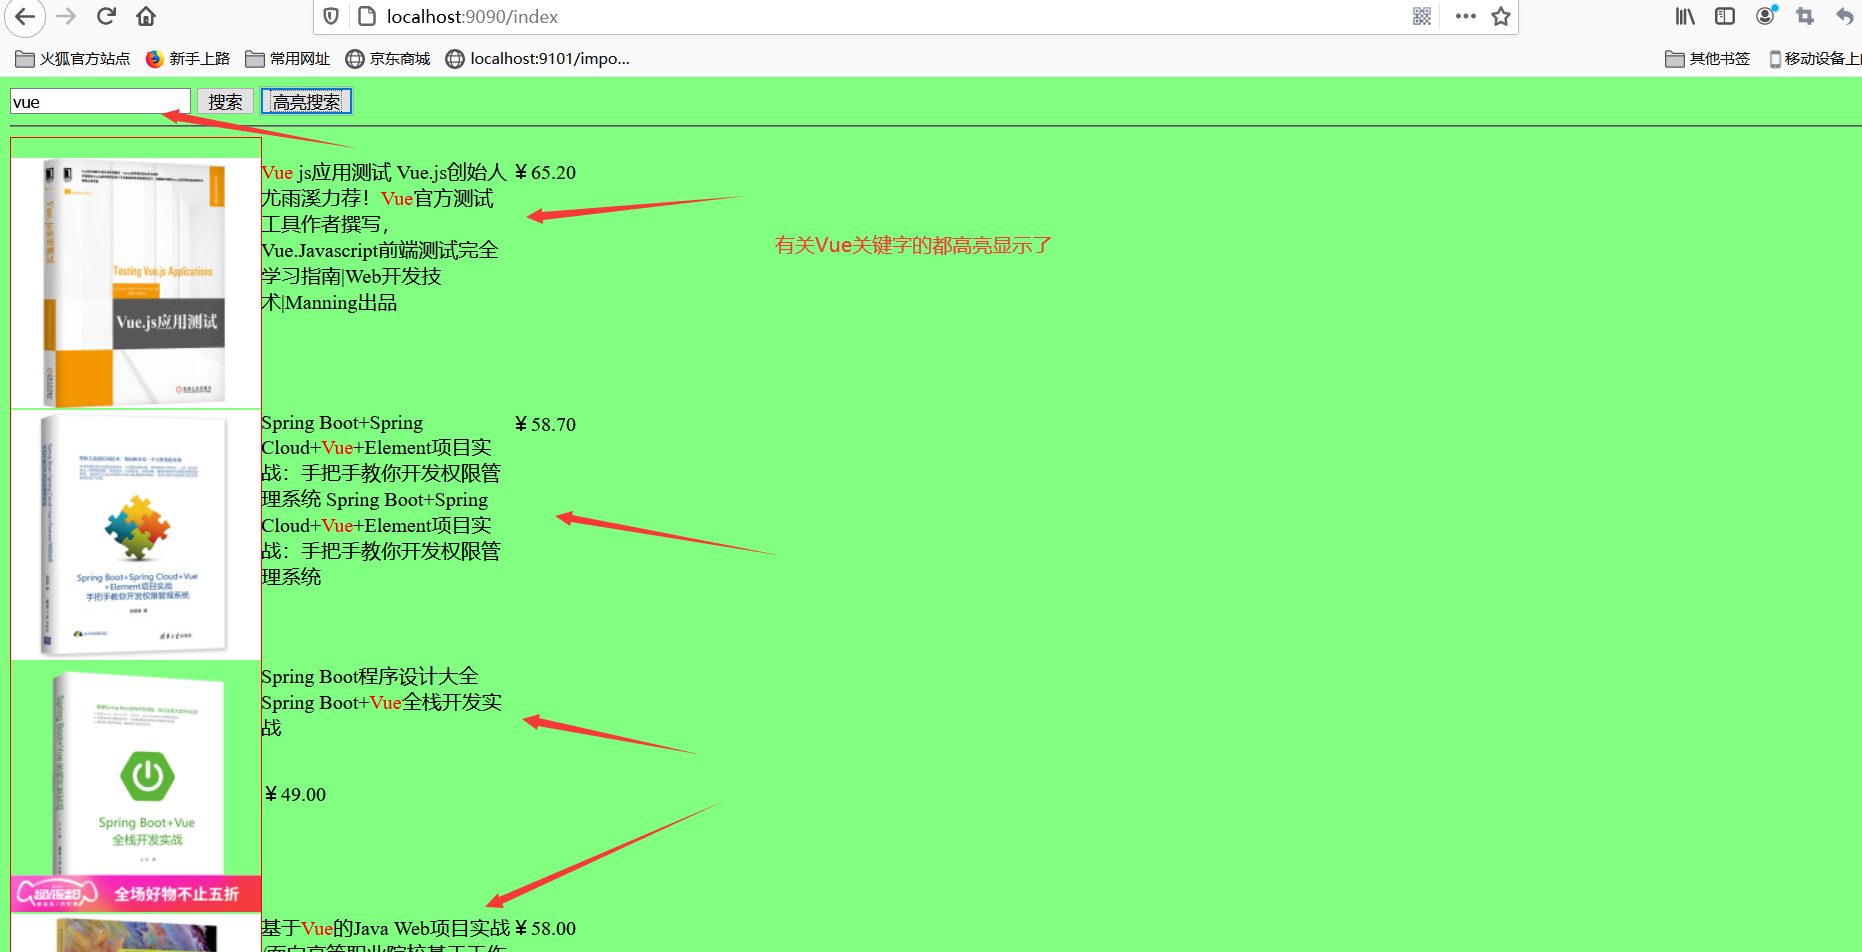
5、关键字高亮显示
ContentService里面添加高亮设置和获取高亮字段替换原来字段
搜索vue